Raised beds are one of the most practical decisions a gardener can make. They warm up faster in spring, drain better than the ground, stay uncompacted because you never walk on the soil, and give you complete control over what goes into them. A single well-built raised bed will outperform twice the area of open ground.
Contents
- 01. Classic Timber Kitchen Garden Beds
- 02. Tiered Beds on a Slope
- 03. Galvanised Steel Raised Beds
- 04. Keyhole Raised Bed
- 05. Raised Beds with Built-In Seating
- 06. Cut Flower Raised Bed
- 07. Herb Wheel Raised Bed
- 08. Tall No-Dig Raised Beds
- 09. Children’s First Vegetable Bed
- 10. Corten Steel Raised Beds
- 11. Cascading Strawberry Planter
- 12. Raised Beds in a Small Courtyard
- 13. Potager Ornamental Kitchen Garden
- 14. Railway Sleeper Raised Beds
- 15. Raised Salad Garden
- 16. Raised Bed with Cold Frame Top
- 17. Wicking Raised Bed
- 18. Raised Perennial Border
- 19. Raised Beds on a Deck or Terrace
- 20. Brick-Built Raised Beds
- 21. Soft Fruit Raised Bed
- 22. Pollinator Raised Bed
- 23. Pizza Garden Raised Bed
- 24. Raised Bed with Integrated Trellis
- 25. Year-Round Succession Raised Bed
These 25 ideas cover everything from a child’s first vegetable patch to an ornamental potager, from galvanised steel planters on a terrace to railway sleeper beds on a slope. There are designs for small courtyards, front gardens and large kitchen gardens, for people with bad backs and for those who want maximum yield from a minimum of space.
Most of these ideas work on any budget and at any scale. Pick the one that fits your space and your growing ambitions, and adapt the dimensions to suit.
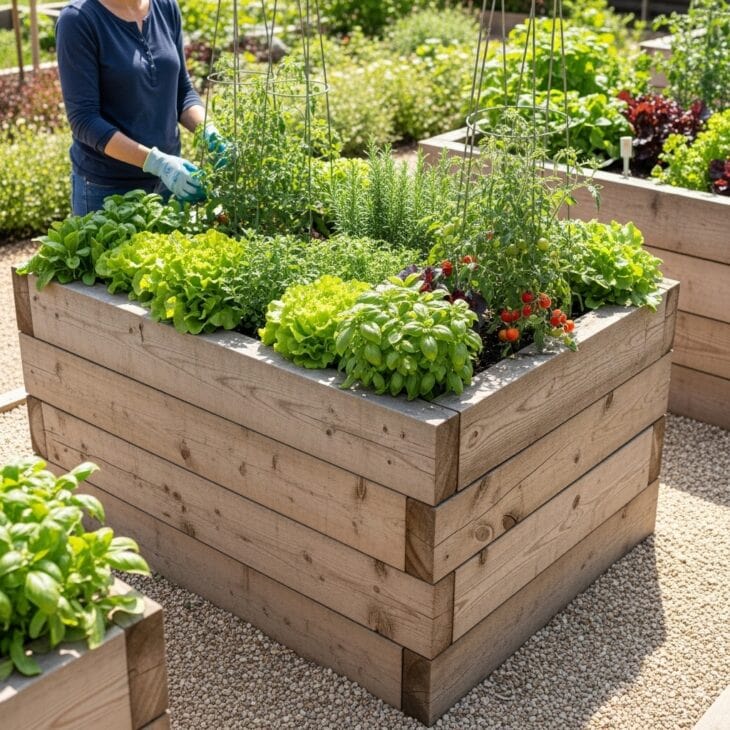
01. Classic Timber Kitchen Garden Beds
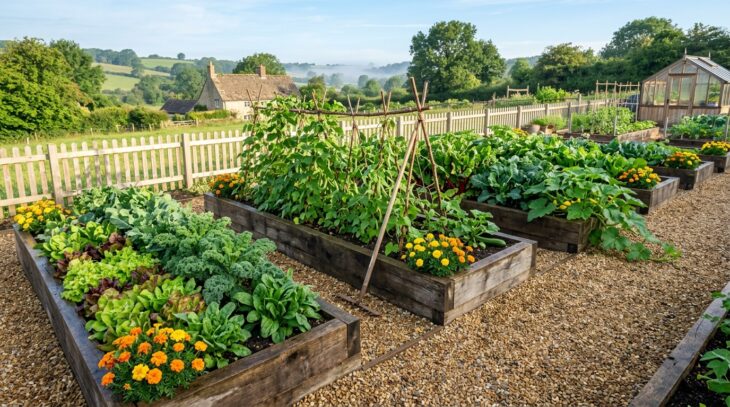
What you see Four rectangular wooden raised beds sit in a grid, separated by gravel paths wide enough to kneel beside. Each bed holds a different crop: lettuces and salad leaves in one, climbing beans on hazel canes in another, brassicas under net in the third, and sprawling courgettes in the fourth. The whole arrangement fits a standard garden plot and produces enough to make a dent in the weekly shop.
Why it works A set of four beds in a two-by-two grid is the classic kitchen garden layout for good reason. It makes crop rotation simple (move each family of crops one bed clockwise each year), allows easy access from all sides, and keeps the vegetable plot organised enough to be manageable. The gravel paths stay clean even in wet weather.
How to get it Build beds from 38mm (1.5in) thick untreated hardwood such as oak, larch, or Douglas fir: these last eight to twelve years without treatment. Standard dimensions of 120cm (4ft) wide by 240cm (8ft) long allow access from both sides without stretching. Fill with a 50/50 mix of topsoil and good garden compost. Bed depth of 30cm (12in) suits most vegetables; root crops such as parsnip and carrot prefer 40cm (16in). Replenish with compost each autumn rather than digging.
02. Tiered Beds on a Slope
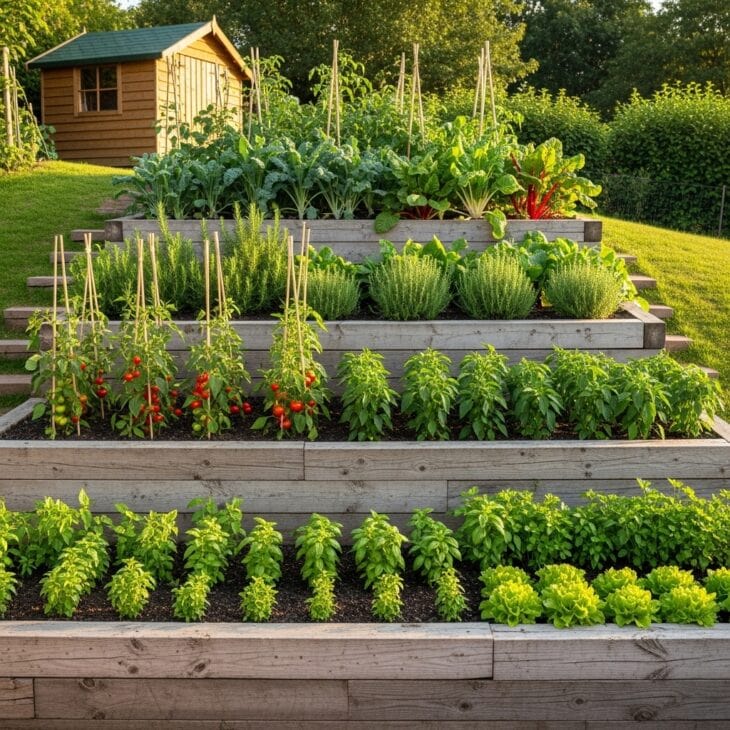
What you see Three raised beds step down a sloping garden in terraces, each one retained by thick timber sleepers set into the hillside. The slope that made growing almost impossible has become a kitchen garden with three distinct flat planting levels. Herbs grow in the top tier, closest to the kitchen door; vegetables fill the two lower beds.
Why it works A sloping garden is difficult to plant and near-impossible to water without runoff washing nutrients away. Terracing with raised beds solves both problems: each level holds water, stays uncompacted, and creates usable growing space on ground that would otherwise just slide past the crops. The stepped profile also looks deliberate and well-designed.
How to get it Use 200mm (8in) or 250mm (10in) square oak sleepers for the retaining front walls: they are heavy enough to stay in place without posts or pegs. Step each tier back by at least the depth of the sleeper to prevent pressure from the soil behind pushing the front wall forward. Ensure each bed has drainage holes or gaps between sleepers at the base so water does not pond. Fill with topsoil and compost as standard. Access paths between tiers should be at least 60cm (24in) wide to carry a watering can safely.
03. Galvanised Steel Raised Beds
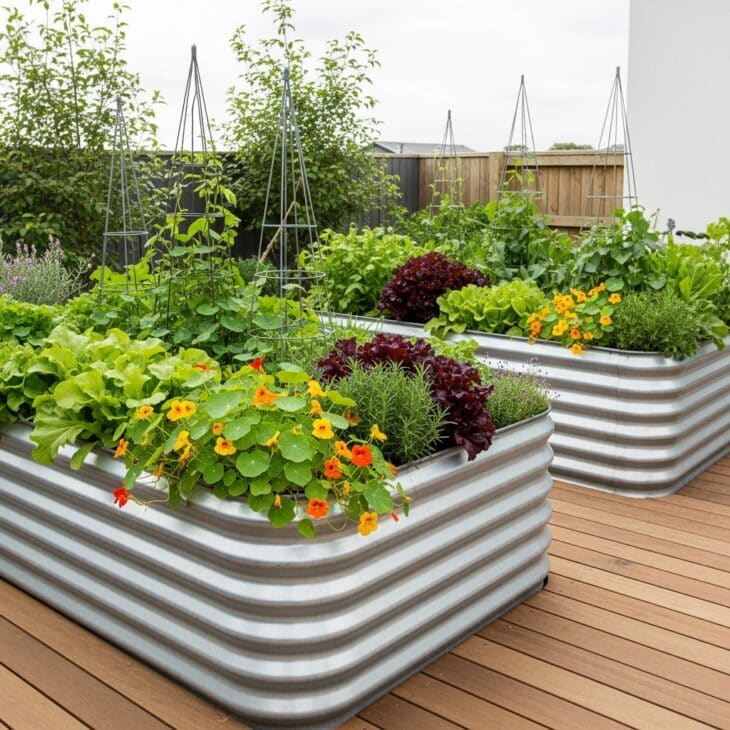
What you see Two corrugated galvanised steel raised beds stand on a timber deck, planted with a loose mix of leafy greens, purple basil, and trailing nasturtiums. The metal is cool and industrial but the planting is relaxed and generous. In a contemporary garden or on a rooftop terrace, they look entirely at home.
Why it works Galvanised steel raised beds have become popular because they are light, extremely durable, and genuinely attractive in modern garden settings. Corrugated steel sheets can be cut to any size and screwed or bolted together in an afternoon. Unlike timber, they never rot, splinter, or need replacing. The metal walls also absorb heat and warm the soil slightly faster than wood in spring.
How to get it Use 0.7mm to 1mm galvanised corrugated steel sheet, available from agricultural suppliers far more cheaply than from garden retailers. Bed walls of 40 to 50cm (16 to 20in) height give enough depth for most crops without needing enormous quantities of compost to fill them. Line the inside walls with cardboard or landscape fabric to prevent soil washing through the corrugations. Steel beds reach full temperature more quickly in spring but also cool faster at night: in exposed positions, add a cold frame top for early-season crops.
04. Keyhole Raised Bed
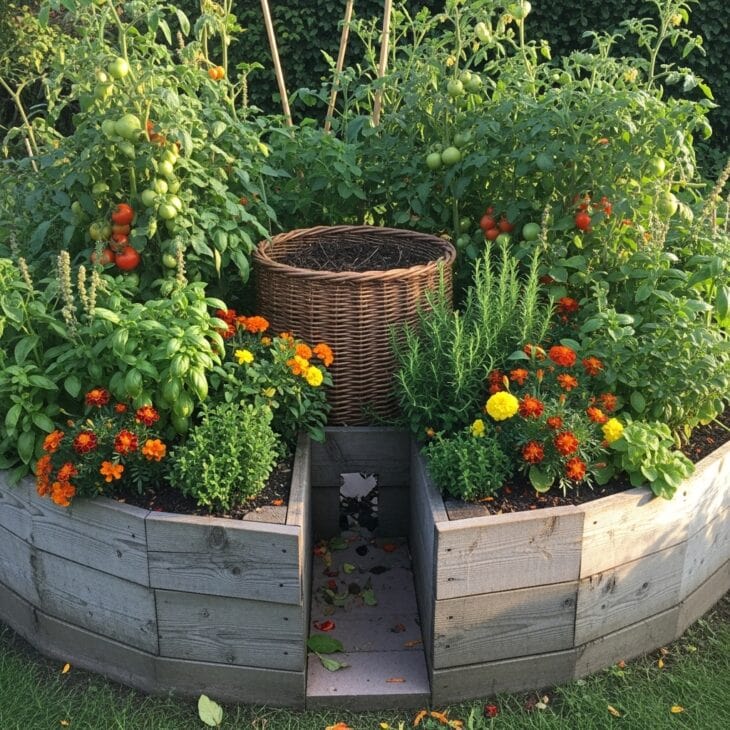
What you see A circular raised bed has a narrow wedge-shaped path cut into one side, like a keyhole viewed from above. At the centre of the circle sits a wicker compost basket. Water poured into the basket seeps outward through the bed as it drains, carrying nutrients with it. The whole circular planting can be reached from one standing position in the middle of the path.
Why it works The keyhole design originated in sub-Saharan Africa as a highly water-efficient way to grow food in dry climates. The central compost basket acts as both a slow-release fertiliser and a watering point. Every drop goes directly into the soil where crops need it, with no surface evaporation. The circular shape also maximises planting space relative to path area.
How to get it Build the outer circle 180 to 200cm (6 to 7ft) in diameter using stone, brick, or stacked timber. The access path should be 40cm (16in) wide and reach to the centre. Make the central compost basket from wicker, chicken wire, or a bottomless plastic crate at least 40cm (16in) in diameter. Fill the basket with kitchen scraps and garden waste; fill the bed with a deep mix of soil, compost, and rotted manure. Plant intensively — the fertility is high enough to support crops at closer than normal spacing.
05. Raised Beds with Built-In Seating
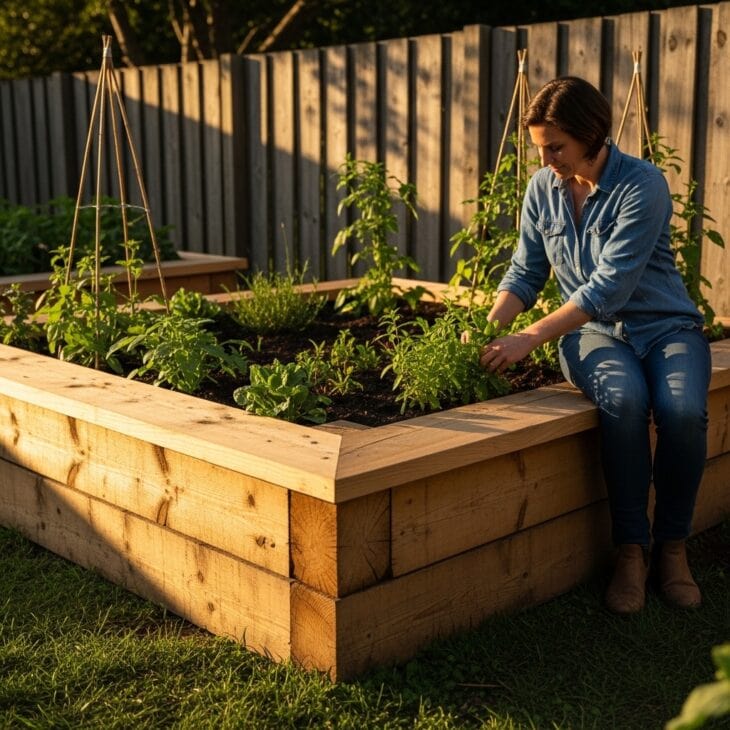
What you see The top edge of each raised bed is finished with a wide, smooth-planed timber coping — broad enough to sit on comfortably while weeding or harvesting. The beds are 60cm (24in) tall, which puts the soil at a good working height when seated on the coping. You can tend the entire bed without bending or kneeling.
Why it works Adding a seating ledge to a raised bed transforms it from a growing structure into a garden feature. It makes vegetable gardening accessible to people with bad backs, limited mobility, or those who simply prefer to sit while they work. At the right height, a coping-seat bed lets you sow, weed, harvest, and water without any bending at all.
How to get it Build the bed walls from 38mm (1.5in) thick structural timber to a height of 55 to 60cm (22 to 24in). Fix a coping of 150 to 200mm (6 to 8in) wide smooth-planed timber along the top edge, overhanging inward and outward by 25mm (1in). Oak, iroko, and larch are the best choices for longevity: sand smooth and finish with a wood oil to prevent splinters. The coping adds rigidity to the bed as well as comfort. Keep bed width to a maximum of 100cm (40in) so the centre is always reachable from the seated position.
06. Cut Flower Raised Bed
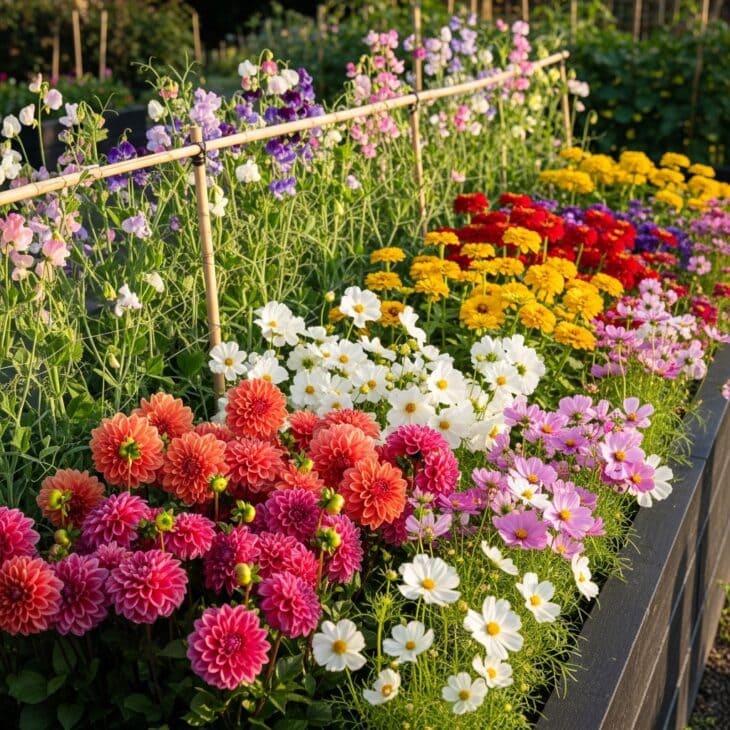
What you see A single raised bed is given over entirely to cut flowers: dahlias in deep pink and copper at the back, cosmos and zinnias in the middle, and sweet peas climbing a bamboo frame at the far end. From July to the first frost, the house has fresh flowers every week without spending a penny at a florist.
Why it works A dedicated cut flower raised bed is one of the most satisfying things a garden can produce. The raised bed format suits cut flowers particularly well because the improved drainage prevents tuber and bulb rot in winter, the rich soil supports the prolific growth that cutting encourages, and the defined space keeps the flower patch looking intentional rather than chaotic.
How to get it Plant a succession: sow hardy annuals (larkspur, cornflower, ammi) in September for early summer cutting, then add dahlias from tubers in May and summer annuals (cosmos, zinnia, scabiosa) as plugs in late May. Pinch dahlias once at 30cm (12in) to encourage branching and more stems. Cut flowers regularly: the more you cut, the more the plant produces. Feed with a high-potash liquid feed every two weeks from June onward to sustain flowering. Lift dahlia tubers in October after the first frost blackens the foliage and store dry.
07. Herb Wheel Raised Bed
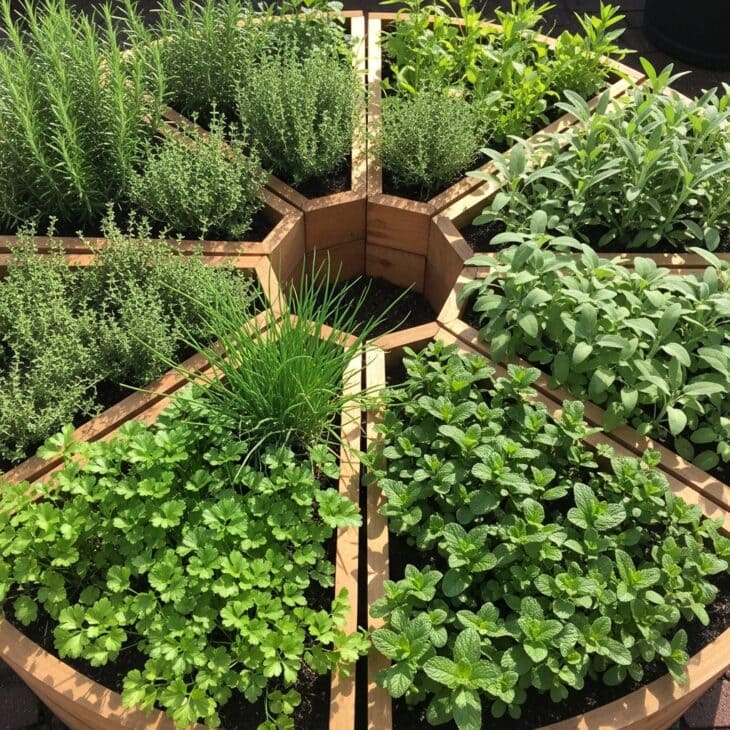
What you see A circular raised bed is divided into six wedge-shaped segments by low timber dividers radiating from the centre like spokes. Each segment holds a different culinary herb: rosemary, sage, thyme, chives, flat-leaf parsley, and mint contained in its own section so it cannot invade the others. The design is neat and immediately readable from above or from the kitchen window.
Why it works The wheel design makes a herb bed both functional and ornamental. It solves the mint problem — mint spreads aggressively and overwhelms other herbs if not contained — by giving each plant its own divided space. The circular form looks attractive in a patio or kitchen garden setting, and the segmented layout makes it easy to harvest the right herb at a glance.
How to get it Build the outer circle from brick, stone, or timber to a diameter of 120 to 150cm (4 to 5ft) and a height of 30cm (12in). Use 50mm (2in) thick timber boards as dividers, set on edge and fixed to a central post. Fill with free-draining compost mixed with 20% grit: most culinary herbs dislike wet feet. Plant rosemary and sage on the south-facing segments for maximum sun exposure. Plant mint in its own segment and additionally sink it in a buried pot within that segment to further restrict its roots.
08. Tall No-Dig Raised Beds
What you see Two raised beds stand at waist height, built from stacked timber planks to a finished height of 75cm (30in). The soil surface is at a comfortable working level for standing adults. No kneeling, no bending, no back pain. From this height, every crop from salad to dwarf tomatoes can be sown, watered, harvested, and tended without discomfort.
Why it works Tall raised beds are the most ergonomically sensible way to grow food for anyone who struggles to bend or kneel. They are particularly valuable for older gardeners, those with mobility limitations, or anyone who simply wants to garden more comfortably. At 70 to 80cm (28 to 32in) height, the working surface is at the same level as a kitchen worktop.
How to get it Build walls from 38mm (1.5in) thick hardwood planks stacked and screwed to corner posts. Use corner posts of at least 75 x 75mm (3 x 3in) section for stability; beds this tall carry significant soil weight. Fill the bottom third with woody material — logs, branches, cardboard — to reduce the volume of compost needed and improve drainage. Top up with topsoil and compost. Fit legs or fix posts into ground anchors rather than setting them in concrete so the structure can be moved if needed.
09. Children’s First Vegetable Bed
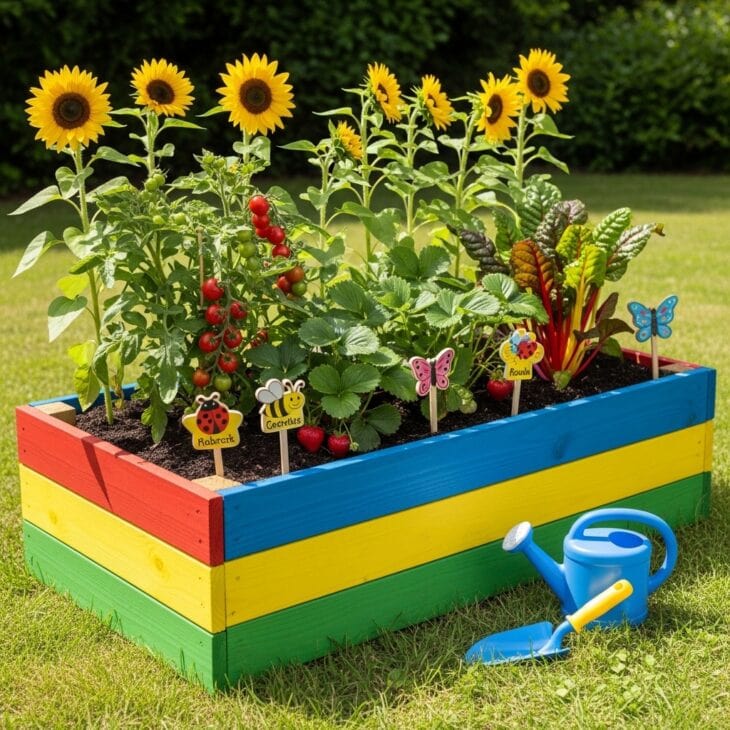
What you see A small, low raised bed stands at a child’s working height, planted with the things that get children genuinely interested in growing: tall sunflowers at the back, cherry tomatoes they can eat straight from the plant, strawberries, and rainbow chard in its unlikely mix of pink, yellow, and white stems. Hand-painted plant labels stick up from the soil. A small trowel and watering can sit ready beside the bed.
Why it works A child’s own raised bed, even a very small one, is one of the most reliable ways to create a lifelong relationship with growing food. The key is choosing plants that reward patience quickly: cherry tomatoes ripen in weeks, sunflowers grow visibly taller day by day, and strawberries are edible on the spot. Giving a child ownership of a plot, however small, makes the difference between a passing interest and a lasting one.
How to get it Build the bed at 35 to 45cm (14 to 18in) height so a young child can reach across it and work without an adult’s help. Keep it small: 90 x 90cm (3 x 3ft) is plenty. Choose fast, dramatic plants: Helianthus annuus (sunflowers, sow direct in April), Solanum lycopersicum ‘Tumbling Tom’ (cherry tomatoes, no staking needed), Fragaria x ananassa (strawberries, instant reward), and Beta vulgaris ‘Bright Lights’ (rainbow chard, colourful and hard to kill). Let the child water it themselves from a small watering can and harvest everything without asking first.
10. Corten Steel Raised Beds

What you see Two corten steel raised beds glow with a warm orange-brown rusted patina. The weathered metal against the green of chard leaves and the purple of sage creates a colour combination that looks designed rather than accidental. In a contemporary garden with gravel paths and clean timber fencing, they are the most visually confident raised beds available.
Why it works Corten steel is a self-weathering alloy that forms a stable rust surface layer which protects the steel beneath from further corrosion. Unlike ordinary steel, it does not rust through: the patina is the protection. Properly made corten beds last thirty years or more without any treatment. The warm rust colour suits both modern and traditional garden settings and improves with age.
How to get it Buy corten raised bed kits or order custom sizes cut and folded from a steel fabricator: 3mm (0.125in) sheet is sufficient for beds up to 60cm (24in) high. Allow six to twelve months for the patina to fully develop: in this period the surface will weep orange staining, so lay newspaper or card beneath the beds on a patio until the patina is stable. Line the inside with landscape fabric to prevent soil contact accelerating corrosion at the base. Corten heats up significantly in full sun, which can dry soil quickly: water accordingly.
11. Cascading Strawberry Planter
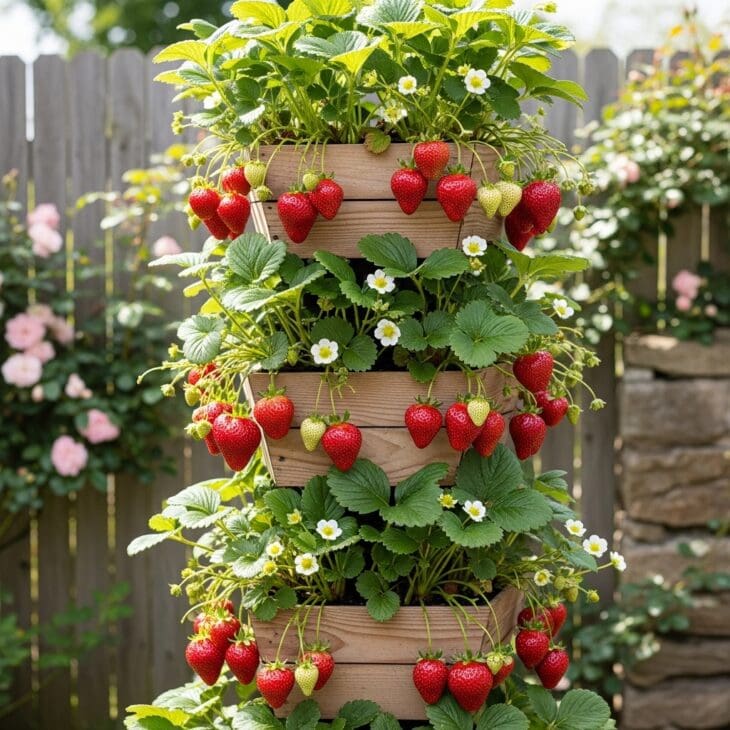
What you see A tall narrow raised structure is given over entirely to strawberries, planted in tiered layers or cascading pockets so the fruits hang over the edges at multiple heights. The runners trail down the outside and the berries are at eye level and below, easy to pick without bending. In June, it is the most visited corner of the garden.
Why it works Growing strawberries in a raised structure rather than in ground-level beds keeps fruits clean (no soil splash), makes picking easy, and dramatically reduces slug damage — slugs rarely climb a sheer vertical surface. The elevated position also means fruits get better air circulation, which reduces botrytis (grey mould) in wet summers.
How to get it Build a narrow A-frame structure or tiered planting tower 120 to 150cm (4 to 5ft) tall, with planting pockets or shelves at 30cm (12in) intervals. Alternatively, use a standard raised bed 45cm (18in) high and plant strawberries along the top and at the base, training runners to root in the lower level. Choose a remontant (perpetual) variety such as Fragaria ‘Mara des Bois’ or ‘Flamenco’ for fruits from June to October. Plant at 30cm (12in) intervals and water regularly in dry spells; strawberries need consistent moisture to size up their fruit.
12. Raised Beds in a Small Courtyard
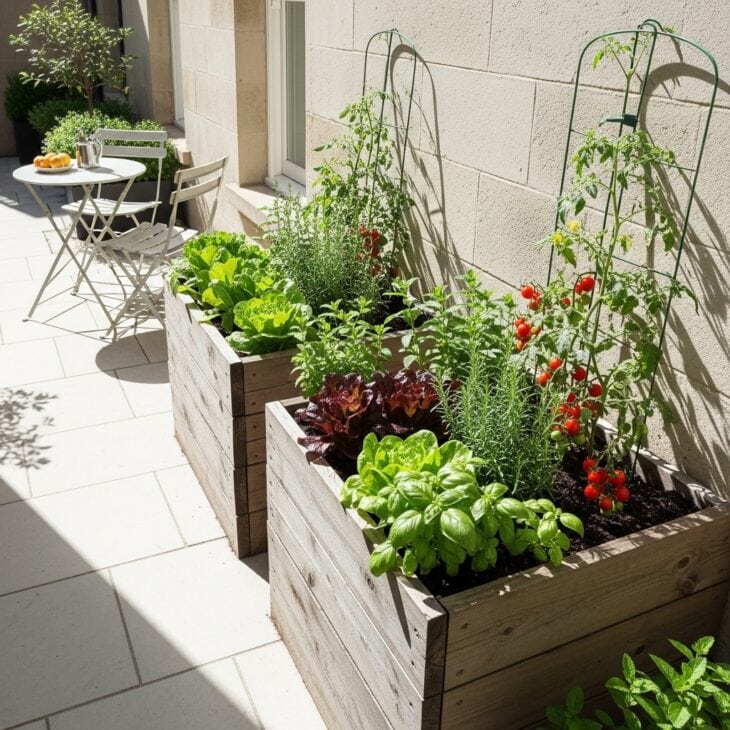
What you see Two compact raised beds are fitted against the walls of a small paved courtyard, each one planted with salad leaves, herbs, and a cherry tomato in a cage at the end. The courtyard is entirely paved and would grow nothing without them. The beds hold all the greenery, all the food, and all the living texture in a space barely four metres square.
Why it works A paved courtyard with no soil access is one of the most common gardening situations in urban areas. Raised beds solve it completely. They bring growing space to a place that has none, work on concrete or tile without needing drainage holes in the surface below, and can be fitted around seating areas and doorways to make the most of every available metre.
How to get it In a small courtyard, keep bed widths to 60 to 75cm (24 to 30in) so they do not crowd the remaining floor space. A height of 45cm (18in) provides enough depth for most crops without the beds dominating the space visually. Use lightweight growing media mixed with perlite if the courtyard is on a balcony or roof terrace with load restrictions. Reflected heat from surrounding walls can be intense: choose heat-tolerant crops such as basil, tomatoes, and aubergine for a south-facing courtyard; lettuces and herbs for north or east aspects.
13. Potager Ornamental Kitchen Garden
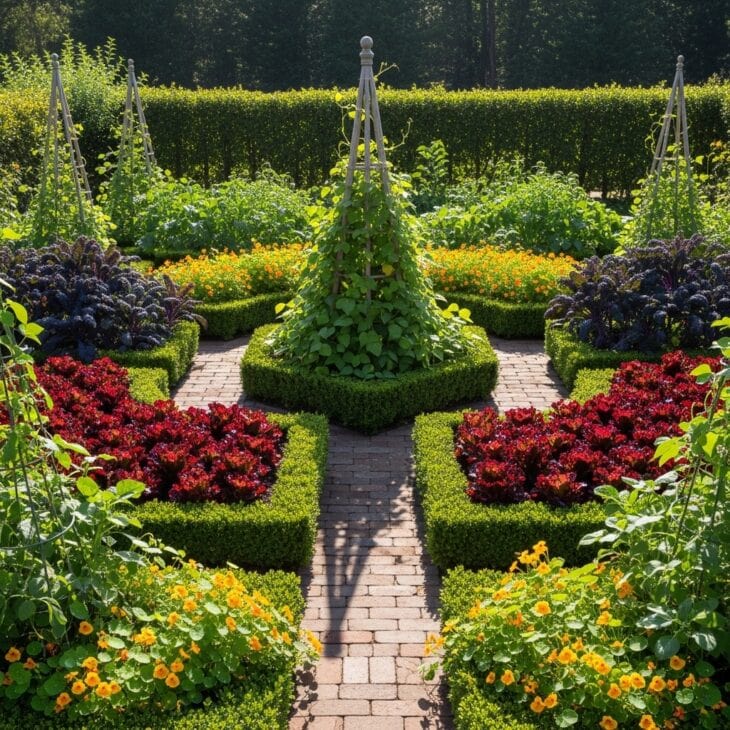
What you see The kitchen garden is arranged like a parterre: six raised beds in a formal geometric pattern, separated by brick paths and edged with low box clipping. But inside the structure, the planting is entirely edible. Purple kale and red lettuce are as ornamental as any flower. Climbing beans run up a central obelisk. Nasturtiums in orange and yellow fill the corners. It is a vegetable garden that asks to be looked at as well as harvested.
Why it works A potager — a French-style ornamental kitchen garden — applies the principles of formal design to food growing. The result is a productive garden that works as a destination space rather than being hidden at the back of the plot. The key is choosing vegetables and herbs with strong colour and form: red and purple leaves, yellow flowers, tall structural plants like artichokes or sweetcorn.
How to get it Choose vegetables for ornamental as well as culinary value: Beta vulgaris ‘Bright Lights’ (rainbow chard), Brassica oleracea ‘Red Drumhead’ (red cabbage), Lactuca sativa ‘Flashy Trout’s Back’ (spotted lettuce), and Tropaeolum majus (nasturtiums, edible flowers) all look as good as they taste. Plan the layout on paper first, keeping the central feature strong and the outer beds symmetrical. Replenish with a thick layer of compost each spring. Harvest regularly to keep the planting looking full rather than picked over.
14. Railway Sleeper Raised Beds
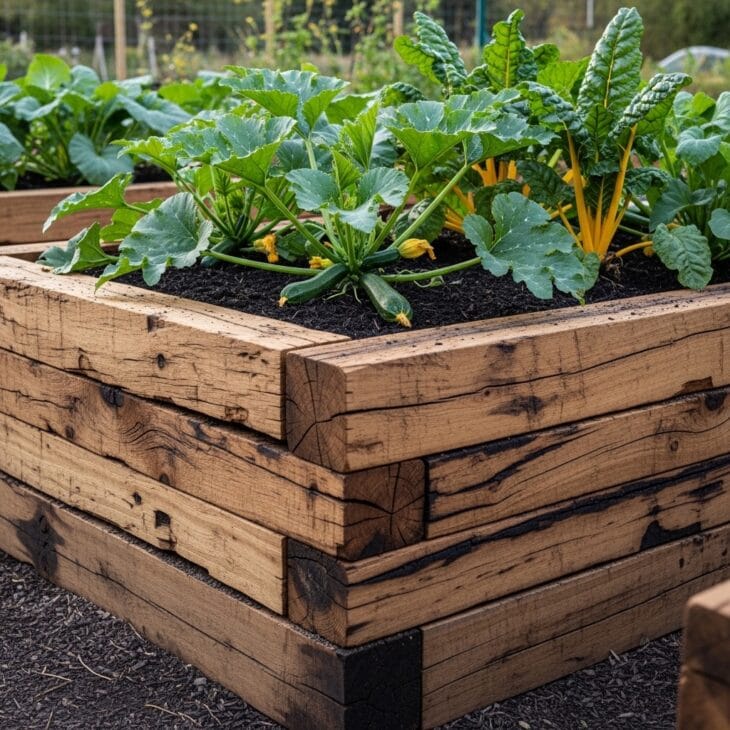
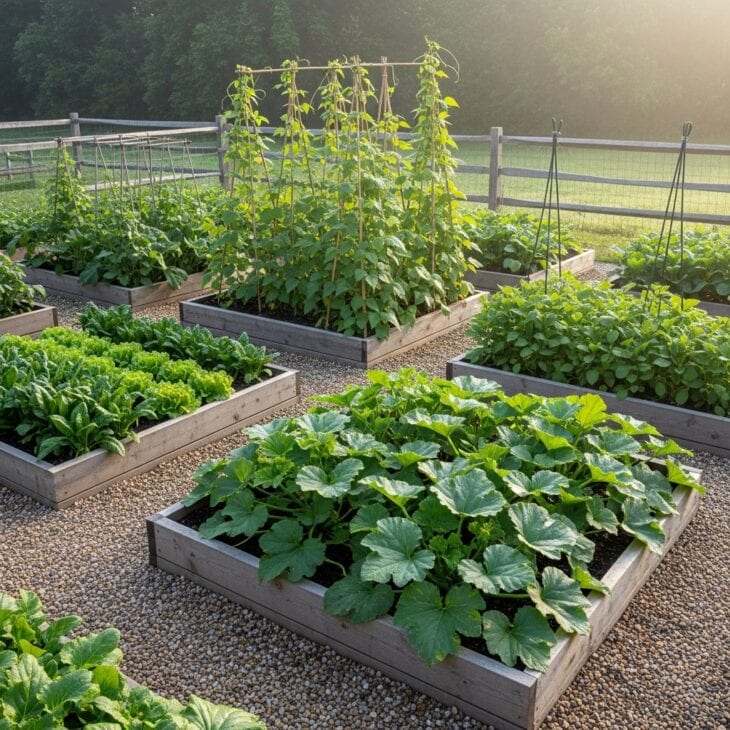
What you see Thick oak railway sleepers are stacked two courses high to form raised beds of real substance and weight. Each sleeper is 250mm (10in) deep, so two courses give a bed height of 500mm (20in) without any fixings needed — the weight alone holds them in place. Inside the beds, courgettes and squash spread their large leaves across the dark, rich compost.
Why it works Railway sleeper beds have a physical presence that timber plank construction cannot match. The sheer mass and weight of the sleepers means the beds need no corner posts, no screws, and no ground anchors. They are also among the longest-lasting raised bed materials available: reclaimed oak sleepers already centuries old will easily outlast a lifetime of growing.
How to get it Use new green oak sleepers rather than reclaimed railway sleepers treated with creosote, which can leach toxins into food-growing soil. New oak sleepers typically measure 250mm x 125mm (10in x 5in) in cross-section. Stack two courses on level ground, offsetting the joints between sleepers like brickwork for stability. No fixings are needed for beds up to three courses high. Fill with a 60/40 mix of topsoil and compost. Oak sleepers bleed tannins in the first year: expect some dark leachate from the bed but it does not harm crops.
15. Raised Salad Garden
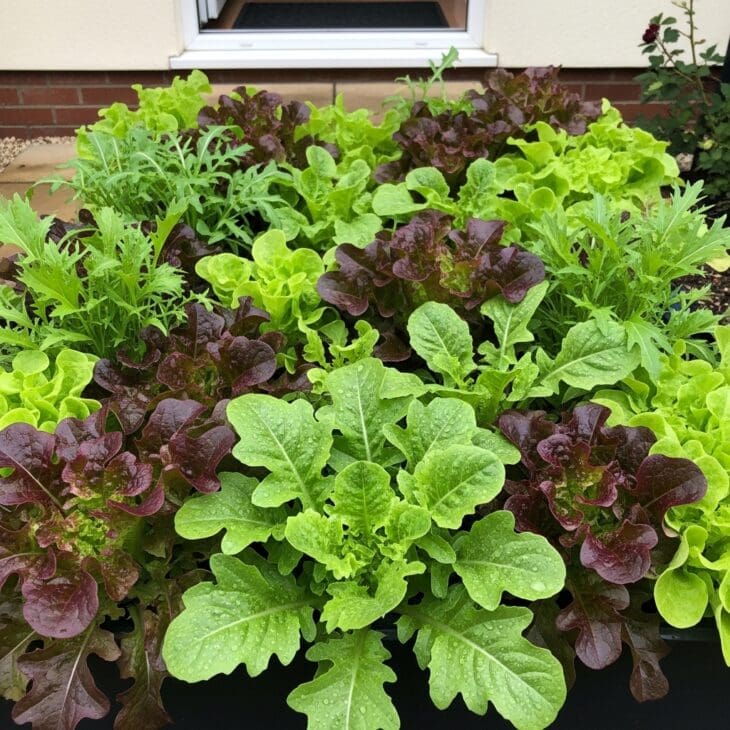
What you see A single raised bed close to the kitchen door is devoted entirely to cut-and-come-again salad. Red and green oak-leaf lettuce, speckled cos, rocket, mizuna, and mustard leaves grow in an overlapping dense tapestry. You cut what you need for the evening meal and it grows back within a week. From April to November, there is always fresh salad available three steps from the back door.
Why it works A dedicated salad bed is the most immediately rewarding raised bed you can grow. The returns are fast — from seed to first harvest in as little as three weeks for rocket and mizuna — and the cut-and-come-again harvest method means one sowing produces months of picking. Locating it near the kitchen door removes every excuse not to use it.
How to get it Sow in succession rather than all at once: a 90cm (3ft) row every three weeks gives a continuous supply without a glut. Use a good mixed salad seed blend or sow separately: Lactuca sativa (lettuce), Eruca vesicaria (rocket), Brassica juncea (mustard greens), and Cichorium intybus (chicory) all perform well in raised beds. Harvest by cutting leaves to 3cm (1in) above the growing point and the plant regrows. Water regularly: salad bolts (runs to seed) in dry conditions, especially in summer. Provide shade netting over the bed in July and August to slow bolting in hot weather.
16. Raised Bed with Cold Frame Top
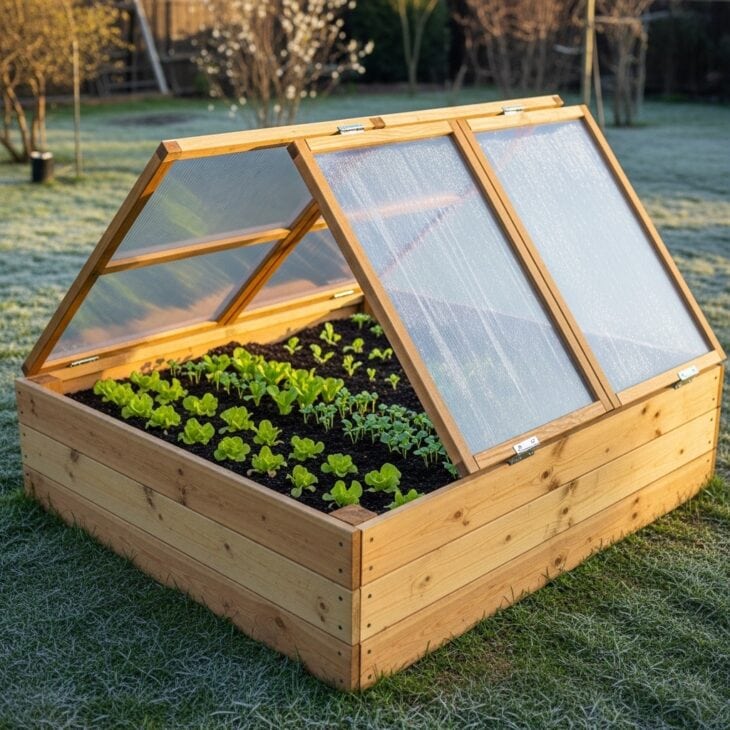
What you see A standard raised bed has a hinged cold frame lid of twin-wall polycarbonate resting on a timber frame above it. The lid is propped open at an angle today, airing the lettuce and seedlings inside. In early March and late October, the lid is closed at night and the crops inside are weeks ahead of anything growing in the open ground.
Why it works Adding a cold frame lid to a raised bed is the most cost-effective way to extend the growing season at both ends. Sowing can begin four to six weeks earlier in spring, and crops continue four to six weeks later in autumn than in unprotected beds. Over a season, this almost doubles the productive period of the bed without heating, grow lights, or a greenhouse.
How to get it Build the cold frame lid frame from 50 x 50mm (2 x 2in) timber to match the bed’s outer dimensions, using twin-wall polycarbonate at 6mm (0.25in) thickness for the glazing. Hinge the lid along the back edge so it can be propped open for ventilation on warm days. A simple wooden prop cut to length is sufficient. In winter, the lid can be used to force early rhubarb, overwinter tender herbs, or start seedlings of tomatoes and chillies in late February without heat. Close fully on nights when frost is forecast.
17. Wicking Raised Bed
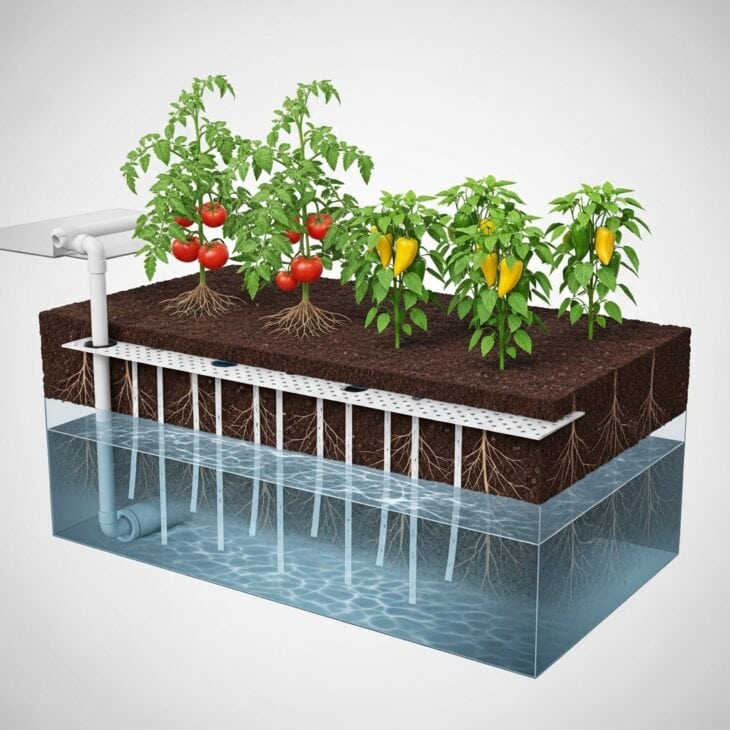
What you see Inside this raised bed, concealed beneath the growing medium, is a water reservoir separated from the soil above by a perforated platform. A fill pipe enters at one side. Water added through the pipe fills the reservoir; capillary action wicks moisture upward into the soil as plants need it. The bed waters itself from below, which is both more efficient and better for plant growth than watering from above.
Why it works A wicking bed uses roughly a third as much water as a conventionally irrigated raised bed. Because water is supplied from below the root zone, leaves stay dry (reducing fungal disease), and roots grow downward toward the water source rather than staying shallow. The reservoir can hold enough water to keep crops going for several days without any attention, making wicking beds ideal for gardeners who travel or want low-maintenance growing.
How to get it Build a standard raised bed to a depth of at least 60cm (24in). Line the base and lower sides with pond liner or thick plastic sheeting. Install a perforated platform of timber or plastic mesh at 20 to 25cm (8 to 10in) from the base to separate the reservoir from the growing medium. Run a fill pipe (a simple 50mm/2in drainpipe) from ground level down through the platform into the reservoir. Add an overflow hole at the top of the reservoir layer. Fill with compost above the platform and fill the reservoir via the pipe. Check water level weekly in summer.
18. Raised Perennial Border
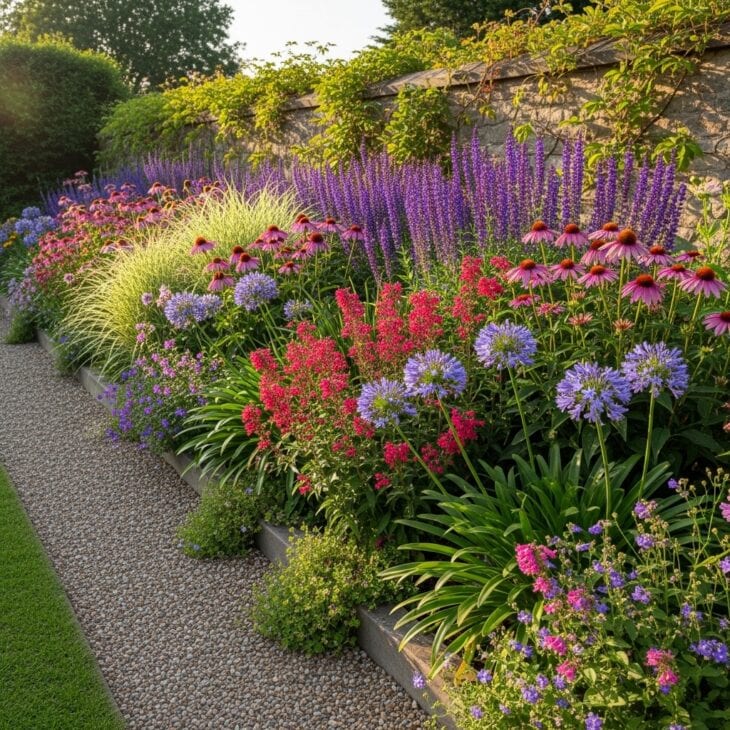
What you see A wide raised bed is planted not with vegetables but with ornamental perennials: Echinacea in pink and white, dark blue Salvia nemorosa, scarlet Penstemon, and Agapanthus in soft blue. Miscanthus grass rises at the back. The raised position lifts the planting to a height where every flower is visible from the path in front. It looks like an ambitious border but requires none of the ground preparation.
Why it works Using a raised bed for ornamental perennials rather than vegetables is underused but highly effective. The improved drainage that benefits vegetables also suits Mediterranean perennials such as Salvia, Agapanthus, and Penstemon perfectly. The raised position adds depth and drama to low-growing plants that would disappear in a ground-level border. And the defined edges keep the planting looking intentional year-round.
How to get it Build a wide bed of 100 to 120cm (40 to 48in) for the most impressive planting depth. Add extra grit to the soil mix for Mediterranean perennials: a ratio of 60% good topsoil, 30% compost, and 10% horticultural grit suits Salvia, Agapanthus, Penstemon, and Echinacea. Plant in bold drifts of five to seven plants rather than singles. Leave seed heads standing over winter: they extend the display and provide food for birds. Cut back in late February and top-dress with compost.
19. Raised Beds on a Deck or Terrace
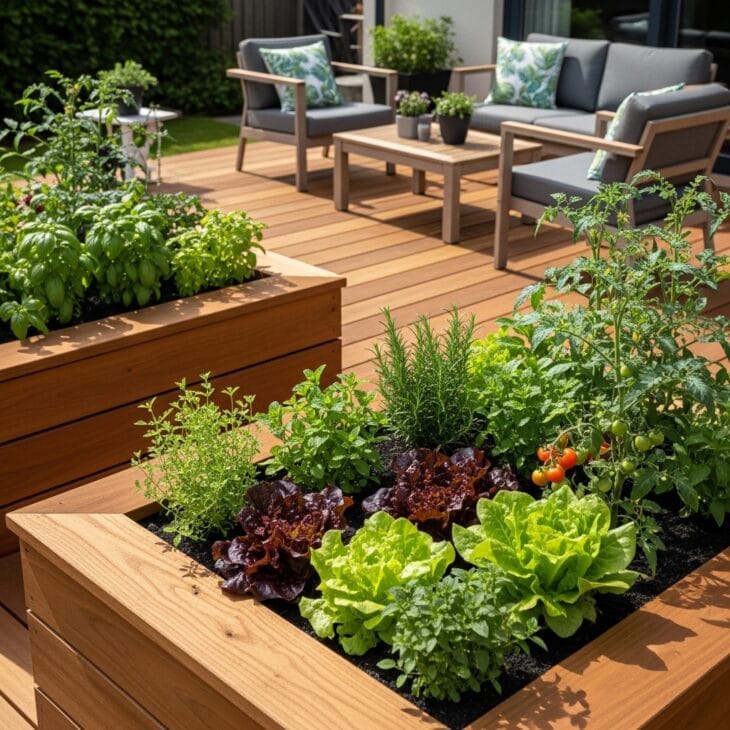
What you see Two large raised planters are integrated into the edge of a timber deck as part of the original design. They are the same height as the deck balustrade and planted with herbs, lettuces, and dwarf tomatoes that trail over the sides. The growing space is at hand level when seated at the table in the centre of the deck. Lunch comes from the planter six feet away.
Why it works Integrating raised beds into a deck or terrace design creates growing space without losing usable floor area. Beds built into the structure rather than placed on it look considered and permanent. They also add privacy and wind protection at the deck perimeter, functioning as living screens at the edge of the seating space.
How to get it Design deck-integrated beds at least 45cm (18in) deep for adequate root run. Line with thick plastic sheeting and include drainage holes above deck level to prevent waterlogging without water pooling on the deck surface. Use lightweight growing media mixed with perlite if the deck has load restrictions: a full cubic metre of compost weighs approximately 500kg. Fix drip irrigation to each bed if accessible from the garden: deck beds are easy to underwater in dry weather because they are out of the main garden sight line.
20. Brick-Built Raised Beds
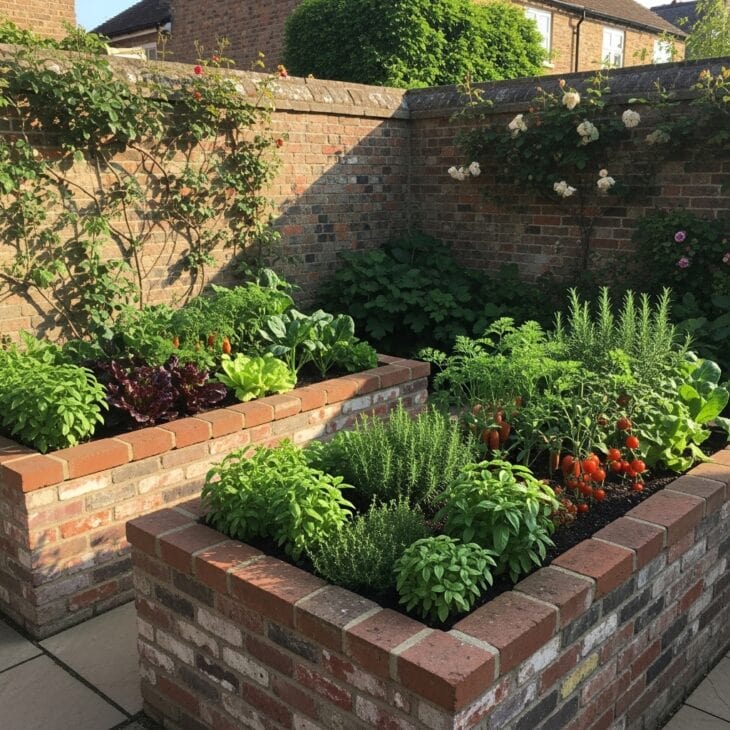
What you see Two raised beds are built from reclaimed brick to match the surrounding garden walls, with a single course of soldier bricks along the top as coping. The beds are permanent, structural, and entirely at home in a traditional walled garden setting. They will outlast every wooden raised bed in the neighbourhood by several decades.
Why it works Brick raised beds are the most permanent and visually integrated option available. In a garden with existing brick walls, paths, or paving, brick beds look as if they belong to the fabric of the space rather than sitting in it as temporary features. Properly built with a mortar base, they need no maintenance and do not rot, warp, or need replacing.
How to get it Lay a concrete or mortar foundation course along the bed perimeter to prevent the wall sinking unevenly over time. Build walls in stretcher bond (standard brickwork) to two or three courses, finishing with a coping course. Weep holes in the bottom course at 60cm (24in) intervals allow drainage without the beds becoming waterlogged. Use reclaimed brick to match existing materials. Allow mortar to fully cure for two weeks before filling with soil. A soldier course coping at the top provides a clean finished edge that also functions as a narrow seat.
21. Soft Fruit Raised Bed
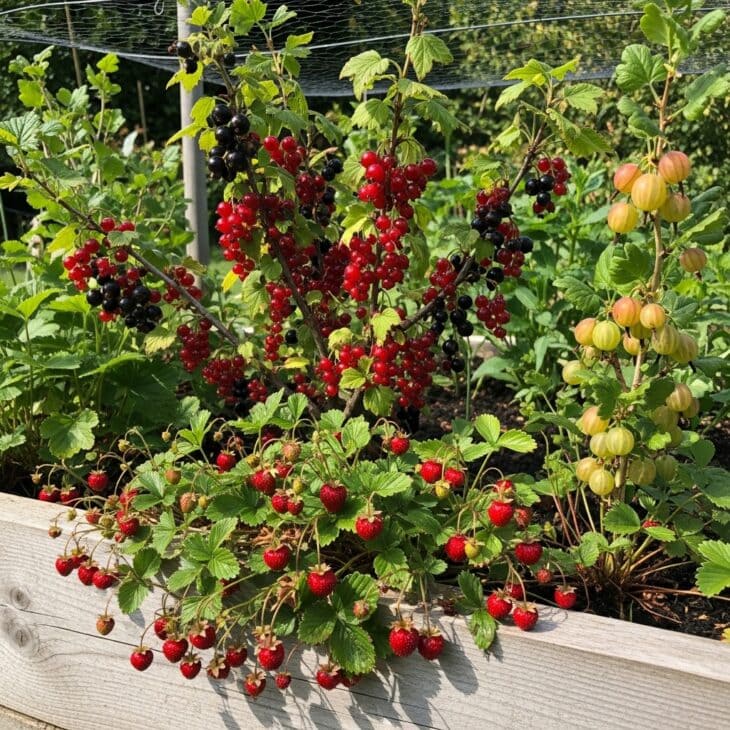
What you see A wide raised bed is planted with a concentrated soft fruit collection: redcurrant and blackcurrant bushes in the centre, a gooseberry at one end, and alpine strawberries tumbling over the front edge. The fruit is heavy on every stem in July. A fruit cage net covers the whole bed on a simple timber frame — without it, the blackbirds would take everything overnight.
Why it works Soft fruit is one of the most rewarding things a raised bed can grow. A well-planted soft fruit bed pays back the initial investment within two or three seasons and then continues producing for ten to twenty years with minimal attention. The raised bed format suits it well: currants and gooseberries need sharp drainage that ground-level beds in heavy clay cannot always provide.
How to get it Build the bed at least 40cm (16in) deep and 150cm (5ft) wide to give the bushes enough root run. Plant blackcurrant (Ribes nigrum ‘Ben Connan’ for compact size), redcurrant (Ribes rubrum ‘Rovada’), and gooseberry (Ribes uva-crispa ‘Invicta’) at 120cm (4ft) spacing. Add alpine strawberries (Fragaria vesca) at the front edge for ground-level harvest. Mulch with compost each spring. Build a simple fruit cage from 12mm galvanised conduit pipe and fruit netting to protect from birds; fix it so it can be removed easily when you need to harvest.
22. Pollinator Raised Bed
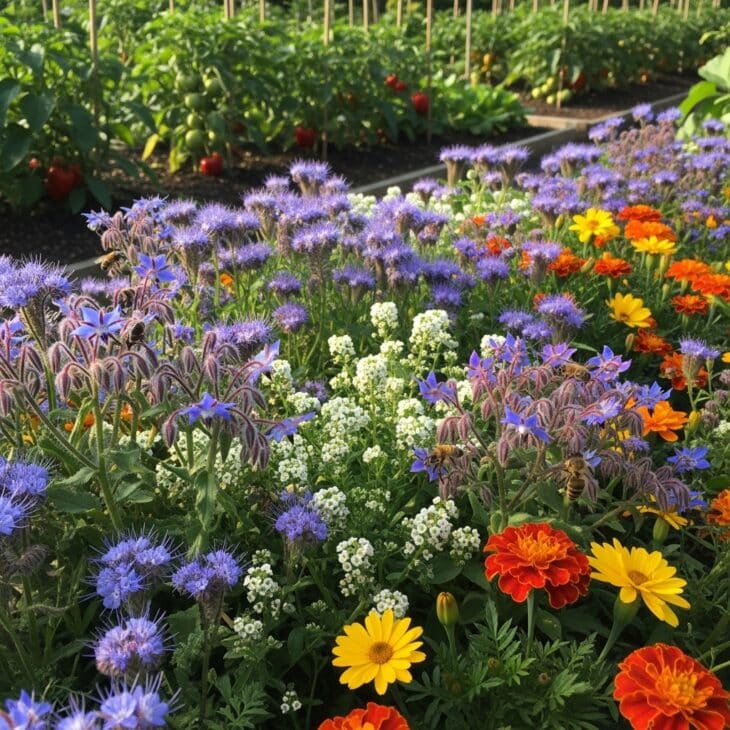
What you see One raised bed in the kitchen garden is given over entirely to flowers. Borage with its brilliant blue star-shaped flowers, violet-blue phacelia, white sweet alyssum, and orange pot marigolds fill every inch. Bees work the flowers continuously from morning to evening. The neighbouring vegetable beds produce noticeably better crops as a result.
Why it works A dedicated pollinator bed in a kitchen garden is both ecologically valuable and practically smart. Courgettes, squash, beans, and tomatoes all depend on insect pollination for their fruit. A bed of bee-attractive flowers nearby keeps pollinators in the garden throughout the season. Many of the best pollinator plants are also edible — borage flowers in salads, marigolds as garnishes — so the bed is productive as well as beneficial.
How to get it Sow direct in April: Borago officinalis (borage), Phacelia tanacetifolia (phacelia), Lobularia maritima (sweet alyssum), Calendula officinalis (pot marigold), and Coriandrum sativum (coriander, allowed to flower). All are fast-growing annual or biennial plants. Dead-head regularly to extend flowering; allow a few plants of each to set seed for the following year. Position the pollinator bed in the sunniest part of the kitchen garden and within view of the crops that need pollinating most.
23. Pizza Garden Raised Bed
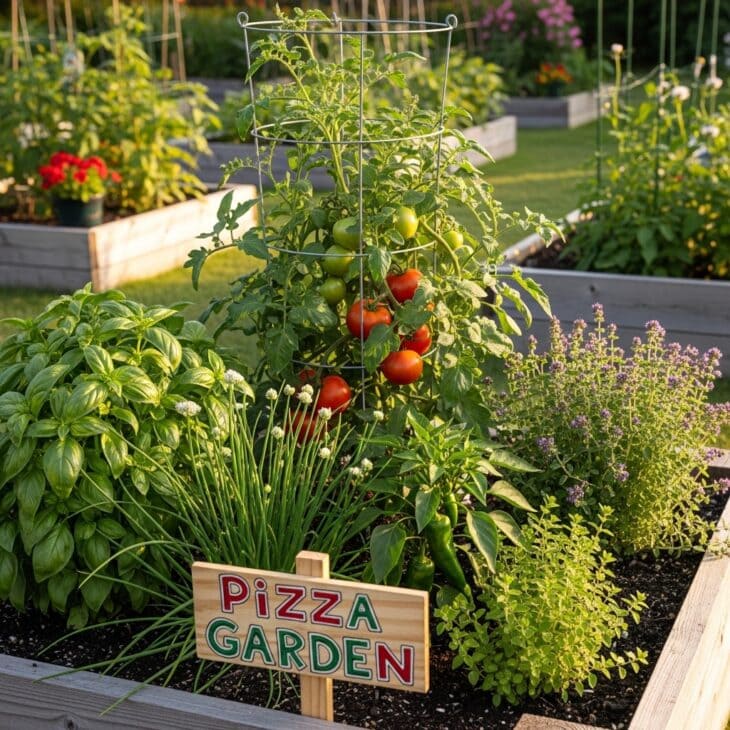
What you see One raised bed is planted with every topping and herb needed to make a pizza from scratch: a cordon tomato in a cage, a generous clump of sweet basil, spreading oregano, garlic chives, and a sweet pepper at the sunny end. A hand-painted sign confirms what it is. Come August, the household makes pizza using only what is growing three metres from the back door.
Why it works A themed raised bed around a single dish or ingredient family is one of the best ways to get children and non-gardeners engaged with growing food. The pizza garden concept is specific enough to feel like a project rather than just vegetable gardening. Harvesting everything for a single meal from a single bed is genuinely satisfying in a way that growing a mixed crop never quite is.
How to get it A 120 x 60cm (4 x 2ft) bed is large enough for the full pizza planting. Choose a cordon (single-stemmed) tomato variety such as ‘San Marzano’ or ‘Gardener’s Delight’ and support it with a cage or cane. Plant sweet basil (Ocimum basilicum) in blocks of three to four plants for a continuous supply. Add oregano (Origanum vulgare), garlic (planted the previous autumn), a sweet pepper such as ‘Gypsy’, and rosemary as a perennial backbone. Grow the bed in the sunniest spot available: tomatoes and peppers need at least six hours of direct sun per day to produce worthwhile fruit.
24. Raised Bed with Integrated Trellis
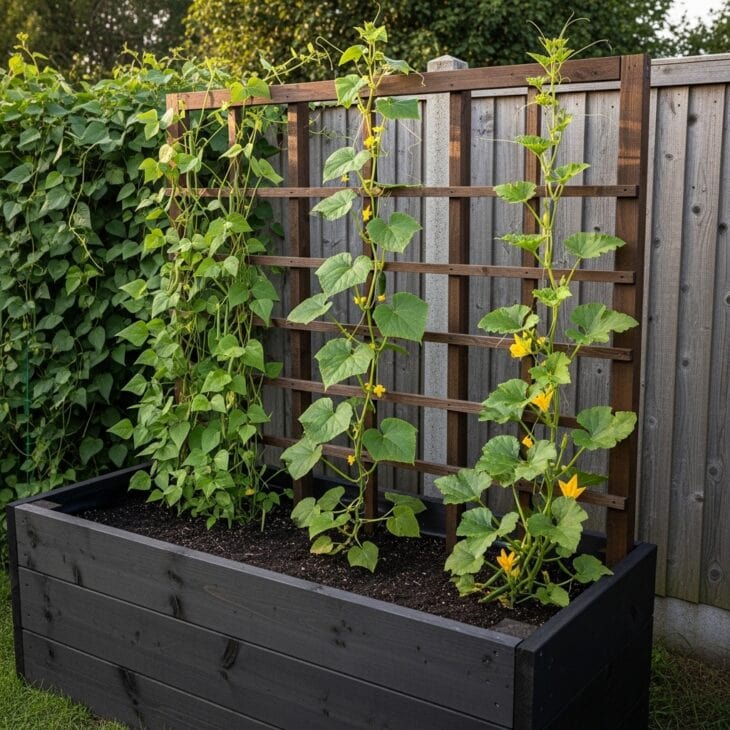
What you see A raised bed has a sturdy timber trellis built into its back wall, rising to 150cm (5ft) above the bed surface. Climbing French beans cover the lower half of the trellis; a cucumber is trained up the middle and a climbing courgette is just reaching the top. The bed grows both horizontally and vertically. The trellis roughly doubles the growing area available in the same footprint.
Why it works A raised bed with an integrated trellis or frame is the most space-efficient growing structure available to a small garden. Climbing crops that would normally require a separate support system are built into the bed design. The trellis also provides a windbreak for crops in the bed, creates privacy if used near a seating area, and adds visual height to what can otherwise be a flat, low feature.
How to get it Build the trellis from 75 x 75mm (3 x 3in) upright posts fixed to the rear corners of the bed, spanning a lattice of 50 x 25mm (2 x 1in) horizontal rails at 20cm (8in) intervals. The structure must be robust: a fully laden cucumber or bean row in full growth is heavy and catches wind. Good climbing crops for a trellis-backed raised bed include Phaseolus vulgaris (climbing French beans), Cucumis sativus (cucumber), Cucurbita pepo (climbing courgette), and Lathyrus odoratus (sweet peas for edible flowers). Fix jute twine between rails to give climbing plants something to grip in the early weeks.
25. Year-Round Succession Raised Bed
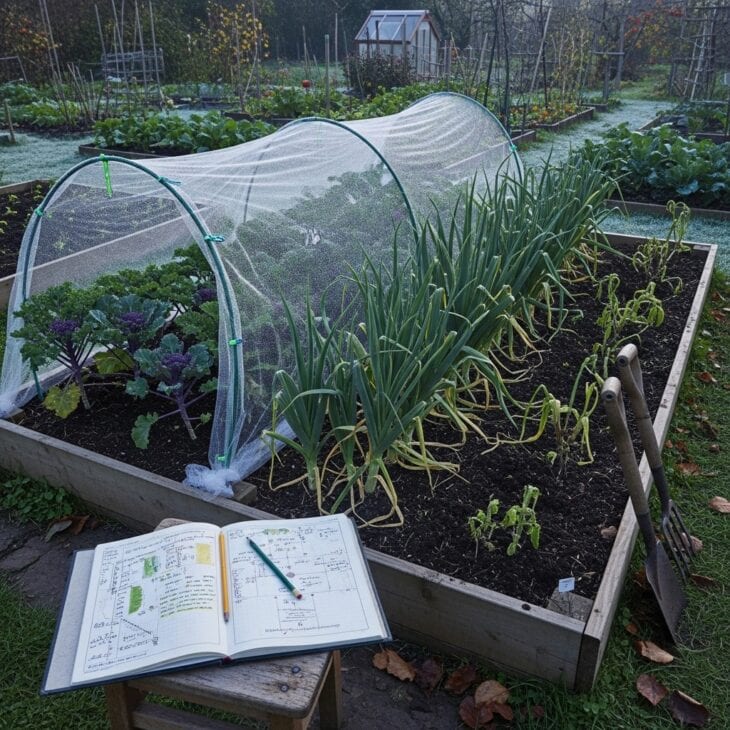
What you see One raised bed is planned to be productive in every month of the year without interruption. One end holds leeks through winter; the centre grows overwintering spinach and chard; the far end has just been cleared of summer crops and is being prepared for garlic planting in October. A handwritten planting plan in a notebook beside the bed makes the timing clear. The bed produces food every single week of the year.
Why it works A year-round succession plan transforms a raised bed from a seasonal project into a permanent productive feature. The key is treating each section of the bed as a rolling timeline rather than planting it all at once. When one crop finishes, the next one is already scheduled and often started in a tray nearby, ready to go in immediately after clearance.
How to get it Plan in three-month blocks. Winter (Dec to Feb): leeks, overwintering spinach (Spinacia oleracea ‘Medania’), chard, and land cress. Spring (Mar to May): sow direct salad, sow under cover tomatoes and courgettes, plant out broad beans and onion sets. Summer (Jun to Aug): tomatoes, courgettes, climbing French beans, and basil. Autumn (Sep to Nov): plant garlic and spring onion sets, sow winter salad under a cloche, and plant overwintering varieties of spinach and chard. The secret is never leaving the bed empty: as one crop ends, the next is planted within a week.