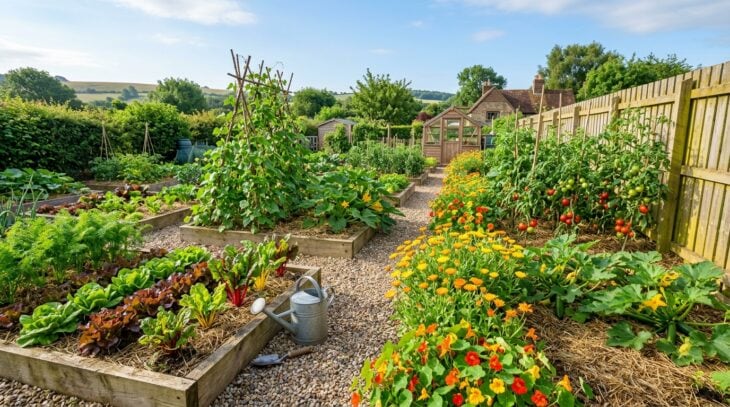
There is nothing quite like walking out the back door and picking dinner. A vegetable garden turns a patch of ground into a working larder, and it rewards you all season with crops that taste better than anything in the store. Whether you have a sprawling plot or a sunny corner, growing your own is within reach.
Contents
- 01. Build a Raised Bed Vegetable Garden
- 02. Start a No-Dig Bed with Compost Mulch
- 03. Try Square Foot Gardening
- 04. Lay Out a Classic Potager
- 05. Plant the Three Sisters Together
- 06. Grow Tomatoes Up a Cordon
- 07. Build a Bean Teepee
- 08. Train Cucumbers and Squash Up a Trellis
- 09. Sow a Cut-and-Come-Again Salad Bed
- 10. Make a Root Vegetable Bed
- 11. Grow Brassicas Under Netting
- 12. Plant an Allium Bed of Garlic and Onions
- 13. Grow Potatoes in Bags or Towers
- 14. Plant a Pumpkin and Winter Squash Patch
- 15. Build a Strawberry Bed or Tower
- 16. Espalier Fruit Along a Sunny Wall
- 17. Grow Vegetables in Containers on the Patio
- 18. Build a Waist-High Salad Table
- 19. Sow Peas Up Pea Sticks
- 20. Dedicate a Bed to Kitchen Herbs
- 21. Interplant Companion Flowers
- 22. Add a Pollinator Border Beside the Veg
- 23. Plant a Perennial Vegetable Bed
- 24. Start an Asparagus Bed
- 25. Make a Keyhole Garden Bed
- 26. Build a Hugelkultur Mound
- 27. Add a Cold Frame for Early and Late Crops
- 28. Set Up a Greenhouse or Polytunnel
- 29. Create a Children’s Vegetable Patch
- 30. Put a Compost Bay at the Heart of the Plot
The 30 ideas below cover the whole craft of growing food: how to build and lay out your beds, which crops to grow and how to support them, and the structures that stretch your season at both ends. There are projects for raised beds and bare soil, for patios and full plots, for absolute beginners and seasoned growers chasing a bigger harvest.
Read straight through to plan a productive plot from scratch, or scroll and pick the ideas that suit your space and appetite. Each one explains what you are looking at, why it works, and exactly how to make it happen.
01. Build a Raised Bed Vegetable Garden
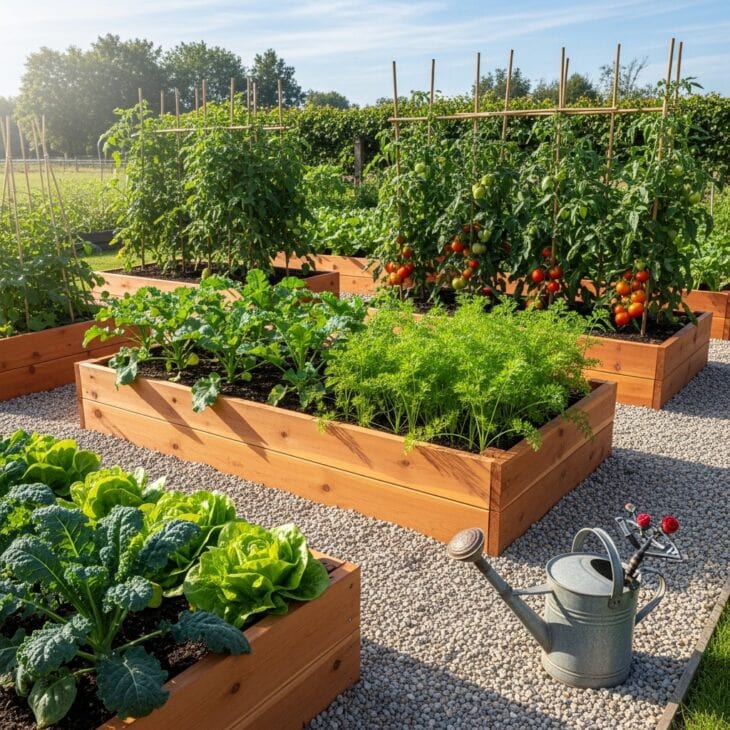
What you see A run of timber raised beds, brimming with lettuce, kale, carrots and staked tomatoes, with tidy paths threading between them. Lifting the soil into framed boxes gives the whole garden order and instant productivity, the beds packed edge to edge with crops.
Why it works A raised bed lets you fill it with the perfect growing medium, which is a gift on heavy clay, stony ground or thin soil. It warms up faster in spring for an earlier start, drains freely, and the defined edge keeps paths and planting separate so you never compact the soil you grow in. It is the most reliable way to get a productive plot going quickly.
How to get it Build beds no wider than 4ft (120cm) so you can reach the center from either side without stepping on the soil. Untreated cedar or Douglas fir lasts well, or use scaffold boards for a budget build. Fill with a mix of roughly half topsoil and half garden compost or well-rotted manure, and leave paths at least 18in (45cm) wide for a wheelbarrow. There are dozens of raised bed designs to borrow, so start with one or two beds and expand as you find your stride.
02. Start a No-Dig Bed with Compost Mulch
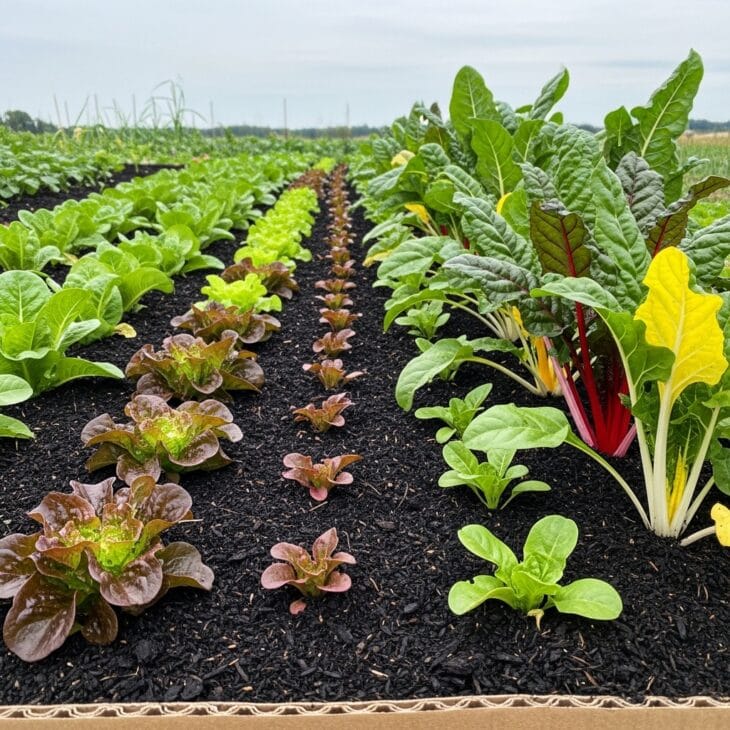
What you see A flat bed covered in a thick blanket of dark, crumbly compost, with rows of glossy lettuce and chard growing straight out of it. There is no bare, dug-over earth here, just a rich surface mulch that the plants seem to love.
Why it works No-dig gardening leaves the soil structure and its web of fungi and worms undisturbed, which keeps it healthy and free-draining. A yearly mulch of compost feeds the soil from the top down, just as it happens in nature, and the covering smothers most weeds before they start. Less digging means less work and far fewer weeds, which is why so many kitchen gardeners have switched.
How to get it To start a bed on grass or weeds, lay overlapping cardboard straight onto the ground to block the light, then pile 4 to 6in (10 to 15cm) of compost on top and plant directly into it. Do not dig it in. Top up with an inch or two of fresh compost each year, ideally in autumn or late winter. Water well in the first season while roots push down through the cardboard into the soil below.
03. Try Square Foot Gardening
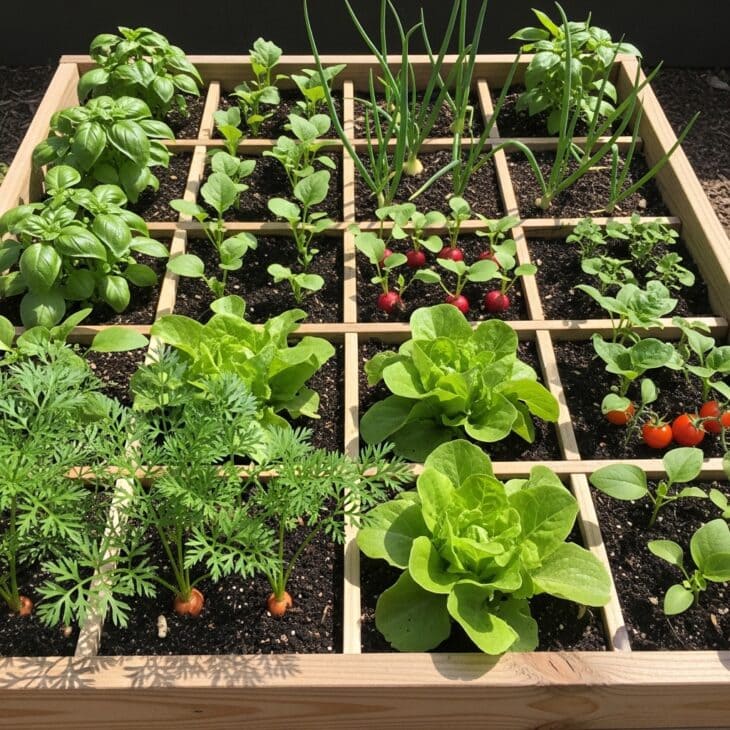
What you see A raised bed divided by slim wooden laths into a neat grid of squares, each one growing a different crop: carrots here, lettuce there, a square of radishes, a clump of onions, a basil plant. It looks like a planted chessboard, and every inch is in use.
Why it works Dividing a bed into one-foot squares takes all the guesswork out of spacing and makes a small space astonishingly productive. Each square holds the right number of plants for its crop, so nothing is wasted, and harvesting one square frees it for an instant resowing. The method is tidy, beginner-friendly and ideal for small garden plots where every inch counts.
How to get it Build or use a bed 4ft by 4ft (120cm by 120cm) and mark it into 16 squares with thin laths or string. Plant by size: 1 large plant such as a cabbage per square, 4 lettuce, 9 onions, or 16 carrots or radishes. Fill with a rich, light mix so roots run freely in the shallow grid. As each square is cleared, refresh it with a handful of compost and sow the next crop straight away.
04. Lay Out a Classic Potager
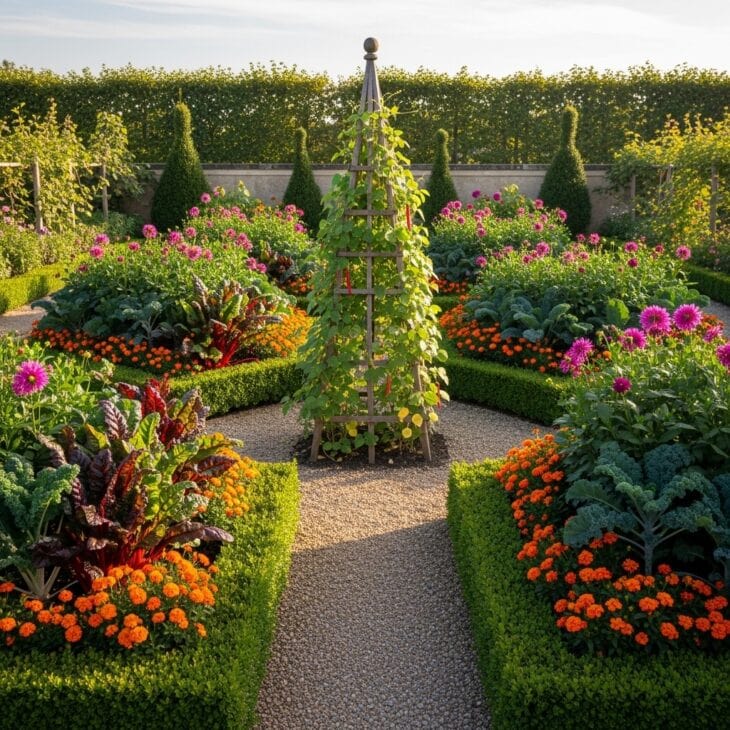
What you see Symmetrical beds edged in low clipped box, with vegetables and flowers grown shoulder to shoulder: ruby chard and curly kale next to marigolds and dahlias, and a bean-clad obelisk rising at the center. This is a kitchen garden designed to be beautiful as well as useful.
Why it works The potager, the French ornamental kitchen garden, treats vegetables as decorative plants in their own right, mixing them with flowers and herbs in a formal pattern. The structure of clipped edges and paths holds the picture together even when a bed is half-harvested, so the garden never looks scruffy. It proves that a productive plot can be every bit as pretty as a flower garden.
How to get it Start with a simple, symmetrical layout: four beds around a central feature, edged with box (Buxus sempervirens) or a low evergreen herb such as dwarf lavender. Choose vegetables with good looks, like rainbow chard, frilly lettuce, purple kale and climbing beans, and tuck in marigolds (Tagetes patula) and nasturtiums for color. Repeat plants and colors across the beds to keep it coherent, and keep the edges crisp, since the geometry is what makes a potager sing.
05. Plant the Three Sisters Together
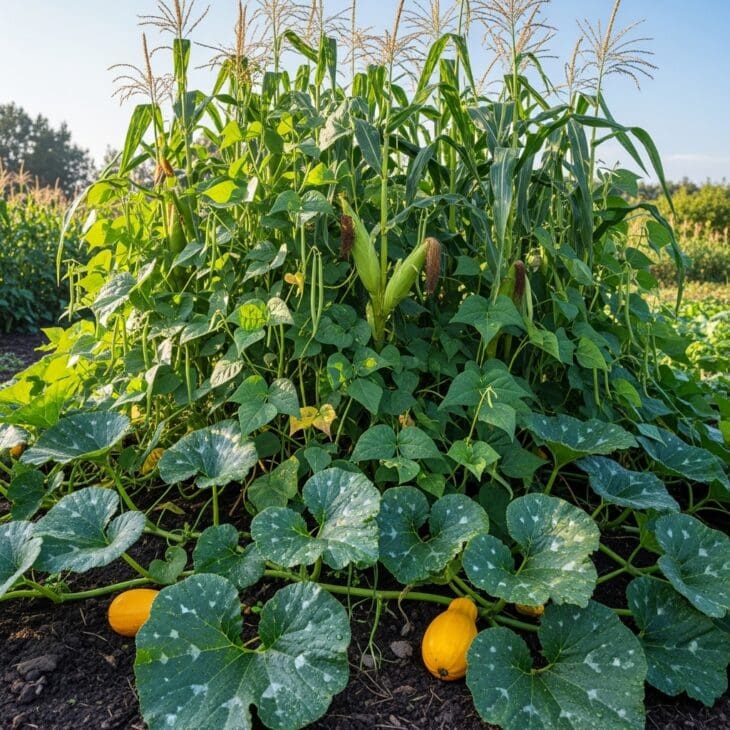
What you see Tall sweetcorn standing in a block, with climbing beans spiralling up the stalks and big squash leaves sprawling across the soil at their feet. Three crops share one bed in a living tangle, each one doing a job for the others.
Why it works This Native American companion planting is a masterclass in cooperation. The corn (Zea mays) gives the beans a pole to climb, the beans (Phaseolus vulgaris) fix nitrogen in the soil to feed the corn, and the squash (Cucurbita pepo) shades the ground with its broad leaves, smothering weeds and keeping moisture in. Together they yield more from the same space than any one of them grown alone.
How to get it Wait until the soil is warm in late spring, then sow corn in a block rather than a row so it pollinates well, spacing plants about 12in (30cm) apart. When the corn is 6in (15cm) tall, sow climbing beans at the base of each stalk, and sow squash around the edges of the block. Keep it all well watered and well fed, as three hungry crops in one bed need rich soil to thrive.
06. Grow Tomatoes Up a Cordon
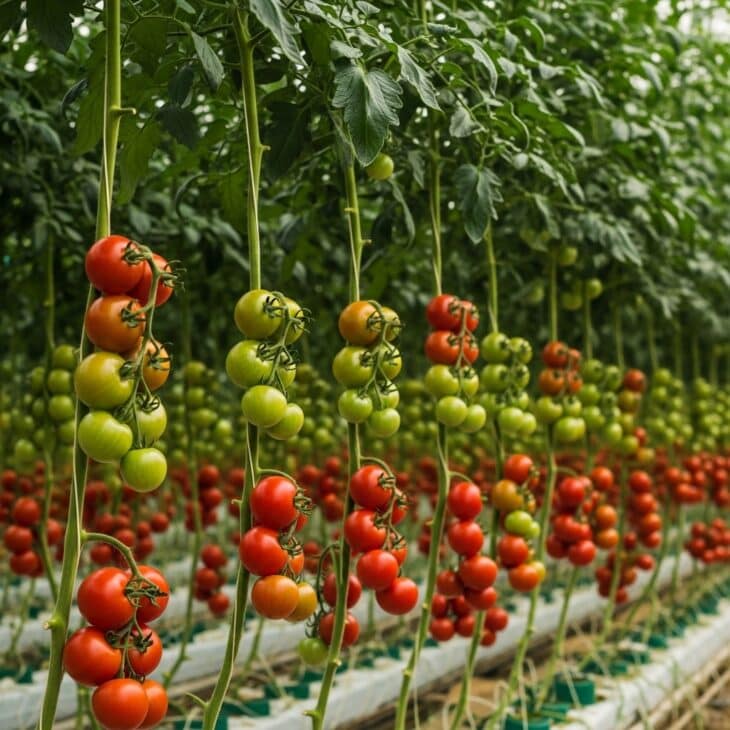
What you see A row of tomato plants grown as tall single stems up canes and strings, each one hung with trusses of ripening fruit from knee height to well above your head. Stripped of their side shoots, the plants pour all their energy into fruit rather than leaf.
Why it works Training indeterminate tomatoes (Solanum lycopersicum) as cordons, a single stem up a support, keeps them upright, airy and easy to pick, and a packed row takes up very little ground. Removing the side shoots channels energy into fewer, larger trusses and lets air and light reach the fruit, which ripens it evenly and cuts down on disease. It is the classic way to get a heavy crop from a small footprint.
How to get it Choose cordon (indeterminate) varieties such as ‘Sungold’ or ‘Gardener’s Delight’ and give each a tall cane or a string tied to an overhead wire. Pinch out the side shoots that form in every leaf joint while they are small, and tie the stem in as it grows. Feed weekly with a high-potash tomato feed once the first fruits set, and pinch out the growing tip two leaves above the top truss in late summer so the remaining fruit can ripen.
07. Build a Bean Teepee
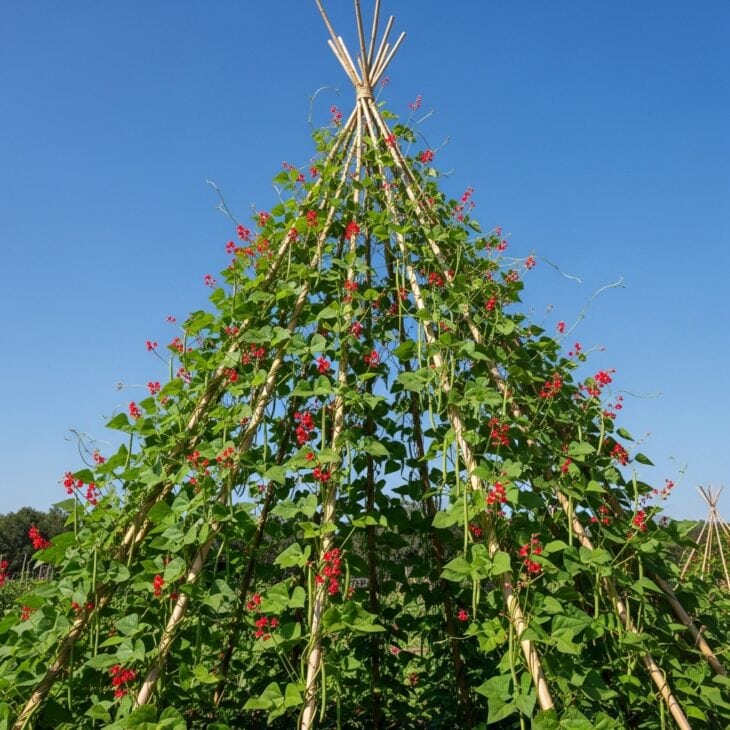
What you see A wigwam of bamboo canes tied together at the top, completely clothed in climbing beans, with scarlet flowers and long pods dangling within easy reach. It is a column of green that doubles as a piece of garden architecture.
Why it works Growing beans up a teepee makes brilliant use of vertical space, lifting a heavy crop off the ground where it stays clean, easy to pick and well aired. The structure is quick to build, sturdy in wind because of its tripod shape, and a flowering teepee of runner beans (Phaseolus coccineus) is genuinely ornamental enough for a flower border. One teepee can feed a family through late summer.
How to get it Push six to eight canes at least 8ft (240cm) long into a circle about 3ft (90cm) across and lash them together at the top. Sow two beans at the foot of each cane in late spring once frost has passed, and thin to the stronger seedling. Help the young shoots find the cane, after which they twine up on their own. Keep them well watered once they flower, and pick regularly, as the more you pick, the more pods the plants set.
08. Train Cucumbers and Squash Up a Trellis
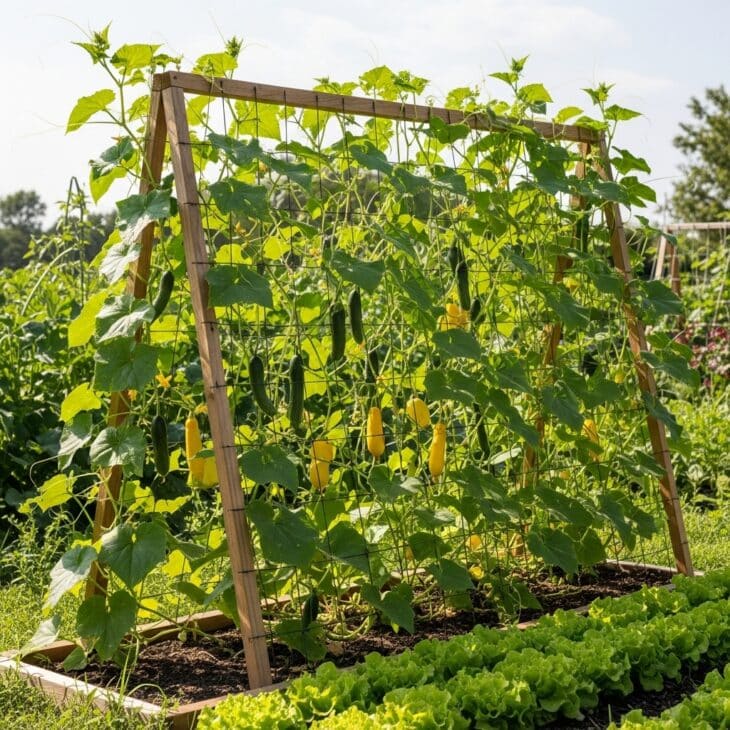
What you see A sturdy trellis with cucumber and small squash vines scrambling up it, their fruits hanging cleanly through the mesh and curling tendrils gripping the supports. In the cool shade beneath, a row of lettuce makes use of the space the climbers would otherwise sprawl across.
Why it works Trailing crops that would normally sprawl across the ground can be sent upward instead, freeing the soil below for a second crop and turning one bed into two layers of harvest. Off the ground, cucumbers (Cucumis sativus) grow straighter and cleaner, slugs reach them less easily, and the better airflow keeps mildew at bay. This is vertical growing at its most efficient.
How to get it Set up a strong trellis, netting or an A-frame that can take the weight of fruiting vines. Plant climbing cucumbers or small-fruited squash at the base and tie in the young growth until the tendrils take hold. Support heavy fruits in slings of netting or old tights if they need it. Underplant the shaded ground with quick salad leaves, and keep everything well fed and watered, as climbing crops are thirsty.
09. Sow a Cut-and-Come-Again Salad Bed
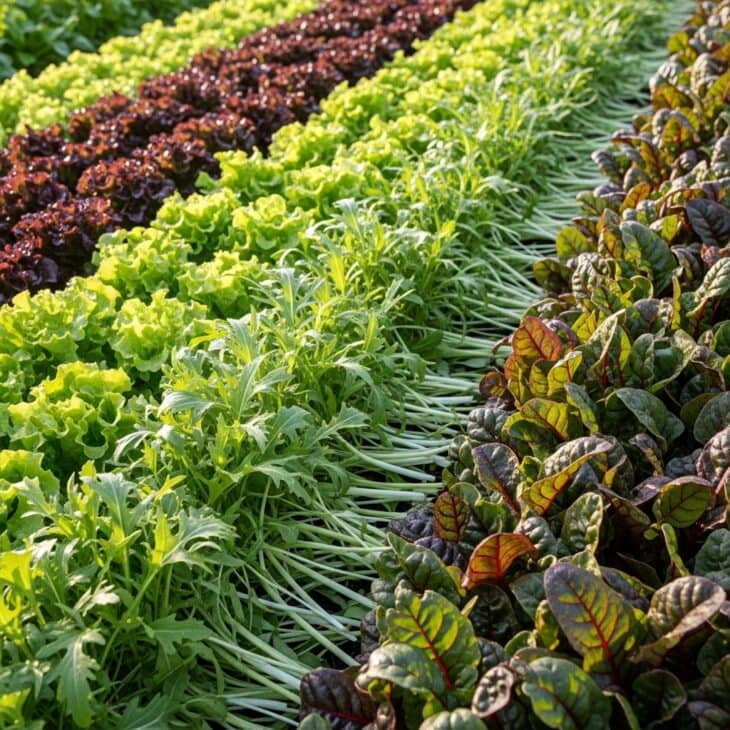
What you see A wide bed densely sown with baby salad leaves in ribbons of green and red: ruffled lettuce, peppery rocket, feathery mizuna and ruby chard, some of it just trimmed with scissors. It is a living salad bowl you harvest a handful at a time.
Why it works Cut-and-come-again salads are sown thickly and harvested young, snipping the leaves an inch above the base so the plants resprout for several more pickings. You get weeks of tender leaves from a single sowing, far more value than buying bagged salad, and the crop is fast enough to fit between slower vegetables. It is the most beginner-friendly thing you can grow.
How to get it Sow a loose-leaf lettuce (Lactuca sativa) mix or a spicy oriental blend thinly across a shallow drill, and keep the soil moist for fast germination. Begin cutting when leaves are 3 to 4in (8 to 10cm) tall, taking the outer leaves or shearing the whole row above the growing point. Sow a fresh short row every two to three weeks for a constant supply, and move to some afternoon shade in high summer, since heat makes salad bolt.
10. Make a Root Vegetable Bed
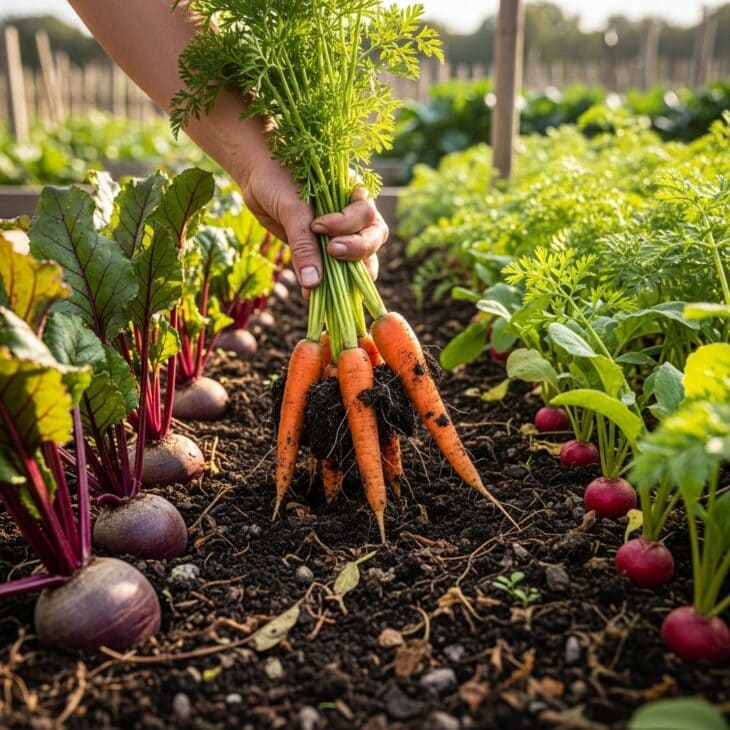
What you see A bed devoted to roots, with a bunch of bright carrots just lifted from dark crumbly soil and rows of beetroot, parsnip and radish growing alongside. The feathery green tops give little away about the harvest hidden beneath them.
Why it works Root crops are some of the most economical things to grow, storing for months and freeing up space above ground while they swell below it. Grouping them in one bed lets you prepare the right soil, deep, stone-free and not too rich, which is exactly what gives long, straight carrots and well-shaped parsnips. They also fit neatly into a crop rotation, following hungry crops that have left the soil leaner.
How to get it Fork over the bed to loosen it deeply but avoid fresh manure, which makes carrots (Daucus carota) fork. Sow thinly straight into the ground, as roots dislike being transplanted, and thin seedlings to give each room to swell. Sow carrots and beetroot in succession from spring to midsummer, and parsnips once in early spring for a long, slow crop. Cover carrots with fine mesh to keep carrot fly off, and keep the bed evenly watered to prevent splitting.
11. Grow Brassicas Under Netting
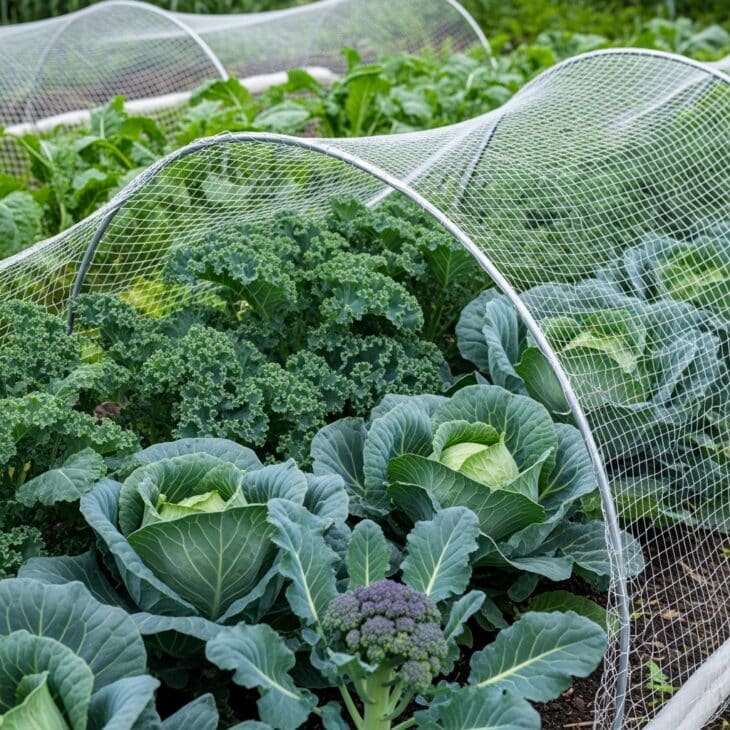
What you see A bed of cabbages, kale and sprouting broccoli growing under a low tunnel of fine netting stretched over hoops, the blue-green leaves clean and whole behind the mesh. It looks like a crop kept safe under glass, except the cover is light and breathable.
Why it works The cabbage family is a magnet for pests, from cabbage white butterflies laying eggs to pigeons stripping the leaves, and a simple net barrier stops nearly all of them. Covered from the day they go in, brassicas (Brassica oleracea) grow into clean, unholed plants with no need for spraying. The netting also shelters tender young plants from wind and the worst of the cold.
How to get it Bend lengths of alkathene pipe or wire into hoops over the bed and drape fine insect-proof mesh across them, tucking the edges into the soil so no butterfly can creep underneath. Plant brassicas firmly, as they hate loose soil, and space them generously: 18in (45cm) for cabbages, more for kale and broccoli. Firm the soil around the stems with your heel, and keep the netting in place right through to harvest.
12. Plant an Allium Bed of Garlic and Onions
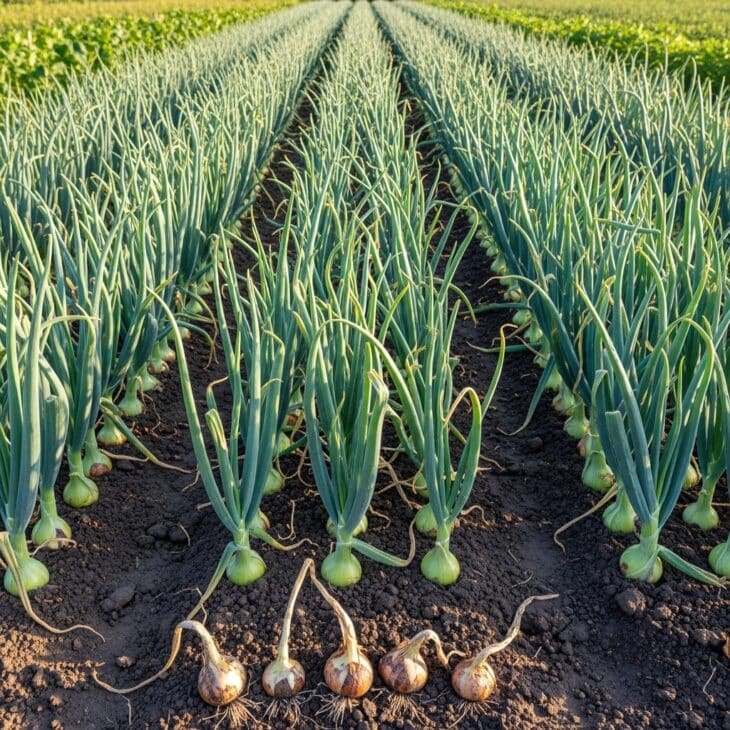
What you seeStraight rows of onions, garlic and shallots, their upright blue-green stems standing to attention, with fat bulbs just starting to show at the soil surface and a few drying in the sun at the bed’s edge. This is the backbone of the kitchen, growing quietly all season.
Why it works Alliums are about the easiest crop to grow, asking little once planted and storing for months after harvest, so a single bed can flavor your cooking through winter. They take up little room, with their slim upright leaves casting almost no shade, and their pungent scent is even said to deter some pests from neighboring crops. Few vegetables give so much return for so little effort.
How to get it Plant onion (Allium cepa) sets and garlic (Allium sativum) cloves pointed-end up, just covered, in autumn or early spring, spacing them about 4in (10cm) apart in rows 10in (25cm) apart. Garlic in particular benefits from a cold spell, so autumn planting gives the biggest bulbs. Keep the bed weed-free, since alliums hate competition, and stop watering once the bulbs swell. Lift them when the foliage flops and yellows, then dry them in the sun before storing.
13. Grow Potatoes in Bags or Towers
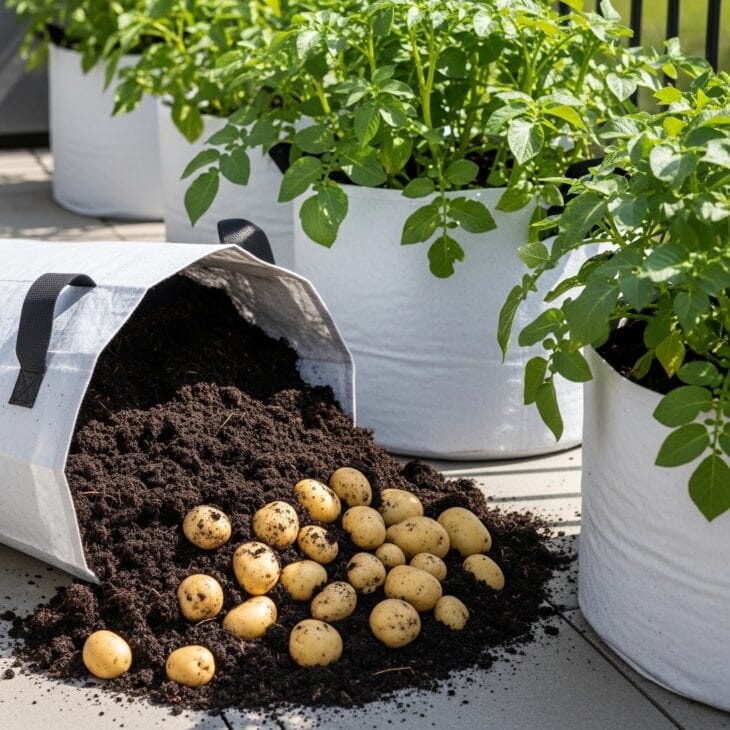
What you see Tall fabric bags of leafy potato foliage standing on a patio, with one bag tipped over to spill a heap of clean new potatoes from dark compost. No digging, no plot, just a sack and a harvest you tip straight into a bucket.
Why it works Growing potatoes (Solanum tuberosum) in bags or towers brings this staple crop to anyone with a sunny corner, no bed required, which makes it perfect for patios and container gardens. The fresh compost is free of the blight and eelworm that build up in open soil, and harvesting is as simple as tipping the bag out, with no forking through the ground and spearing tubers. It is the cleanest, easiest way to grow your own spuds.
How to get it Stand a 40-litre grow bag or large tub with drainage holes in full sun and put 4in (10cm) of compost in the bottom. Set two or three seed potatoes on top, cover with more compost, and as the shoots grow keep adding compost to bury the lower stems, which encourages more tubers to form. Water regularly, as bags dry out fast, and feed every couple of weeks. Harvest earlies about ten weeks after planting, when the flowers open.
14. Plant a Pumpkin and Winter Squash Patch
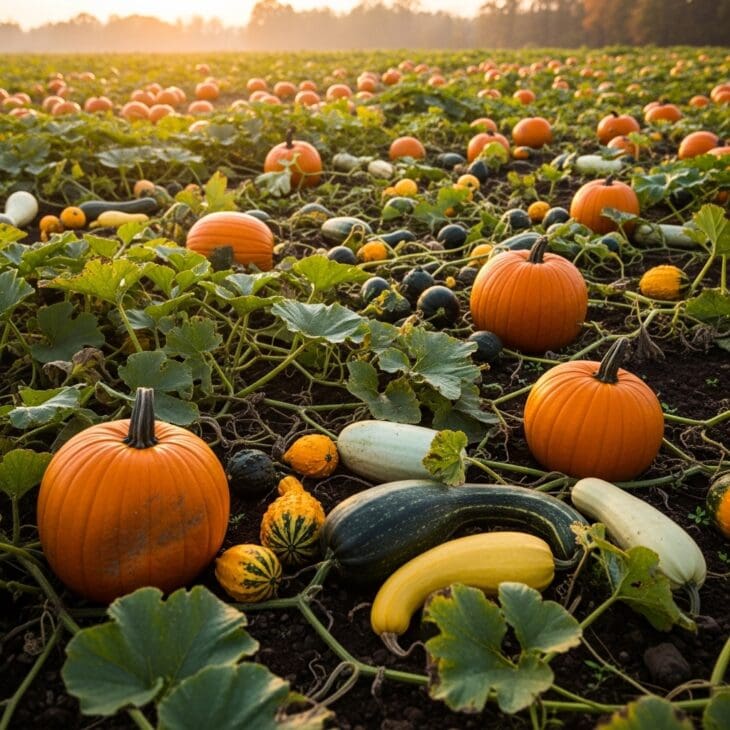
What you see A generous sprawl of vines across rich soil, dotted with fat orange pumpkins and an assortment of warty, striped and blue-skinned winter squash nestled among the big leaves. It is the most theatrical corner of the autumn garden, the harvest on full display.
Why it works Pumpkins and winter squash (Cucurbita maxima) need room but ask little else, rambling happily over ground you might otherwise struggle to fill, even over a compost heap. The fruits store for months in a cool, dry place, turning a few summer plants into food right through winter, and children love growing something so big and dramatic. One well-fed plant can produce a heap of squash.
How to get it Sow seed indoors in late spring and plant out after the last frost into ground enriched with plenty of well-rotted manure, leaving at least 3ft (90cm) between plants, more for trailing types. Water copiously and feed every couple of weeks once the fruits set. Slip a tile or board under each swelling fruit to keep it off the damp earth, and cure them in the sun for a week or two after cutting so the skins harden for storage.
15. Build a Strawberry Bed or Tower
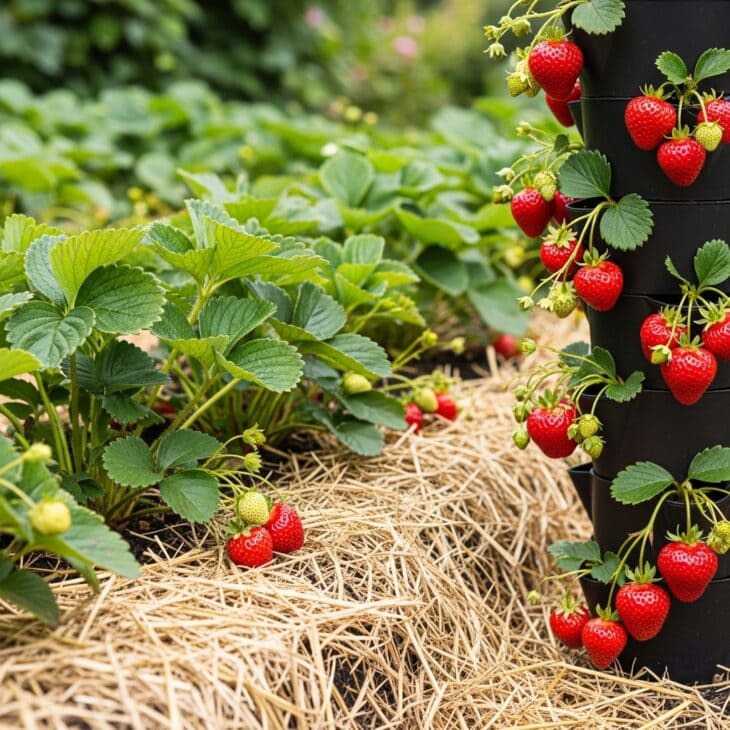
What you see A bed of leafy strawberry plants studded with hanging red berries resting on a bed of straw, next to a stacked vertical planter dripping with fruit at every level. Sweet, sun-warmed berries are within arm’s reach wherever you look.
Why it works Strawberries (Fragaria x ananassa) are the most rewarding fruit for a small space, cropping heavily in their first full summer and spreading themselves with free runners. Growing them in a dedicated bed or a tower keeps the fruit off the soil, away from slugs, and easy to net from the birds. A stacked planter packs dozens of plants into a single square foot, ideal for a patio or balcony.
How to get it Plant young strawberries in early autumn or spring, setting the crown level with the soil surface and spacing them about 12in (30cm) apart in open ground. Tuck straw under the developing fruit to keep it clean and net the plants as the berries color. Feed with a high-potash feed while fruiting, and peg down a few runners each summer to raise free new plants. Replace the bed every three or four years, as old plants crop less.
16. Espalier Fruit Along a Sunny Wall
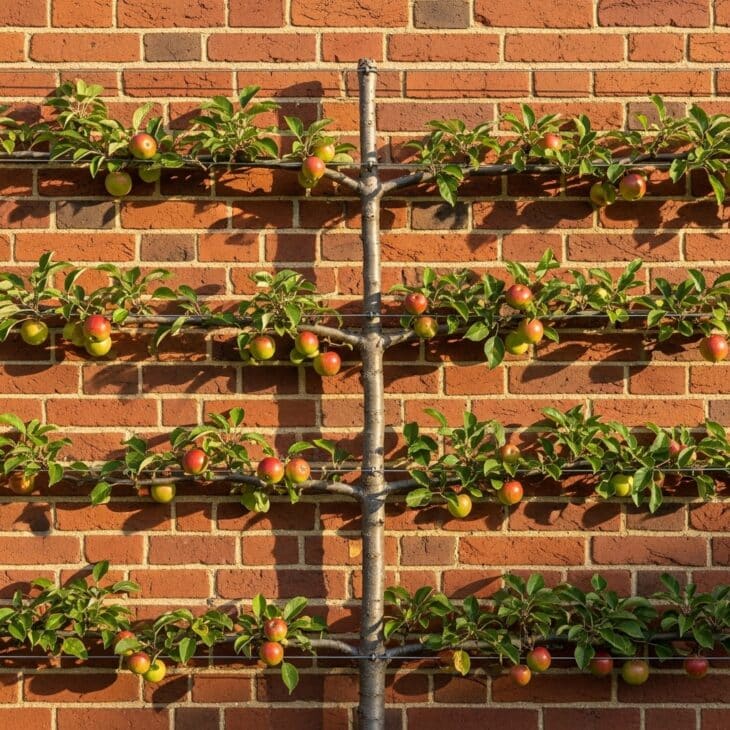
What you see An apple tree trained flat against a warm brick wall in neat horizontal tiers, each branch tied to a wire and hung with ripening fruit. It is part orchard, part living sculpture, taking up barely a foot of ground.
Why it works Espalier training presses a fruit tree flat against a wall or fence, so it crops generously while occupying almost no space, perfect for a narrow side yard or the edge of a plot. A sunny wall stores heat and ripens the fruit beautifully, and the open, two-dimensional shape lets light and air reach every branch, which means better fruit and less disease. Apples (Malus domestica) and pears take to it especially well.
How to get it Fix horizontal wires to a south- or west-facing wall about 18in (45cm) apart, and plant a young tree on a dwarfing rootstock such as M26 for apples. Buy a ready-trained espalier to save years, or start with a maiden whip and tie in a new tier each year, pruning the side shoots back in late summer to build fruiting spurs. Keep it watered while establishing, and prune annually to hold the flat shape and keep it cropping.
17. Grow Vegetables in Containers on the Patio
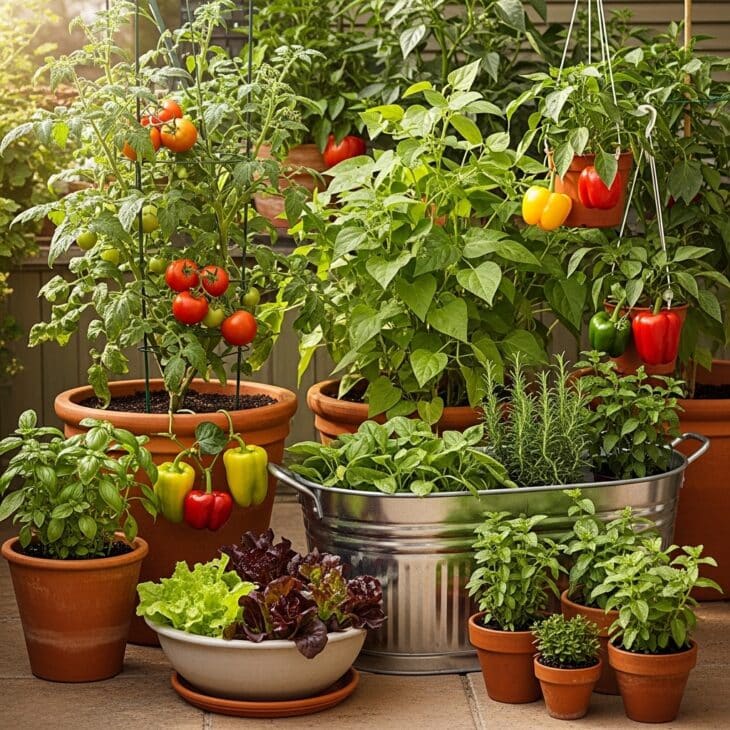
What you see A sunny patio turned into a productive garden in pots: a tomato heavy with fruit, a tub of bush beans, peppers ripening in terracotta, and lettuce and herbs crowding every surface. There is no soil in sight, yet the harvest is real.
Why it works Containers let you grow vegetables anywhere with sun, on a patio, a doorstep or a balcony, which makes growing your own possible for renters and those with no open ground at all. You control the soil completely, pests in the ground can’t reach the roots, and you can move pots to chase the sun or shelter from a cold snap. Almost any crop has a compact variety bred for pots.
How to get it Choose the biggest pots you can, at least 12in (30cm) across for fruiting crops, with good drainage holes, and fill with a quality peat-free compost. Pick compact and dwarf varieties: bush tomatoes, patio peppers, baby carrots and cut-and-come-again salad all thrive. Containers dry out fast, so water daily in summer and feed weekly once plants are cropping. Group the pots together to cut down watering and make a lush container display.
18. Build a Waist-High Salad Table
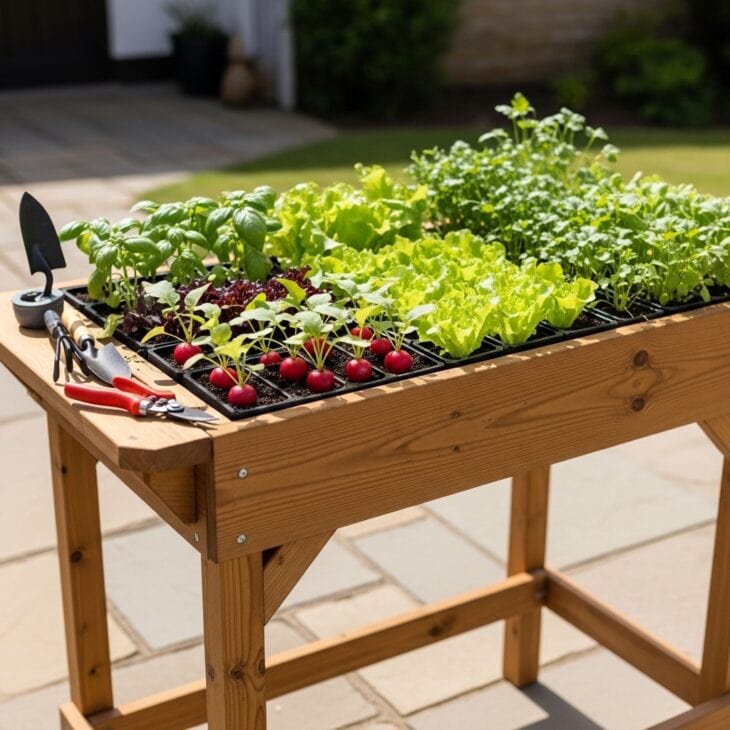
What you see A shallow planting tray raised on legs to waist height, filled with neat rows of baby lettuce, radish and herbs, standing on the patio where you can tend it without bending. It is a vegetable bed brought up to table level.
Why it works A salad table puts shallow-rooted crops at a comfortable working height, which is a real gift for anyone who finds bending or kneeling difficult, and it keeps slugs and rabbits well out of reach. The free-draining tray is ideal for fast salad leaves, radishes and herbs, and sitting close to the kitchen door it tempts you to snip something fresh for every meal. It packs a surprising crop into a small, accessible footprint.
How to get it Build a sturdy table from timber with a slatted base lined with weed fabric, or repurpose an old table, making the tray about 6in (15cm) deep. Fill with a light, free-draining compost and sow little and often: loose-leaf lettuce, rocket, radish, spring onions and low herbs such as chives and parsley. Stand it in good light and keep it watered daily in summer, as the shallow soil dries quickly. Resow each row as soon as it is cleared.
19. Sow Peas Up Pea Sticks
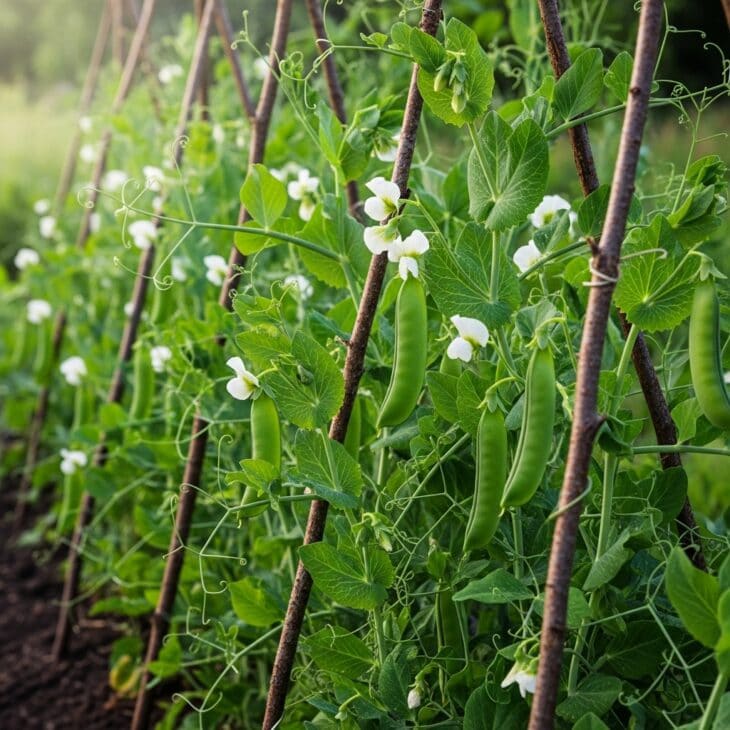
What you see A double row of pea plants scrambling up a line of twiggy hazel sticks, their curling tendrils gripping the branches and plump pods hanging among white flowers. The rustic supports look as good as they work, like a hedge of peas.
Why it works Peas (Pisum sativum) are one of the first crops you can sow in spring and one of the sweetest you will ever eat, with a flavor that fades within hours of picking, so home-grown is in a different league. Their tendrils need only the twiggy support of pea sticks to climb, an old and almost free method, and the upright row keeps pods clean and easy to pick. They also fix nitrogen, leaving the soil richer for the next crop.
How to get it Sow peas direct in early to mid spring in a flat-bottomed drill, scattering them about 2in (5cm) apart in a double row. Push twiggy hazel or birch sticks in along the row as the seedlings emerge so the tendrils can grab on early. Net against mice, which love newly sown peas, and water well once they flower to swell the pods. Pick every few days from the bottom up, since regular picking keeps the plants cropping.
20. Dedicate a Bed to Kitchen Herbs
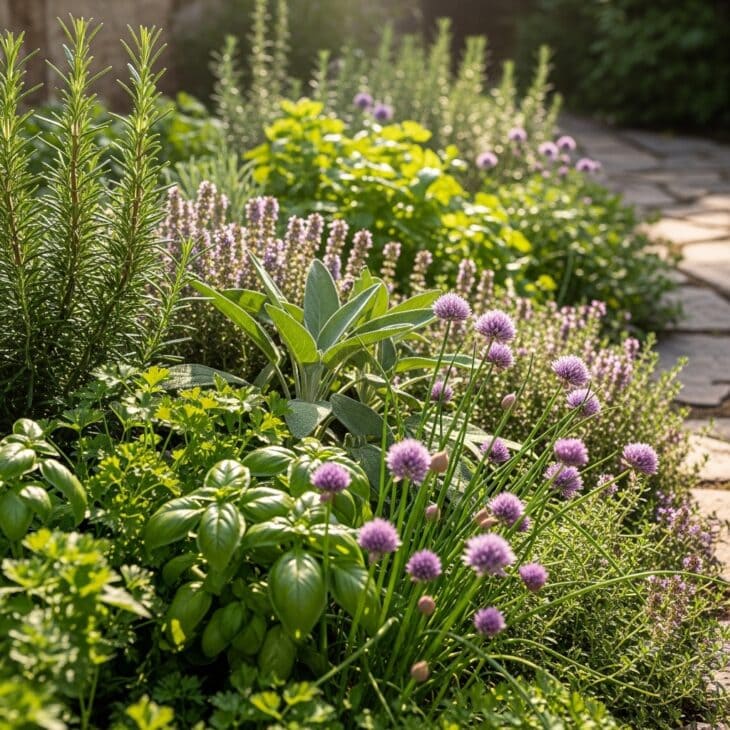
What you see A sunny bed brimming with kitchen herbs: a mound of rosemary, cushions of thyme and sage, frilly parsley, fragrant basil and chives topped with purple pompoms. Brush past it and the air fills with scent.
Why it works A dedicated herb bed keeps the flavors you reach for most within a few steps of the kitchen, and most herbs are tough, drought-tolerant and almost trouble-free once established. Their flowers draw in bees and hoverflies that pollinate the rest of the garden, and many herbs are handsome enough to earn their place on looks alone. A small bed of herb garden favorites repays the space many times over.
How to get it Group herbs by their needs: give the Mediterranean kinds, rosemary (Salvia rosmarinus), thyme (Thymus vulgaris) and sage (Salvia officinalis), a hot, well-drained spot, and keep the thirstier basil, parsley and chives in richer, moister soil. Plant the perennials once and harvest lightly in the first year. Sow basil and parsley fresh each year, and keep mint (Mentha spp.) in a sunken pot, as it spreads aggressively. Trim regularly to keep everything bushy and productive.
21. Interplant Companion Flowers
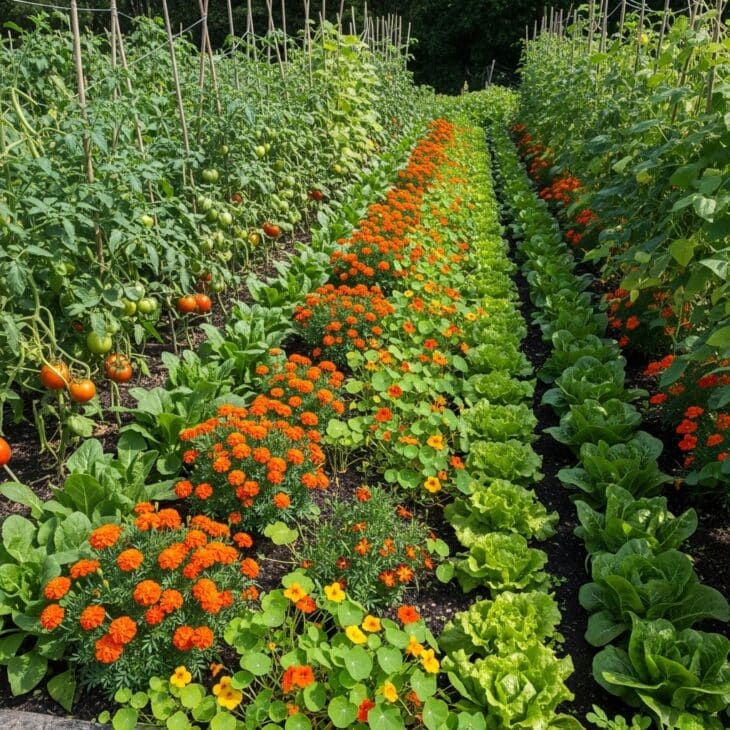
What you see Bright marigolds and trailing nasturtiums woven in among the tomatoes, beans and lettuce, splashing the productive rows with orange and gold. The vegetable beds look like flower borders, alive with bees and hoverflies.
Why it works Companion flowers earn their place by working for the crops around them. French marigolds (Tagetes patula) are said to deter whitefly and their roots discourage nematodes, while nasturtiums (Tropaeolum majus) act as a sacrificial trap, luring aphids and caterpillars away from your vegetables. Both draw in pollinators and predatory insects, building a healthier, more balanced plot that needs less intervention. The color is simply a bonus.
How to get it Dot French marigolds among tomatoes and beans, and let nasturtiums trail at the feet of climbing crops or sprawl along a bed edge. Add a few umbellifers such as dill (Anethum graveolens) and calendula (Calendula officinalis) to feed beneficial insects. Sow them at the same time as your vegetables, and don’t worry about precise placement, as the aim is simply a diverse, flower-rich plot. Both nasturtium leaves and flowers are edible, with a peppery kick in salads.
22. Add a Pollinator Border Beside the Veg
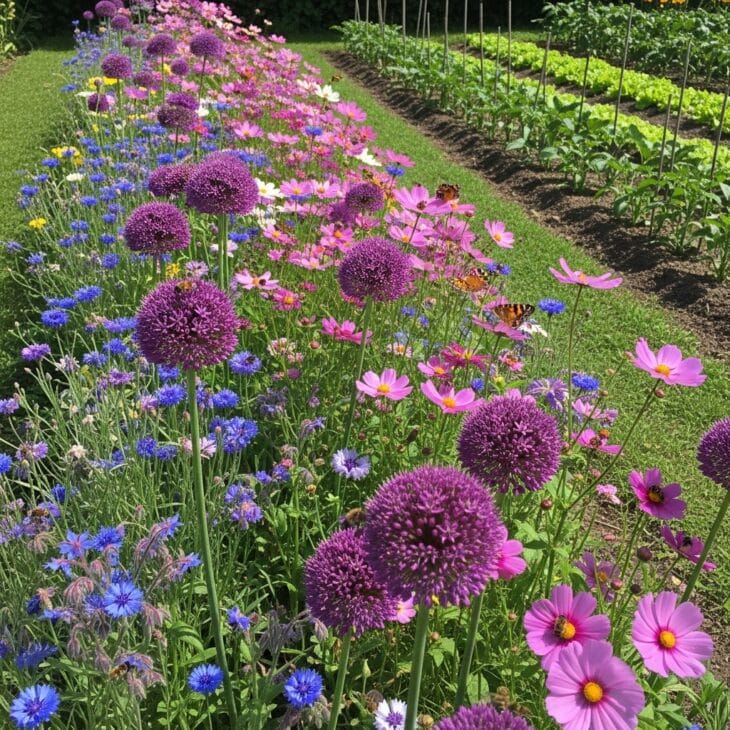
What you see A ribbon of bee-friendly flowers running along the edge of the vegetable beds, with purple alliums, blue cornflowers, borage and drifting cosmos alive with bees and butterflies. The crops grow just beyond, served by the insects this border brings in.
Why it works Many of your crops, from beans and squash to courgettes and strawberries, need insects to pollinate their flowers before they can set fruit, and a nearby border of nectar-rich flowers keeps a steady population of bees on hand. It also draws in hoverflies and ladybirds whose larvae devour aphids, giving you natural pest control. A pollinator strip turns the whole plot into a working ecosystem and makes a fine pollinator garden in its own right.
How to get it Give over a strip along one side of the plot to single-flowered, nectar-rich plants: borage (Borago officinalis), cornflowers (Centaurea cyanus), calendula, cosmos and ornamental alliums all pull in the crowds. Aim for something in flower from spring to autumn so there is always a food source. Avoid double-flowered varieties, which often lack accessible nectar, and leave a few seed heads standing over winter for the birds and overwintering insects.
23. Plant a Perennial Vegetable Bed
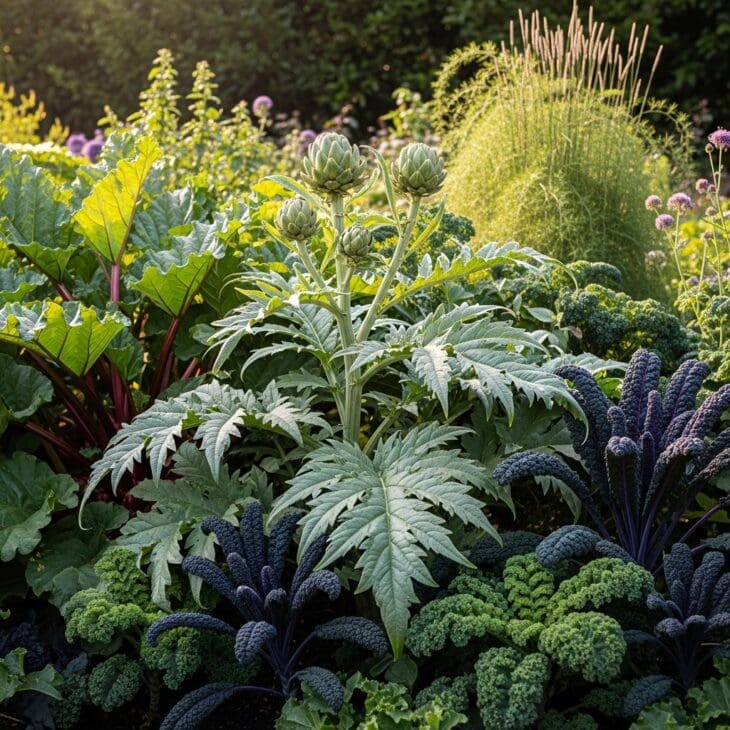
What you see A bed of vegetables that return year after year: a statuesque globe artichoke with silvery leaves, a clump of red-stemmed rhubarb, a stand of kale and the feathery ferns of established asparagus. It has the permanence of a flower border but feeds you.
Why it works Perennial vegetables are planted once and crop for years, asking far less of you than the annual cycle of sowing and clearing, which makes them the heart of a low-maintenance edible garden. Their deep, permanent roots build soil health and shrug off drought, and many, like the globe artichoke (Cynara scolymus), are handsome enough for an ornamental border. Once established, they deliver a harvest for almost no ongoing work.
How to get it Set aside a permanent bed that won’t be dug over, and enrich it deeply with compost before planting, as these crops will stay put for a decade or more. Plant rhubarb (Rheum rhabarbarum) crowns, globe artichokes and perennial kales such as ‘Taunton Deane’, spacing them generously to allow for their mature size. Resist harvesting heavily in the first year while they establish, then mulch with compost each spring and enjoy the crop for years.
24. Start an Asparagus Bed
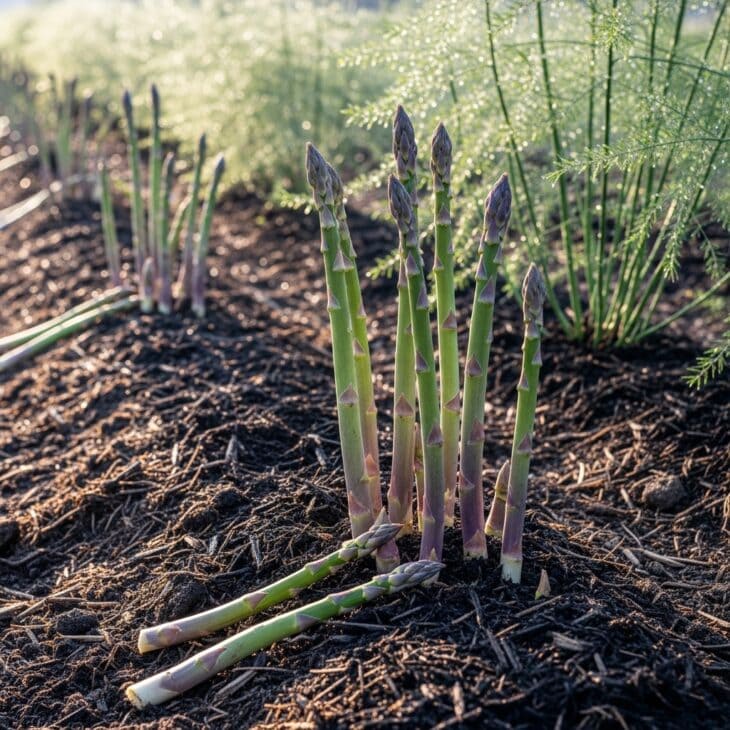
What you see Fat green and purple-tipped spears pushing straight up out of a ridged, well-mulched bed in spring, a few already cut at the base. For a few precious weeks each year, this quiet bed produces one of the great delicacies of the garden.
Why it works An asparagus (Asparagus officinalis) bed is a long-term investment that pays out for 20 years or more, delivering tender spears in late spring that taste nothing like the limp supermarket version. It asks for patience rather than effort: a couple of years to establish, then decades of almost free harvests. Few crops reward a single planting so generously over so long.
How to get it Choose a sunny, well-drained site and clear it of every scrap of perennial weed, since you can’t dig the bed again once it is planted. Set one-year-old crowns on a low ridge in a trench about 8in (20cm) deep in early spring, spreading the roots out, and cover them gently. Resist cutting any spears for the first two years so the plants build strength, then harvest for six weeks each spring before letting the ferns grow to feed the crowns. Mulch generously every year.
25. Make a Keyhole Garden Bed
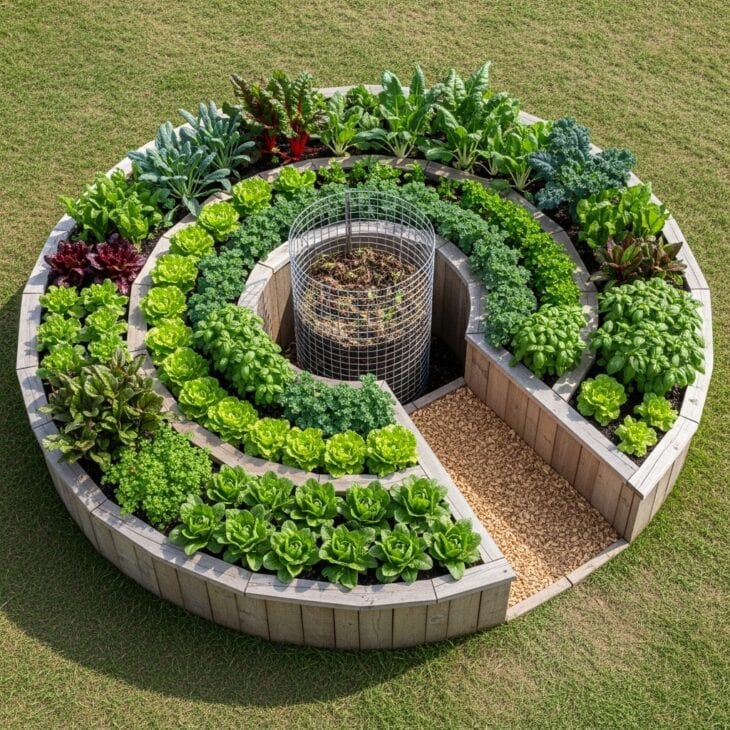
What you see A round raised bed with a notch cut into one side like a slice from a pie, leading to a basket of composting material at the very center. Leafy vegetables radiate out from the middle, all reachable from the path or the rim.
Why it works The keyhole design, developed for dry regions, places a compost basket at the heart of a circular bed so that water and nutrients seep outward into the soil every time you feed or water it. The wedge-shaped path lets you reach the whole bed without stepping on the soil, and the raised circular form packs a lot of growing into a compact, water-efficient shape. It is a self-feeding bed that thrives on kitchen scraps.
How to get it Build a circular wall of stone, brick or timber about 6ft (180cm) across and waist high, with a wedge cut from the edge to a central column of wire mesh. Fill the bed with soil that slopes gently down from the center, and fill the mesh basket with compostable kitchen and garden waste. Plant leafy, hungry crops like chard, lettuce and kale around it, and water and feed by topping up the central basket so the goodness spreads through the bed.
26. Build a Hugelkultur Mound
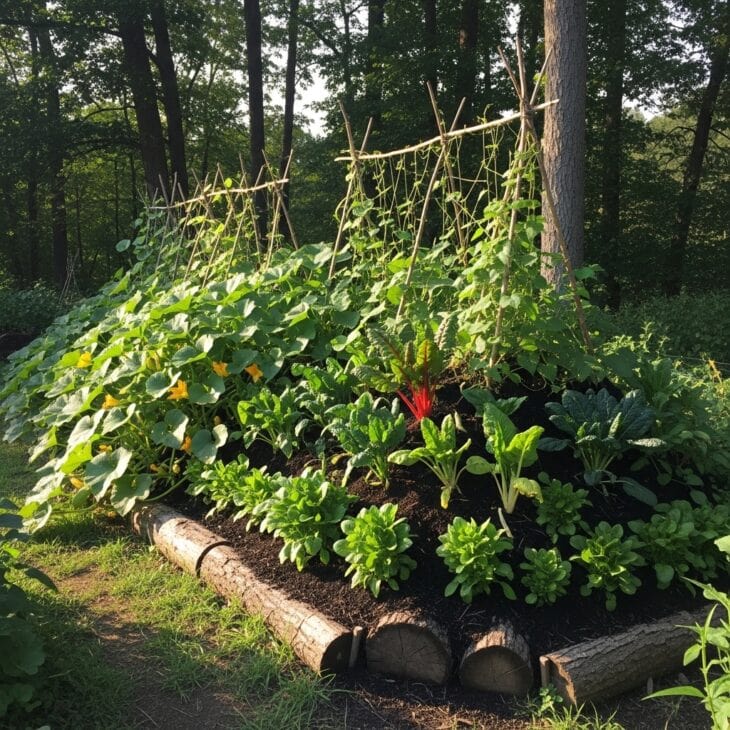
What you see A long, raised mound of soil planted thickly with squash, beans and leafy greens, with the cut ends of buried logs just showing at its base. It looks like a green wave rising from the ground, built on a hidden core of rotting wood.
Why it works Hugelkultur builds a raised bed over a buried stack of logs and woody debris, which slowly rot down to feed the soil and act like a sponge, soaking up rain and releasing it through dry spells so the bed needs little watering. The decomposing wood generates gentle warmth and a steady trickle of nutrients for years, and the method turns prunings and old logs into a productive bed. It is a brilliant way to use up woody waste.
How to get it Dig a shallow trench and stack it with logs and branches, then pile on smaller woody material, turf laid upside down, garden waste and finally a thick layer of soil and compost to cap it, building a mound 2 to 3ft (60 to 90cm) high. Use well-rotted wood rather than fresh, and avoid woods that resist decay. The mound sinks as the wood breaks down, so plant hungry, thirsty crops the first year and top up with compost as it settles.
27. Add a Cold Frame for Early and Late Crops
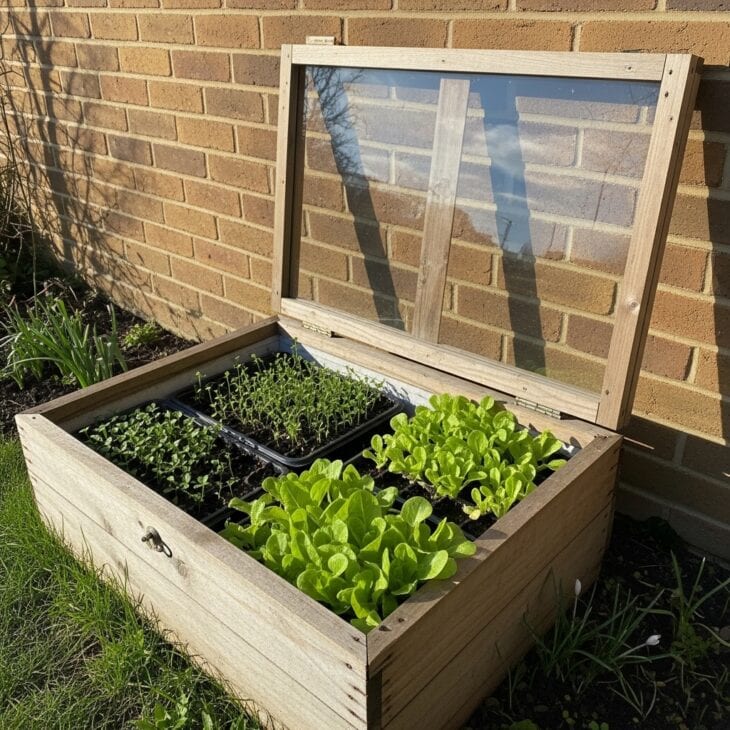
What you see A low wooden box with a sloping glass lid propped open to the spring sun, packed with trays of seedlings and rows of young lettuce. It is a miniature greenhouse at ground level, gathering warmth for the tender plants inside.
Why it works A cold frame is the simplest way to stretch the growing season at both ends, holding a few degrees of warmth that let you sow earlier in spring and keep cropping later into autumn. It is the perfect halfway house for hardening off seedlings raised indoors before they face the open garden, and it shelters salads and herbs right through winter. Cheap and unheated, it earns its keep many times over.
How to get it Place a cold frame against a sunny, south-facing wall that stores warmth, or build one from old timber and a salvaged window. Use it in spring to acclimatize young plants, opening the lid on warm days and closing it at night, and in winter to grow hardy salads and overwinter young plants. Prop the lid on hot days to stop it cooking the seedlings, and cover it with old blankets on the coldest nights for extra protection.
28. Set Up a Greenhouse or Polytunnel
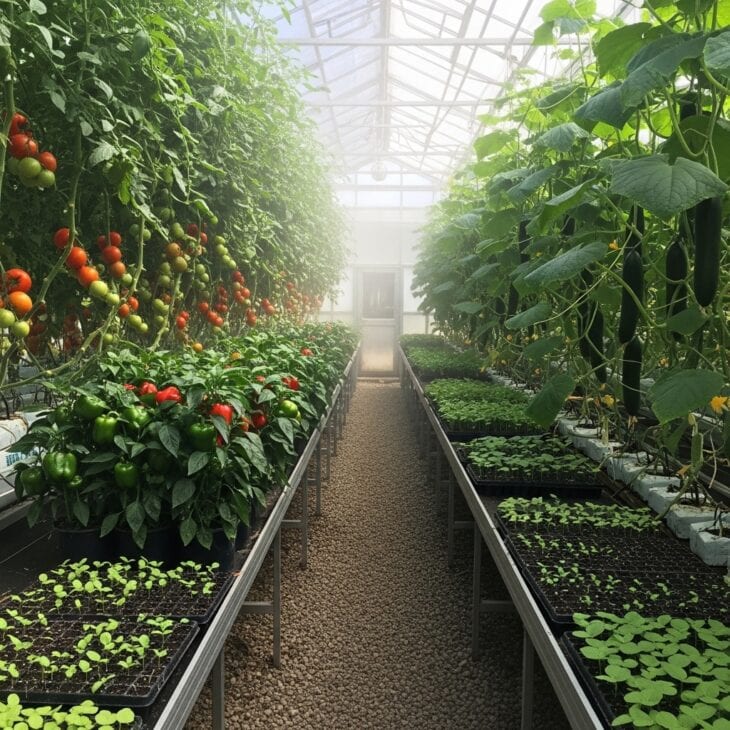
What you see The view down the central path of a greenhouse, staging on both sides loaded with tomatoes, peppers, cucumbers and trays of seedlings, the air warm and humid. Under cover, the growing season runs longer and the choice of crops grows wider.
Why it works A greenhouse or polytunnel is the single biggest upgrade you can make to a vegetable garden, giving you a warm, sheltered space to raise plants from seed, grow heat-lovers like tomatoes, peppers and chillies to perfection, and keep cropping deep into the cold months. It protects against frost, wind and the worst of the weather, and dramatically widens what you can grow. For the committed grower, it changes everything.
How to get it Choose the largest structure your space and budget allow, as you will always wish it were bigger, and site it in full sun on level ground running roughly north to south. A polytunnel gives the most growing space for the money, while a glass greenhouse looks neater and lasts longer. Fit good ventilation and shading for summer, since overheating is the main risk, and add water butts nearby to keep it irrigated through the growing season.
29. Create a Children’s Vegetable Patch
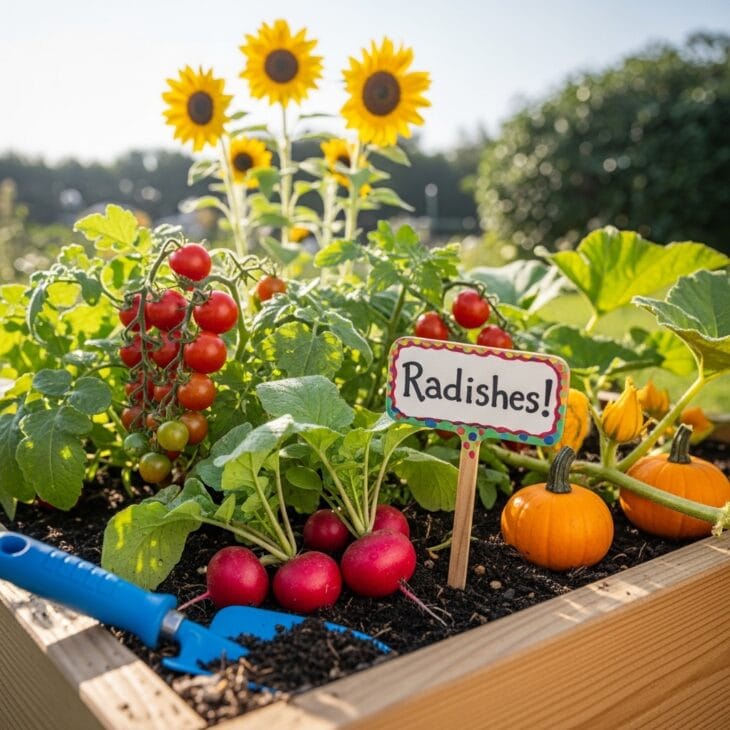
What you see A small, child-sized bed planted with the fun, fast and dramatic: fat radishes, cherry tomatoes, towering sunflowers and a pumpkin swelling by the day, with a hand-painted label and a little trowel left in the soil. It is a garden built for small hands and short attention spans.
Why it works A patch of their own gets children hooked on growing, and the trick is choosing crops that are quick to germinate, easy to succeed with, and exciting to harvest. Radishes are up in days, cherry tomatoes deliver sweet rewards by the handful, and giant sunflowers and pumpkins bring the wow factor that keeps young gardeners coming back. It teaches patience, responsibility and where food really comes from.
How to get it Give children a small, clearly bordered bed or a few big pots so the task feels manageable. Stick to reliable, rewarding crops: radishes (Raphanus sativus), cherry tomatoes, dwarf beans, sunflowers (Helianthus annuus) and a pumpkin for autumn drama. Use chunky seeds they can handle, let them water with their own little can, and add painted labels and markers to make it theirs. Keep it light and fun, and celebrate every harvest, however small.
30. Put a Compost Bay at the Heart of the Plot
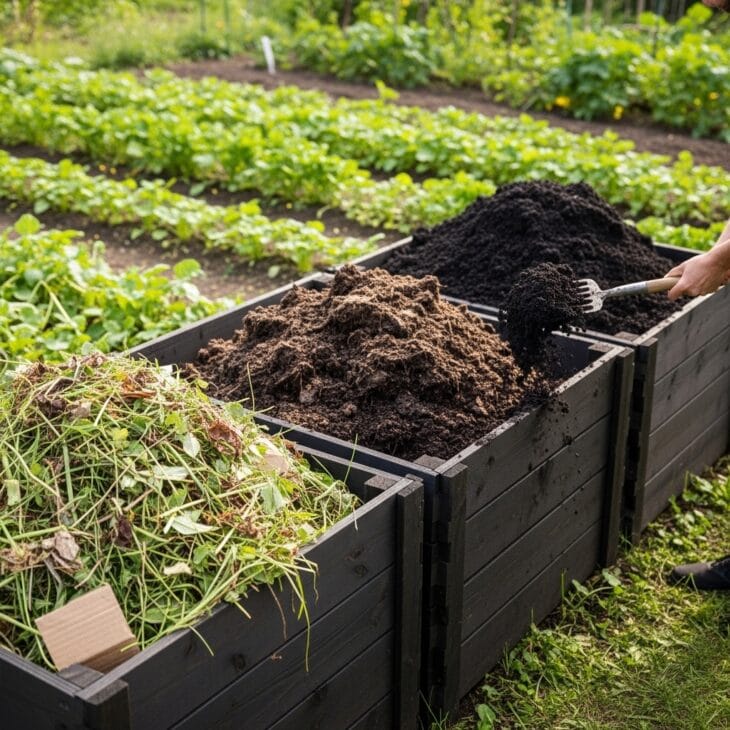
What you see A row of three timber bays at the edge of the plot: one heaped with fresh green and brown waste, one quietly rotting down, and one of dark, crumbly finished compost being forked out onto the beds. This is the engine room of a productive garden.
Why it works Compost is the foundation of a healthy, productive plot, and making your own turns a constant stream of kitchen scraps, weeds and spent crops into the richest soil improver there is, for free. A three-bay system lets you fill one while another rots and a third matures, so there is always finished compost ready to spread. It closes the loop, feeding the soil that feeds you and cutting your waste to almost nothing.
How to get it Build bays at least 3ft (90cm) square from timber or pallets, ideally three in a row, sited on bare soil so worms can move in. Balance soft green material like grass clippings and vegetable peelings with brown material such as cardboard, straw and dead leaves, roughly half and half, and turn the heap occasionally to speed it along. Keep it moist but covered, and in six months to a year you will have dark, sweet-smelling compost to mulch every bed on the plot.