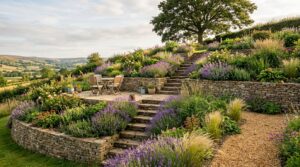
Gravel and cottage gardens might seem like opposites, yet they belong together. A gravel mulch keeps roots cool, suppresses weeds, and mimics the free-draining conditions that lavender, salvia, and achillea love, so the plants fill in faster and fuller than they would in bare soil. The result looks effortlessly romantic while quietly looking after itself.
Contents
- 01. Lavender-Lined Gravel Path
- 02. Self-Seeding California Poppy Drift
- 03. Mexican Feather Grass Cloud
- 04. Russian Sage and Ornamental Allium
- 05. Beth Chatto-Style Dry Border
- 06. Hollyhock and Rose Campion Bank
- 07. Echinacea and Black-Eyed Susan Prairie Mix
- 08. Catmint Cloud Along a Stone Wall
- 09. Sea Holly and Yarrow Coastal Gravel Border
- 10. Miss Willmott’s Ghost Biennial Display
- 11. Bearded Iris in Sun-Baked Gravel
- 12. Silver Foliage Gravel Garden
- 13. Box Topiary Balls on a Gravel Base
- 14. Rosemary and Sage Kitchen Gravel
- 15. Ornamental Allium Spring Spectacle
- 16. Cottage Front Garden Gravel Makeover
- 17. Blue Fescue and Fountain Grass Duo
- 18. African Daisy Hot Spot in Gravel
- 19. Myrtle Spurge Ground Cover
- 20. Gravel Seating Area with Cottage Planting
- 21. Olive Tree in a Gravel Courtyard
- 22. Sedum Tapestry Between Stepping Stones
- 23. Agave Focal Point with Cottage Companions
- 24. Shaded Gravel Corner with Sedge
- 25. Raised Bed and Gravel Path Potager
The 25 ideas here range from a full front-garden conversion to a single drought-tolerant border. Some rely on self-seeding annuals and tough perennials that any beginner can manage; others involve layering spring bulbs beneath summer perennials or pairing formal clipped box with loose naturalistic drifts. Whether your space is a sun-baked slope, a small courtyard, or a wide open border, there is something in this list for you.
Scan through and mark the ideas that match your climate, budget, and style. Most of the plantings below need very little water once established, so a thorough soak after planting is usually all it takes to get them started. Scroll for the full list, or jump to any idea that catches your eye.
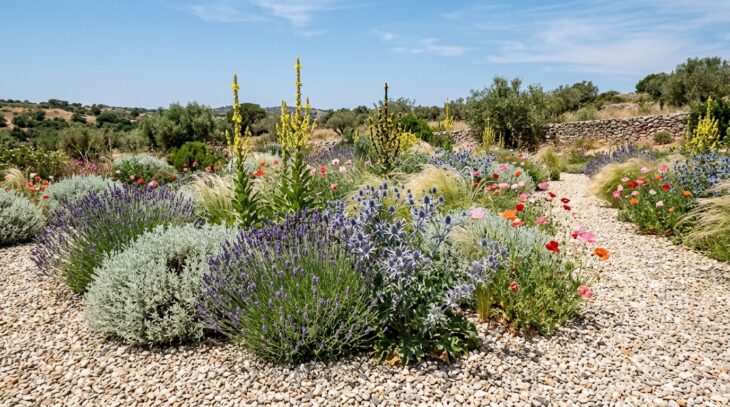
01. Lavender-Lined Gravel Path
What you see A gravel path disappears between two rows of lavender in full flower, the dense purple spikes almost meeting overhead and filling the air with fragrance. Pale buff chippings glow warm against the silver-grey lavender foliage, and bees work every flower head in the afternoon heat.
Why it works Lavender and gravel are natural partners. The sharp drainage the gravel provides keeps lavender roots from sitting in winter wet, which is the most common reason the plant dies in American gardens. Edging a path this way also turns a practical surface into a sensory feature, releasing fragrance every time someone brushes past the plants.
How to get it Space lavender plants 12 to 15in (30 to 38cm) apart along each side of the path, staggering the rows so the plants knit together naturally. ‘Hidcote’ (Lavandula angustifolia ‘Hidcote’) reaches around 18in (45cm) tall and wide, making it ideal for a narrow path. Lay a weed-suppressing membrane before spreading the gravel and cut crosses to plant through it. Trim the plants hard just after flowering each year to keep them compact and prevent them from going woody in the center.
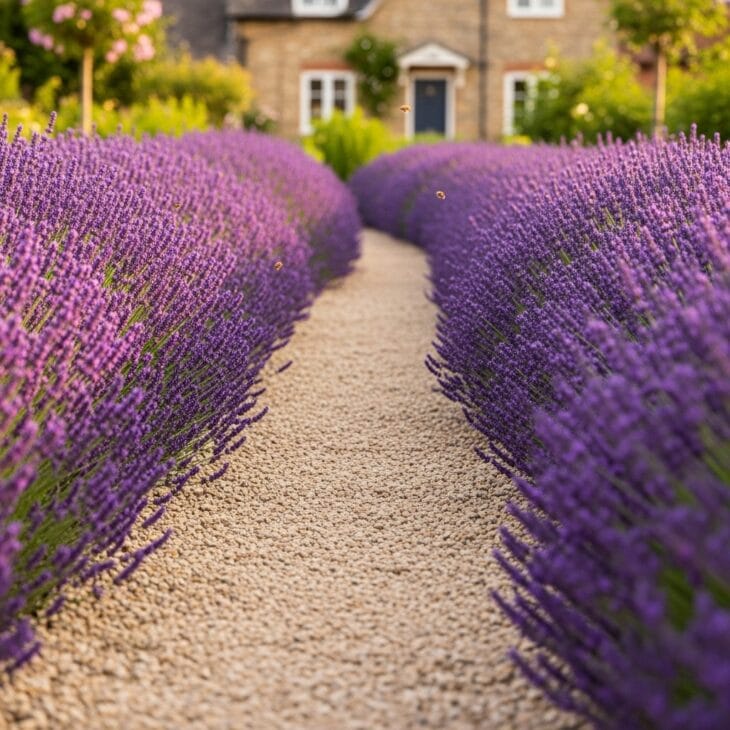
02. Self-Seeding California Poppy Drift
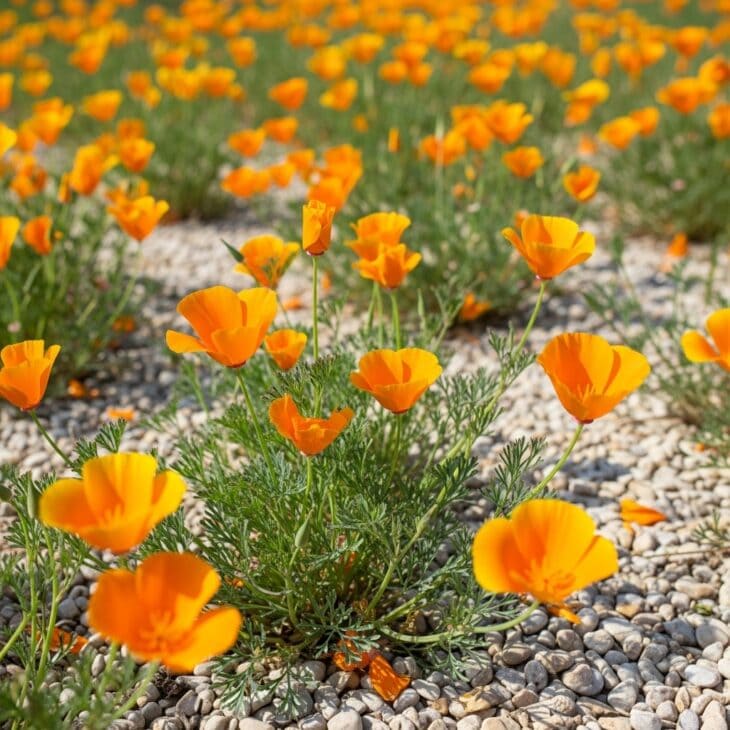
What you see Pools of orange and butter-yellow dance through the gravel all summer, the thin stems of California poppy threading up between the chippings without any help from the gardener. Each flower lasts a single day, but dozens more are always ready to open, giving a continuously renewing display from late spring through the first frosts.
Why it works California poppy (Eschscholzia californica) germinates best in disturbed, poor, free-draining soil, which describes a gravel mulch exactly. The seeds drop in summer, overwinter in the chippings, and sprout the following spring with no intervention needed. Over a few seasons the colony thickens and self-regulates, filling gaps and avoiding dense planting naturally.
How to get it Scatter seed generously over raked gravel in early spring, pressing it lightly into the surface. The seed needs light to germinate, so do not cover it. Thin seedlings to 6 to 8in (15 to 20cm) apart if they crowd, though you can usually let them compete on their own. Once the colony is established, it re-seeds reliably each year. For a classic cottage effect, scatter in a handful of common poppy (Papaver rhoeas) seed too.
03. Mexican Feather Grass Cloud

What you see From mid-spring onward, Mexican feather grass fills its corner of the garden with movement, the ultra-fine foliage turning from apple-green to gold as summer progresses. In low evening light the whole planting seems to glow, the individual blades catching the sun like threads of spun silk over the pale chippings below.
Why it works Gravel gives Mexican feather grass (Nassella tenuissima) the fast drainage it needs to thrive without rotting at the crown. The grass also self-seeds freely in gravel, so a single plant can produce a full drift within two seasons. Its fine texture makes an ideal foil for bolder plants: globe-shaped alliums, flat-headed achillea, and spiky sea holly all look more dramatic beside it.
How to get it Plant young transplants in groups of three or five in spring, spacing them 12 to 18in (30 to 45cm) apart, and they will fill the gaps through self-seeding. Note that this grass can become invasive in mild climates, particularly California and the Southwest, so check your state’s restricted plant list before buying. In cool climates it is fully hardy to around 5°F (-15°C). Divide crowded clumps every three years to keep them vigorous.
04. Russian Sage and Ornamental Allium
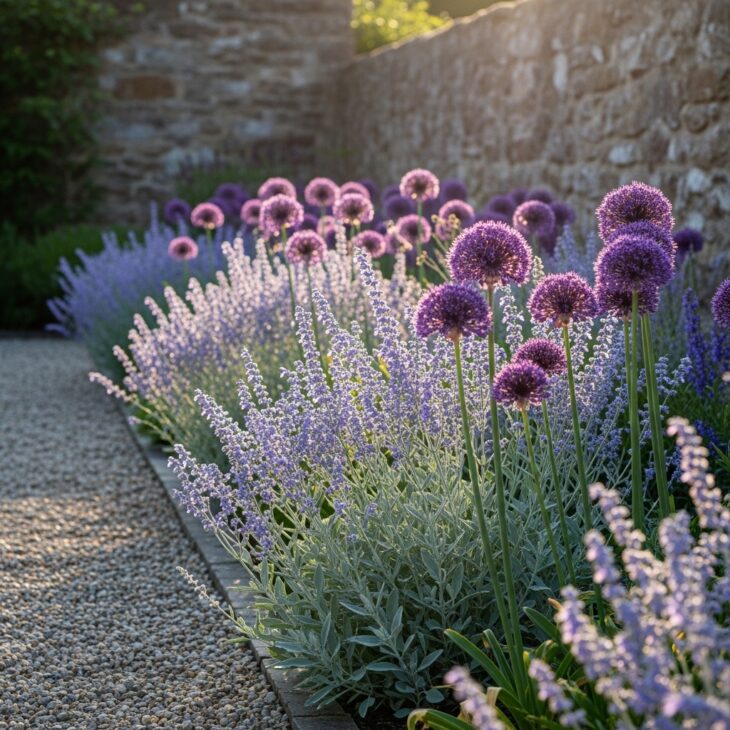
What you see Blue and purple hold the border from late June through August in this pairing, the haze of Russian sage spires drifting above pale gravel while the purple globes of ornamental allium catch the eye on their bare silver stems. On a still evening, the whole planting seems to float above the ground.
Why it works Ornamental allium (Allium spp.) flowers in late spring, then holds its seedheads through summer looking almost as good as the blooms. Russian sage arrives at that point to take over the display, so the two plants share the same space in the calendar, one handing off to the other without a visual gap.
How to get it Plant ornamental allium bulbs in autumn, 4 to 6in (10 to 15cm) deep and 6in (15cm) apart. For Russian sage (Perovskia atriplicifolia), choose a named variety such as ‘Blue Spire’ for the longest flowering period and cut it back hard to around 6in (15cm) in early spring. Both prefer full sun and excellent drainage, making a gravel mulch ideal. The combination looks best in front of a stone wall or a silvery-grey fence.
05. Beth Chatto-Style Dry Border
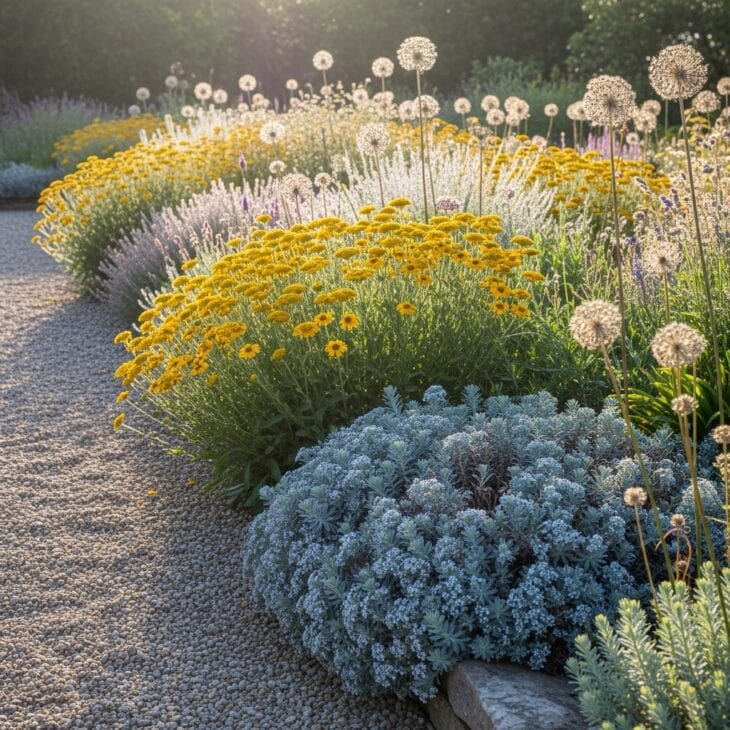
What you see This border takes its cue from Beth Chatto’s gravel garden in Essex, where the principle is simple: grow plants that are already suited to drought and let the gravel do the rest. Flat-headed yellow achillea hovers at mid-height, myrtle spurge tumbles over the front edge in acid-green flower, and allium seedheads rattle in the wind long after the blooms are spent.
Why it works Common yarrow (Achillea millefolium) and its named hybrids have evolved to thrive in poor, dry soil, so gravel is their ideal medium. The mulch reflects heat upward, warming the air around the foliage and preventing the fungal problems yarrow can develop in damp conditions. For a truly low-maintenance garden, this approach, choosing plants for the conditions rather than altering conditions for the plants, is the most honest way to garden.
How to get it Start with five or seven plants in the key structural roles: achillea for the mid-layer, myrtle spurge for the front edge, and tall salvias or ornamental grasses for height. Space these anchor plants 18 to 24in (45 to 60cm) apart and let the gaps fill naturally with self-seeders such as verbena bonariensis or California poppy. Apply a 3in (7.5cm) layer of gravel over a weed membrane. Avoid over-feeding, as rich soil encourages leggy, disease-prone growth in drought-tolerant plants.
06. Hollyhock and Rose Campion Bank
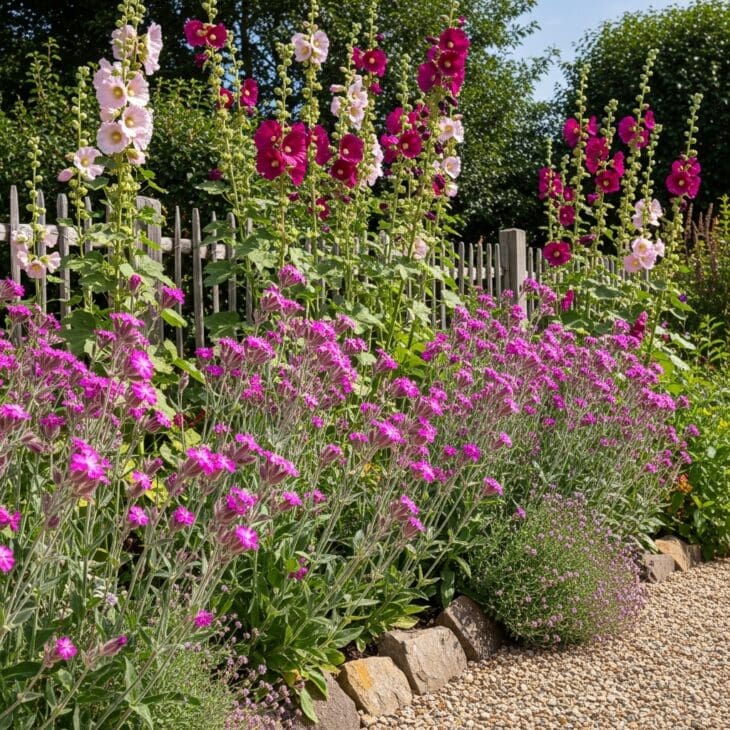
What you see A gravel bank in midsummer becomes a tower of color: hollyhocks reach up to 6ft (180cm) above the chippings, their saucer flowers stacked up the stem from base to tip, while shorter rose campion dots bright magenta saucers at knee height between them. The combination is unapologetically bold and exactly what a cottage gravel garden should look like.
Why it works Both plants are biennials or short-lived perennials, and both self-seed enthusiastically through gravel. Once planted, they typically maintain themselves from year to year, with seedlings appearing in the gaps between chippings and flowering the following summer. Rose campion (Lychnis coronaria) is particularly prolific: you rarely need to buy it twice.
How to get it Sow hollyhock (Alcea rosea) seeds in modules in late spring for flowers the following summer, or buy young plants in autumn. Set them 24in (60cm) apart at the back of the planting. Place rose campion 12 to 18in (30 to 45cm) apart in front. Both need a position with at least six hours of sun. Hollyhocks are prone to rust in wet conditions, so the sharp drainage of a gravel mulch keeps the foliage cleaner. Cut hollyhock stems back to the base after flowering to encourage fresh rosettes for next season.
07. Echinacea and Black-Eyed Susan Prairie Mix
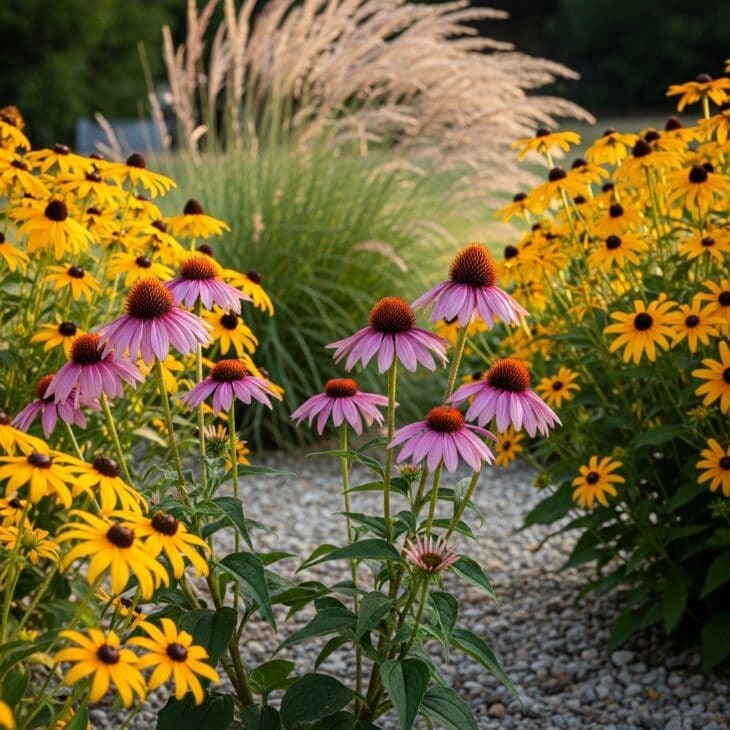
What you see From July to October this planting burns gold and pink: tall coneflowers in rosy purple hold their heads above the gravel while black-eyed Susans billow in bold golden waves at their feet. Bees and butterflies treat the whole area as a landing strip, making this one of the most wildlife-friendly combinations in the gravel garden.
Why it works Both plants are North American natives that evolved in dry prairies, so they are pre-adapted to the conditions a gravel mulch creates. Black-eyed Susan (Rudbeckia hirta) tolerates poorer soils than most garden flowers and its golden blooms last for weeks without deadheading. Plant them in drifts of five or seven each to create the naturalistic flow of a meadow translated into a cottage garden setting.
How to get it Plant pink coneflower (Echinacea purpurea) in spring or autumn, spacing plants 18 to 24in (45 to 60cm) apart. ‘Magnus’ has especially wide, flat ray petals that hold up well in windy spots. For black-eyed Susan, ‘Goldsturm’ is the most reliable perennial form; space it 15 to 18in (38 to 45cm) apart. Leave the seedheads standing over winter for the birds and for structural interest, then cut everything back in early spring before new growth begins.
08. Catmint Cloud Along a Stone Wall
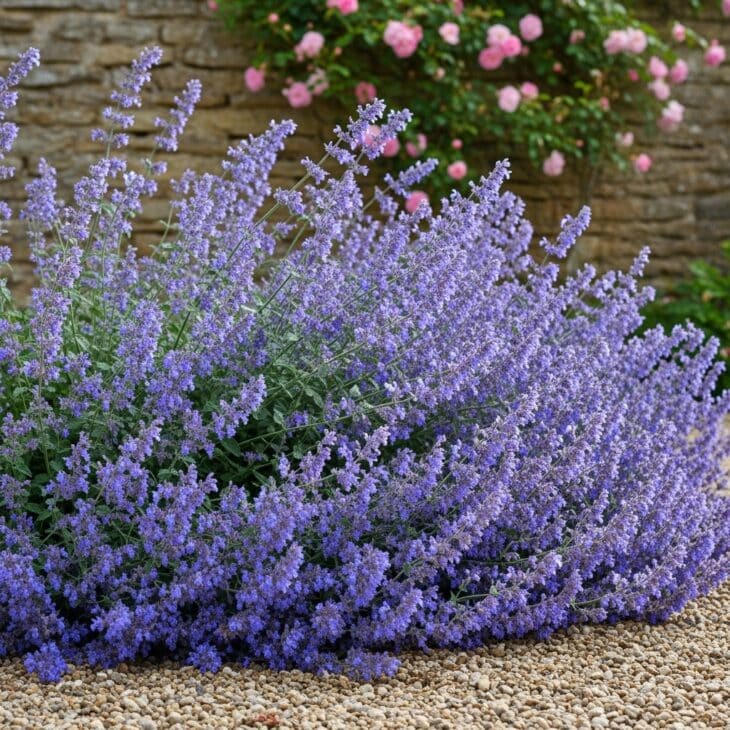
What you see In early summer a ribbon of lavender-blue catmint surges forward over the gravel from the base of the wall, the soft spikes leaning outward as the plants widen with bloom. By midsummer it has softened the wall’s hard line completely, creating the kind of effortless romantic effect that takes years to achieve with other plants.
Why it works Catmint thrives in heat and poor drainage, so a gravel mulch suits it perfectly. Its scent deters a range of common pests and attracts pollinators, which makes it a useful edging plant near vegetable beds and flower beds too. Cutting the whole plant back by half after the first flush of flowers in June triggers a second flush in August and September that is often just as good.
How to get it Plant catmint (Nepeta ‘Six Hills Giant’) in spring, spacing plants 18 to 24in (45 to 60cm) apart. This cultivar reaches around 24 to 30in (60 to 75cm) tall in full bloom; if space is tight, try the more compact ‘Walker’s Low’. For a classic cottage pairing, grow it in front of an old shrub rose or a climbing rose on the wall behind: soft purple-blue catmint beside a blush-pink rose is one of the most photographed combinations in the cottage garden.
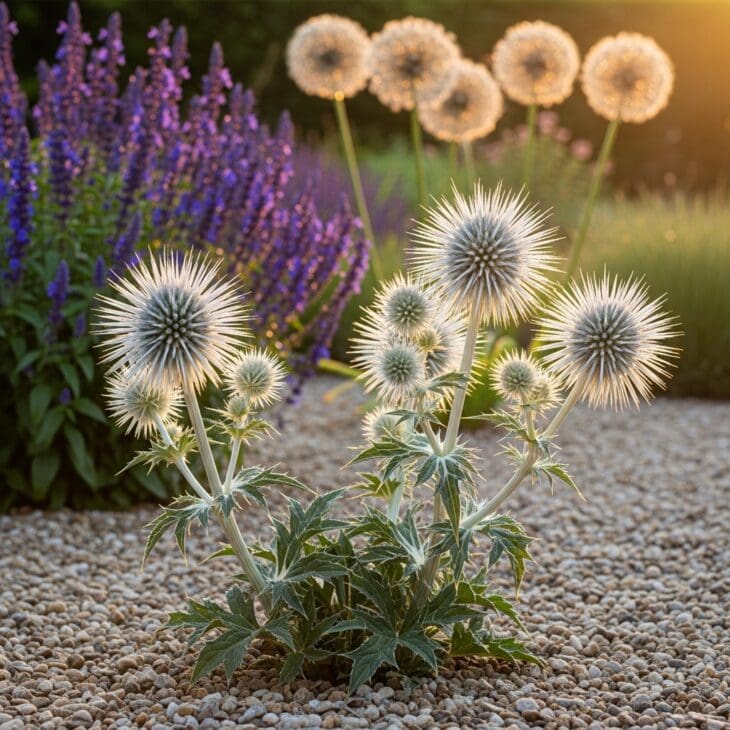
09. Sea Holly and Yarrow Coastal Gravel Border
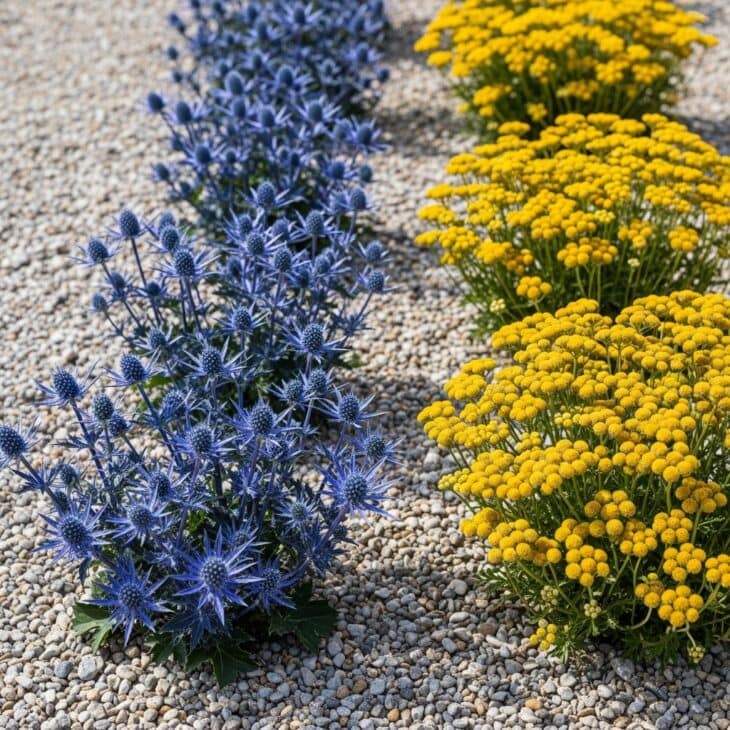
What you see Sea holly and yarrow are the blue and gold of the gravel border, holding their structure even when the flowers are over. The architectural spines of sea holly catch the light in metallic silver-blue, while flat-headed yarrow spreads its golden discs at a lower level, creating a strong two-layer composition that holds from June through the first frosts.
Why it works Both plants evolved in coastal or stony habitats and are among the most drought-tolerant perennials available. Sea holly (Eryngium maritimum) develops a deep taproot that makes it nearly indestructible once established, but it resents being moved, so plant it in its permanent position from the start. The blue and gold combination also attracts a wide range of pollinators, making this a popular approach in wildlife-focused garden border ideas.
How to get it Plant sea holly and yarrow in spring in full sun with sharp drainage. Space sea holly 12 to 18in (30 to 45cm) apart and handle the roots gently at planting time, as they dislike disturbance. For yarrow, ‘Moonshine’ (pale yellow) and ‘Gold Plate’ (deep gold, 4ft/120cm) are both reliable gravel-garden performers. Deadhead yarrow regularly to extend flowering, or leave the seedheads for winter texture. Both plants look good through the colder months if left standing.
10. Miss Willmott’s Ghost Biennial Display
What you see Miss Willmott’s Ghost (Eryngium giganteum) is the ghost of the gravel garden in every sense: its large silver-white bracts glow with an almost metallic light in the evening sun, and it disappears after flowering, leaving only its seedlings to carry on the display the following year. In its second summer a single plant can reach 4ft (120cm) and spread its bracts to 12in (30cm) across.
Why it works As a biennial, this eryngium follows a two-year cycle: seeds germinate in the gravel and produce flat rosettes in year one, then tall flowering stems in year two, before the plant dies and sets fresh seed. Once the colony is established, there are always plants at both stages, giving continuous interest. The gravel surface is essential for germination, as the seed needs the drainage and surface stability the chippings provide.
How to get it Scatter fresh seed directly onto the gravel surface in late summer or early autumn while the soil is still warm. Press it lightly into the chippings and water once. Do not cover the seed; it needs light to germinate. Thin seedlings to 18in (45cm) apart once they are large enough to handle. After flowering, shake the dried seedheads over the gravel to distribute next year’s plants. The colony takes two seasons to reach its full visual impact, but the wait is worth it.
11. Bearded Iris in Sun-Baked Gravel
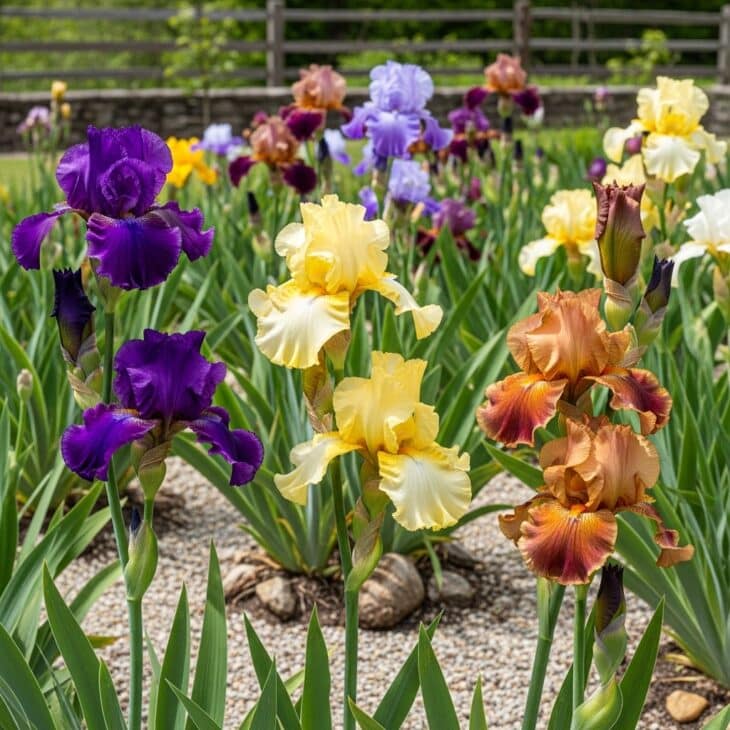
What you see Bearded iris (Iris germanica) in full bloom is one of the most elaborate sights in any garden: ruffled petals in every shade from white to near-black, each fall petal bearing the distinctive fuzzy stripe that gives the group its name. In a gravel garden, the fat rhizomes bask on the surface of the chippings, soaking up the reflected heat, and the result is a better flowering performance than you get in most border soils.
Why it works Bearded iris need their rhizomes baked by the sun to flower reliably. When planted in ordinary border soil, rhizomes are often buried too deep or shaded by neighboring plants, and the iris sulks without blooming. Sitting proud on top of pale gravel in full sun is exactly the condition they prefer. The excellent drainage also prevents the bacterial soft rot that destroys iris in persistently wet ground.
How to get it Plant rhizomes in midsummer, setting them on the surface of the gravel with their roots below and the top of the rhizome fully exposed to sunlight. Space them 12 to 18in (30 to 45cm) apart, all facing the same direction for a tidy look. Choose a mix of early-, mid-, and late-season varieties to extend the display across six to eight weeks in May and June. After flowering, remove the spent stalks but leave the foliage until it dies back naturally. Divide congested clumps every three to four years in late summer.
12. Silver Foliage Gravel Garden
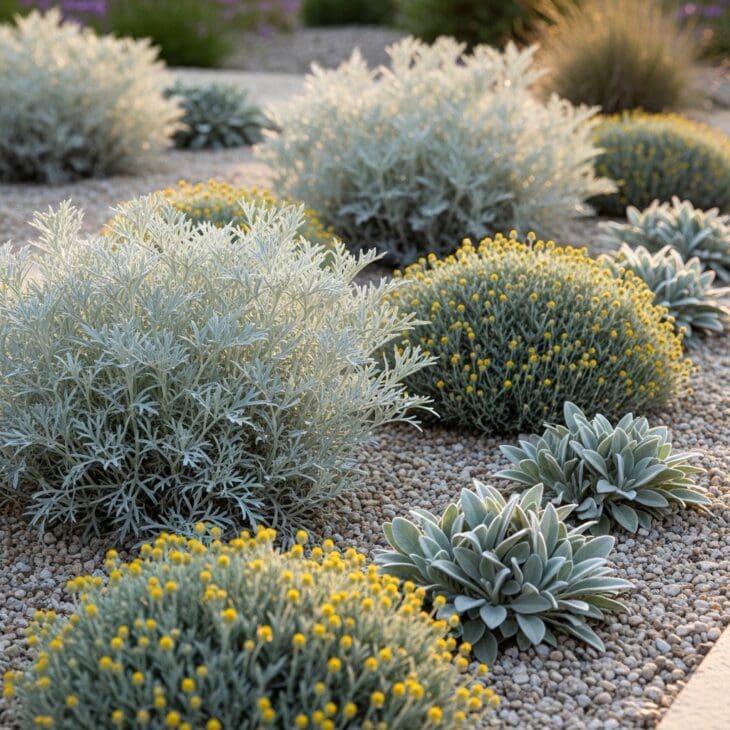
What you see Silver and grey hold this garden together through summer and well into autumn, a quiet composition of contrasting leaf textures that catches the eye without demanding attention. Absinthe wormwood (Artemisia absinthium) provides the finest, most feathery silver of the group, while lamb’s ears contribute broad, softly felted pads and cotton lavender (Santolina chamaecyparissus) rounds it off with its button flowers and filigree foliage.
Why it works Silver-leaved plants have evolved to reflect sunlight and lose as little water as possible through their leaves, which means they are among the most drought-tolerant plants a gravel garden can contain. They also work beautifully as a foil for bolder companions: a single purple salvia or deep pink rose planted among them reads far more richly than it would against ordinary green foliage.
How to get it Build the planting around four or five silver or grey-leaved plants with contrasting leaf shapes and textures: feathery artemisia, felted lamb’s ears, filigree cotton lavender, and the tighter mound of blue catmint. Plant in full sun in late spring and lay a 2 to 3in (5 to 7.5cm) gravel mulch around each plant as you go. Clip artemisia and santolina lightly in late spring to prevent them from becoming leggy, and replace them every three or four years when they start to open up in the center.
13. Box Topiary Balls on a Gravel Base
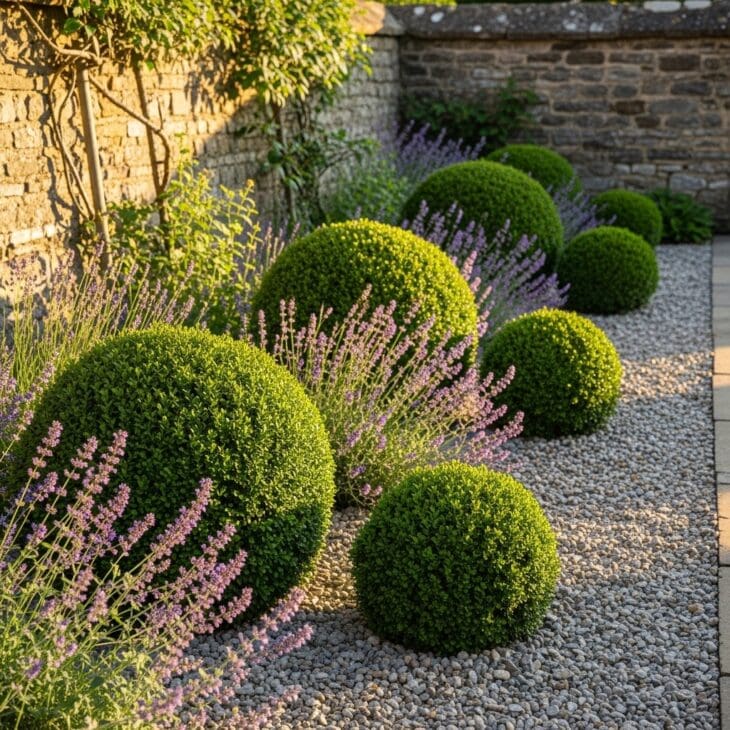
What you see Globe-shaped box balls in various sizes sit among loose drifts of lavender and catmint in pale gravel, the combination of crisp geometry and relaxed planting creating the tension that makes cottage garden design so appealing. The gravel surface ties the formal and informal elements together, giving the whole composition a cohesive ground plane.
Why it works Gravel is an ideal mulch around box because it keeps the foliage dry at the base, reducing the humidity that encourages box blight. The contrast between the controlled, dense sphere of the topiary and the loose informality of the surrounding planting is a classic cottage garden move, and it works especially well in small garden spaces where a single bold topiary shape can anchor a corner without taking up much ground area.
How to get it Buy common boxwood (Buxus sempervirens) as pre-formed balls, available from around 8in (20cm) upward, and plant into the gravel after cutting a cross in the membrane. Apply a balanced slow-release fertilizer in spring. Clip into shape once or twice a year in late spring and early autumn. If box blight is a concern in your area, switch to dwarf Japanese holly (Ilex crenata ‘Convexa’), which provides an almost identical look with much better disease resistance.
14. Rosemary and Sage Kitchen Gravel

What you see Rosemary (Salvia rosmarinus) in full flower is a cloud of blue-lilac in the spring kitchen garden, its narrow grey-green leaves releasing their resinous scent every time a hand brushes past. Beside it, culinary sage spreads its broad purple-tinged leaves over the gravel, and between the two a stepping stone path allows close-up access for harvesting.
Why it works Herbs thrive in the conditions a gravel mulch creates: heat, sharp drainage, and no standing water at the crown. Sage (Salvia officinalis) has its origins in the dry hillsides of the Mediterranean, and rosemary evolved in similar coastal-cliff habitats. Grouping them on gravel near the kitchen door puts the two most-used cooking herbs within arm’s reach with almost no maintenance effort.
How to get it Plant rosemary and sage in spring in full sun with at least six hours of direct light. Space rosemary 24 to 36in (60 to 90cm) apart, as it can spread generously. Sage should go 18 to 24in (45 to 60cm) apart. Both are hardy in zones 6 to 10, though rosemary can be borderline in zone 6 winters; move container-grown plants indoors or protect in situ with a cloche in hard freezes. Harvest regularly to keep the plants compact, and replace sage every three to four years once it becomes too woody to clip back.
15. Ornamental Allium Spring Spectacle
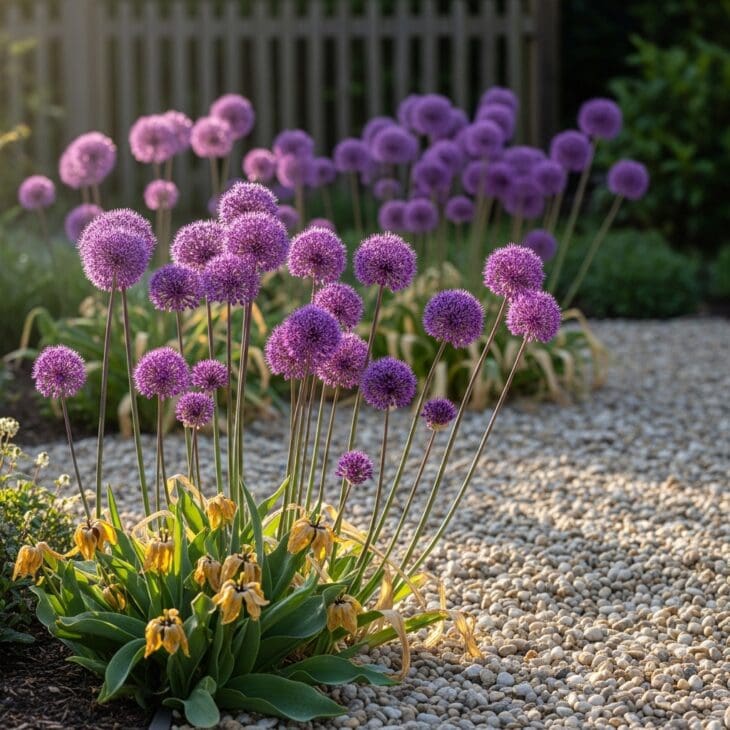
What you see In late May and June, purple spheres on bare stems rise from the gravel in a natural drift, each globe made up of dozens of tiny star-shaped flowers. As they fade to papery brown seedheads they remain worth keeping: the architectural forms stay attractive well into summer and rattle pleasantly in a breeze alongside the emerging foliage of later perennials.
Why it works Ornamental alliums need sharp drainage to prevent the bulbs from rotting over winter, making gravel an ideal planting medium. The bare stems that appear after flowering, which can look untidy in a border, are almost invisible when the neutral gravel acts as a backdrop and surrounding perennials fill in around them. For a simple but beautiful low-level companion, try blue fescue (Festuca glauca): its ice-blue mounds complement the purple globes exactly.
How to get it Plant ornamental allium bulbs in autumn, 3 to 4in (7.5 to 10cm) deep and 4 to 6in (10 to 15cm) apart. ‘Purple Sensation’ reaches about 24in (60cm) and is one of the richest-colored varieties. For a longer display, layer in earlier-flowering ‘Mount Everest’ (white, late May) and later ‘Globemaster’ (large purple globes, June into July). Leave the seedheads standing as long as they hold their form, as they add at least eight weeks of interest after flowering ends.
16. Cottage Front Garden Gravel Makeover

What you see What was once a tired lawn square is now a naturalistic meadow in gravel, the planting so relaxed it looks as though it grew there by accident. Lavender, catmint, and drifts of ornamental grass fill the front space with color, texture, and scent, while the pale gravel beneath ties it all together and reflects light toward the house facade on overcast days.
Why it works Replacing a small front lawn with gravel and cottage planting reduces water use, eliminates mowing, and adds year-round interest where before there was none in winter. It also increases the garden’s permeability, allowing rain to soak into the ground rather than running off hard surfaces into the drains. The best front garden ideas today often revolve around exactly this kind of low-maintenance, high-impact swap.
How to get it Remove the lawn, ideally by sheet mulching with cardboard for six to twelve months before converting. Lay a permeable landscape fabric and top with 2 to 3in (5 to 7.5cm) of decorative chippings. Plant through crosses cut in the membrane. Choose three to five varieties and plant each in drifts of five or seven for a naturalistic look: English lavender, catmint ‘Walker’s Low’, and blue fescue work well as a trio. A low picket fence or a line of low box hedging at the boundary gives the planting a clear cottage character.
17. Blue Fescue and Fountain Grass Duo
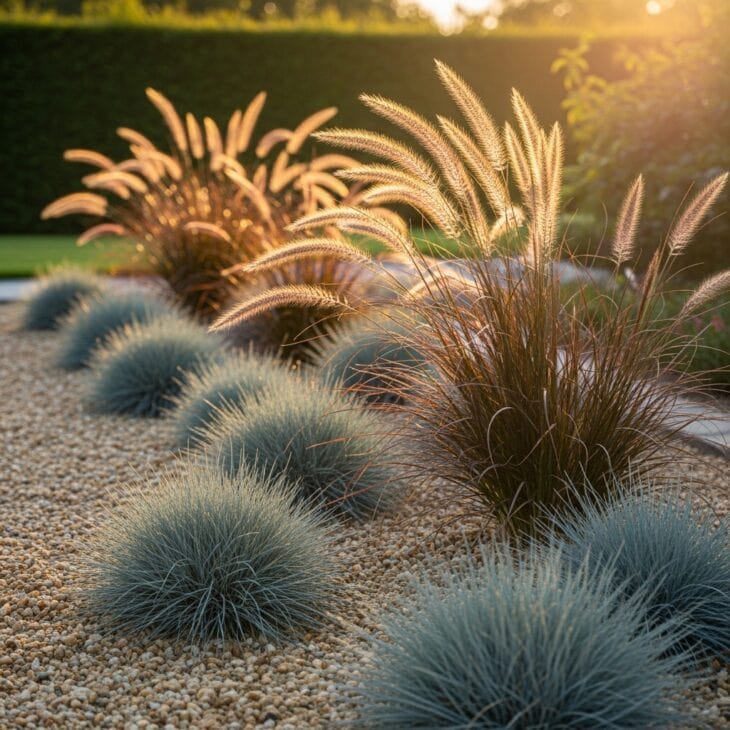
What you see Two grasses in contrasting shapes and sizes create a low-key composition that looks good every month of the year. Compact ice-blue mounds of blue fescue sit at the front of the planting, and behind them fountain grass sweeps upward in arching stems that bear bottlebrush plumes from late summer through winter, catching the light in bronze and gold.
Why it works Both grasses perform at their peak in the sharply drained conditions a gravel mulch provides. Fountain grass (Pennisetum alopecuroides) puts on its most dramatic display of autumn color and plumes in full sun over gravel, and the pairing of a low foreground plant with a taller background plant follows a basic principle of layered planting that gives even a two-plant combination real depth.
How to get it Plant blue fescue in groups of three or five, spacing them 10 to 12in (25 to 30cm) apart. Fountain grass needs more room: 18 to 24in (45 to 60cm) between plants. Both prefer full sun to light shade. Divide blue fescue every two to three years as the center portions tend to die out. Cut fountain grass back to the ground in late winter before new growth begins. In zone 6 and colder, cover fountain grass roots with a generous layer of grit or coarse gravel over winter to reduce frost damage.
18. African Daisy Hot Spot in Gravel
What you see African daisies turn the front edge of the gravel border into a carpet of color from late spring to autumn, the weather-facing flowers opening wide in sun and closing at dusk. In white, lilac, and deep purple forms they read like a continuous drift of daisies, cheerful and prolific, and they never look as good as they do against the pale neutral backdrop of gravel chippings.
Why it works African daisy (Osteospermum spp.) is native to South Africa and thrives in exactly the open, dry, sunny conditions a gravel bed provides. The drainage that gravel gives prevents the crown rot that can kill these plants in wetter soils, particularly over winter. In mild climates (zones 9 to 11) they are perennial; in colder zones they perform as half-hardy annuals, giving a full season of color before the first frost.
How to get it Set out transplants after the last frost date in your area, spacing them 12 to 15in (30 to 38cm) apart. Deadhead regularly to keep flowering going through the summer months. In zone 8 and warmer, plants can overwinter in the gravel with a dry mulch over the crown. Take softwood cuttings in late summer to ensure plants for next season. For the best color range, buy a mixed pack of named varieties such as ‘Voltage Yellow’, ‘Soprano Purple’, and ‘Bride’ (white).
19. Myrtle Spurge Ground Cover
What you see In late winter and early spring, myrtle spurge (Euphorbia myrsinites) is often the first plant to bring the gravel garden to life. The semi-evergreen succulent stems radiate outward over the chipping surface, their blue-grey leaves arranged in tight spirals, and each stem tip ignites with a cluster of acid-yellow-green bracts that glow against the cold grey of the gravel.
Why it works Myrtle spurge is one of the few plants that genuinely thrives in the harshest gravel conditions: full sun, no additional water, and zero soil fertility. It stores water in its succulent blue-grey leaves and can survive on rainfall alone once established. The spreading stems also knit together to cover the ground and suppress weeds, making it useful as a low, weed-smothering edge plant along paths and borders.
How to get it Plant in spring or autumn in full sun. Space plants 12 to 18in (30 to 45cm) apart. After the bracts fade in late spring, cut the stems back by half to keep the plant compact and prevent it sprawling into neighboring plants. Wear gloves when handling, as the milky sap is a skin irritant. Note that myrtle spurge is classified as invasive in some western states, so check your local restrictions before planting.
20. Gravel Seating Area with Cottage Planting
What you see A gravel surface takes the seating area from a patch of bare patio to a courtyard that feels embedded in the garden. Lavender and catmint blur the edge between the sitting space and the planted border, and on a warm evening the scent from both plants drifts over the table as naturally as if you were sitting in an old kitchen garden.
Why it works Gravel is one of the best surfaces for a relaxed seating area because it is level, self-draining, and inexpensive to lay compared to paving. Unlike hard surfaces, it allows water to drain freely so puddles are not an issue after rain. The planted edges also attract insects and birds, turning an outdoor meal into a minor nature-watching event. For even more outdoor living inspiration, see these patio garden ideas.
How to get it Lay at least 3in (7.5cm) of compacted gravel over a permeable membrane for a seating area, using a slightly coarser grade than you would for a planted border so it does not scatter underfoot. Angular 6mm chippings work better than round pea gravel, which shifts under chair legs. Frame the seating with planting on at least two sides, keeping the most fragrant plants, lavender, rosemary, and jasmine, closest to where people will be sitting.
21. Olive Tree in a Gravel Courtyard
What you see A generous terracotta pot holding a mature olive tree stands at the center of a pale gravel courtyard, its silver-green leaves catching the light above low skirts of lavender and rosemary planted directly into the chippings. The contrast between the rough grey bark, the warm terracotta, and the pale gravel is quietly beautiful, and the courtyard smells of herbs and warm stone on a summer afternoon.
Why it works Olive trees are among the most drought-tolerant specimen plants available, so a gravel courtyard is their natural habitat. Growing the tree in a large pot allows it to be moved under cover during severe winters (below around 14°F or -10°C, the wood can suffer frost damage), while the surrounding gravel reflects heat and light that keep the canopy happy through the growing season. For more ideas using pots and planters, see these container garden ideas.
How to get it Choose an established olive tree in a pot at least 18in (45cm) across; smaller trees establish quickly but need a few seasons to make a visual impact. Use a free-draining loam-based potting mix and add extra grit. Feed once in spring with a balanced fertilizer. In zone 8 and colder, move the pot into an unheated greenhouse or garage over winter. The cultivar ‘Arbequina’ is compact, reasonably hardy, and produces edible fruit in warm climates. Browse the full range in this guide to olive tree varieties.
22. Sedum Tapestry Between Stepping Stones
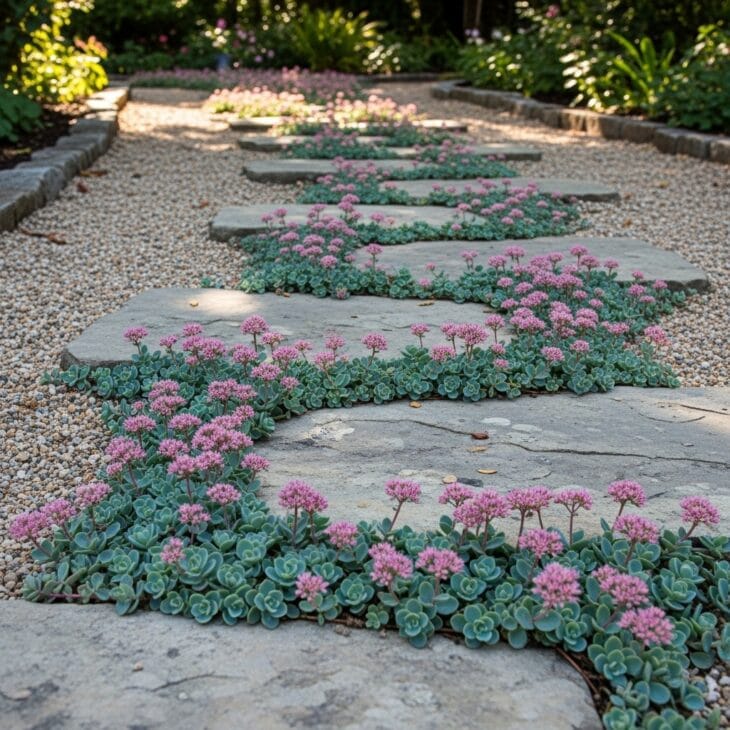
What you see Wide flat stones set on pale gravel create a path that is as much a garden feature as a practical route. In the gaps between the stones, October Daphne Stonecrop (Sedum sieboldii) spreads its circular pink flowers and blue-grey leaves in a low-profile tapestry from late summer through autumn, filling the path with color at the best time of year.
Why it works Sedum sieboldii is one of the few plants that tolerates being walked close to, and it positively thrives in the heat and drainage a gravel-and-stone path creates. Unlike creeping thyme, which can look patchy in wet winters, this sedum reliably returns year after year in most US climates. Its pink and blue-grey color scheme ties naturally with most gravel colors and looks particularly good against warm buff-toned chippings.
How to get it Plant sedum divisions or plug plants in early spring between the stepping stones, pressing them into the gravel surface. One plant per gap is usually enough, as each division spreads to fill a 6 to 8in (15 to 20cm) area within a season. No additional water is needed after the first season except during extreme drought. Lift any sedum that creeps too far onto the stones and replant it in a gap further along the path.
23. Agave Focal Point with Cottage Companions
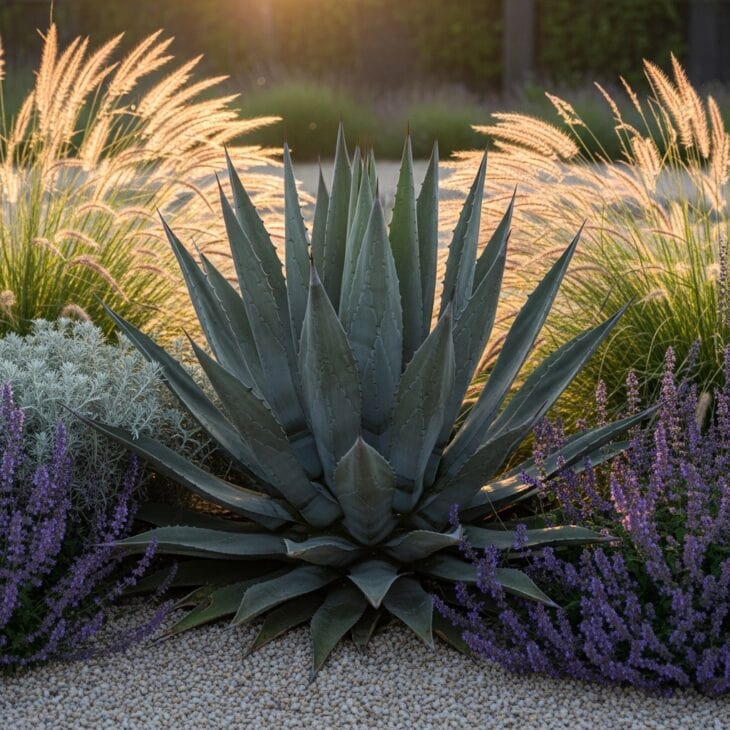
What you see A single agave at the center of a pale gravel bed gives the cottage garden something it often lacks: a structural focal point that commands attention from across the garden. The spiky blue-grey rosette, up to 4ft (120cm) across in a mature specimen, anchors the whole planting and gives the surrounding soft companions, feather grasses, artemisia, and catmint, something dramatic to play against.
Why it works Agave is one of the most drought-tolerant plants in existence, so a gravel bed is its natural medium. In cottage gardens, the secret to using a bold architectural specimen without it looking out of place is to surround it with plants that soften its outline: loose grasses swaying in front, billowing artemisia to either side, and low catmint that blurs the agave’s hard base with a wash of blue-purple. The result is both dramatic and romantic.
How to get it Choose a cold-hardy agave for most US gardens. Agave parryi (Parry’s agave) is one of the hardiest, tolerating temperatures as low as 0°F (-18°C) and reaching 2 to 3ft (60 to 90cm) across. Plant in full sun in gravel over at least 12in (30cm) of free-draining grit. Start with the largest plant you can afford for immediate impact, as agaves are slow-growing. Keep the spiky leaf tips well away from paths and play areas.
24. Shaded Gravel Corner with Sedge
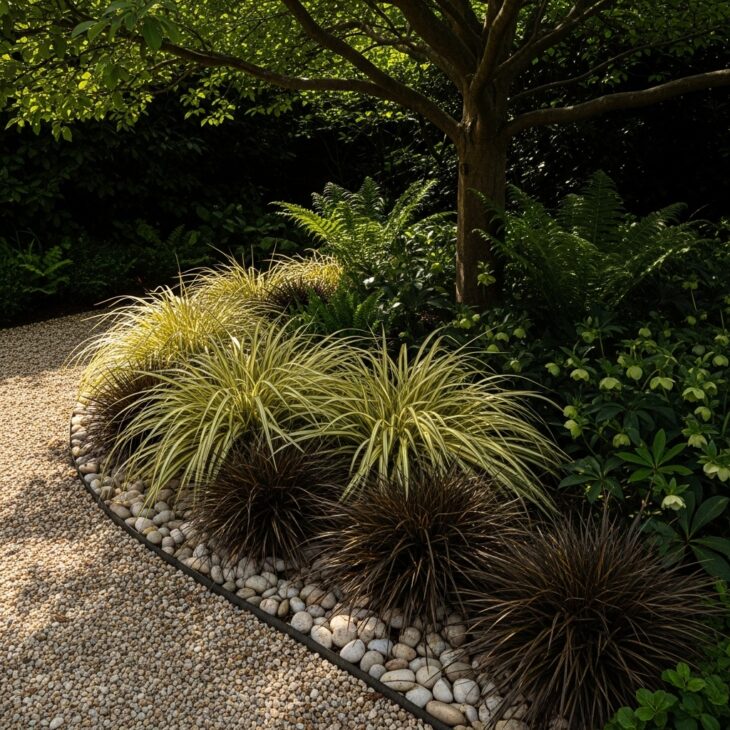
What you see A dark corner under an overhanging tree becomes a restful composition when gravel and sedge take over. Golden-leaved Japanese sedge (Carex oshimensis ‘Evergold’) arches in tight tussocks, its cream-and-green striped blades catching whatever light filters through, while bronze sedge (Carex comans ‘Bronze’) beside it adds a warm copper note. The pale gravel below reflects light upward and keeps the area from feeling gloomy.
Why it works Most gravel gardens are sunny by nature, but a dry shaded spot under a tree is one of the hardest problems in gardening. A gravel mulch here suppresses surface roots from breaking through while still allowing water to reach the tree roots, and sedges, which evolved in the edge habitats of woodland streams, bridge the gap between full sun and deep shade. For more planting ideas for difficult dark corners, see these shade garden ideas.
How to get it Plant Carex oshimensis ‘Evergold’ and Carex comans ‘Bronze’ in spring, spacing clumps 12 to 18in (30 to 45cm) apart. Both are evergreen and need no cutting back, though you can run a gloved hand through the tussock in spring to remove dead blades. Add hellebores (Helleborus orientalis) as early-flowering companions since they thrive in identical conditions. Use a pale limestone chipping rather than dark gravel in shaded areas to maximize the light-reflecting effect.
25. Raised Bed and Gravel Path Potager
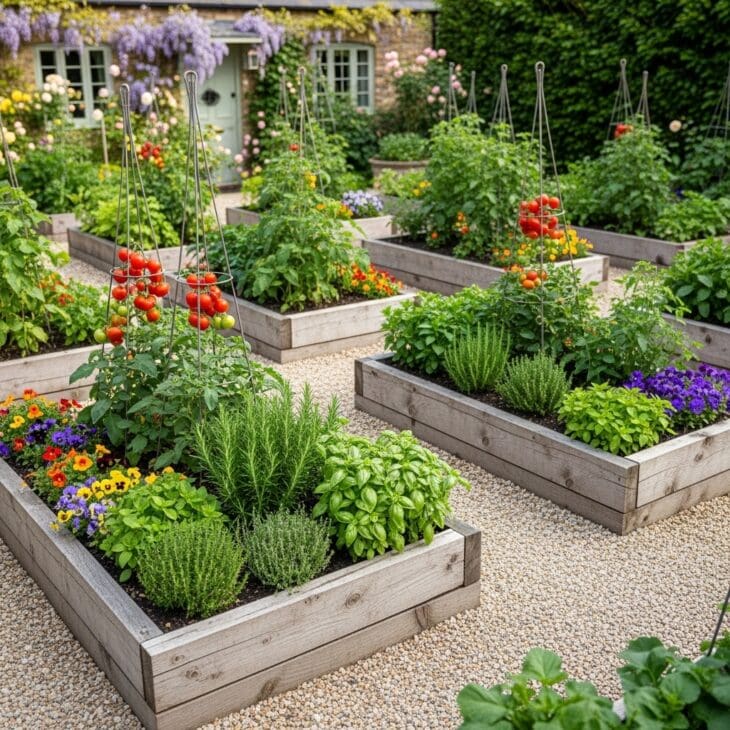
What you see A traditional potager layout, raised beds of timber or stone filled with vegetables and herbs, becomes both more practical and more beautiful when gravel fills the paths between the beds. The pale chippings keep mud off boots and off the vegetable foliage, reflect light into the bed edges, and give the whole kitchen garden a structured, cared-for look without any paving cost.
Why it works Gravel paths between raised beds solve several problems at once: they drain freely so the paths stay dry after heavy rain, they are inexpensive to install compared to paving or bark, they warm the soil a few degrees near the bed edges, and they make a clean neutral backdrop that sets off the vegetables and flowers beautifully. Pair this approach with one of these raised bed garden ideas for a highly productive cottage potager.
How to get it Set the raised beds with 18 to 24in (45 to 60cm) paths between them, which is just wide enough for a wheelbarrow. Lay landscape fabric over the path areas first, then apply 2in (5cm) of angular gravel such as 6mm limestone or granite chipping. Press the gravel firmly for a stable working surface. Replenish the gravel every two to three years as it settles and compacts. Fill the raised beds with a rich compost mix: the contrast between the fertile bed soil and the lean gravel paths is exactly right for a productive and beautiful potager.