By the time the tomatoes start splitting and the zucchini finally slows down, most vegetable gardens look finished. They aren’t. Fall is when kale turns sweet, carrots pack on sugar in the cold, and lettuce grows without bolting or turning bitter, so some of the best eating of the year comes after Labor Day.
Contents
- 01. Succession-Sown Salad Bed
- 02. Rainbow Chard and Lacinato Kale Row
- 03. Raised Beds Under Low Hoop Tunnels
- 04. Cold Frame of Winter Spinach and Mâche
- 05. Garlic Bed Tucked Under Straw
- 06. Broccoli and Cauliflower Under Insect Netting
- 07. Frost-Sweetened Carrots and Beets
- 08. Patio Pots of Kale, Lettuce and Chard
- 09. Front-Yard Potager of Kale, Chard and Violas
- 10. Leeks Standing Tall into Winter
- 11. Asian Greens Bed of Bok Choy, Tatsoi and Mizuna
- 12. Cover Crop Blanket for Resting Beds
- 13. Late-Sown Snow Peas on a Trellis
- 14. Brussels Sprouts Sweetened by Frost
- 15. Southern Collards and Mustard Greens
- 16. Pumpkin and Winter Squash Harvest Patch
- 17. Parsnips and Carrots Stored in the Ground
- 18. Cool-Season Herb Corner
- 19. Salad Window Box on a Balcony Railing
- 20. Spinach and Radishes Sown Under Tomatoes
- 21. Radicchio and Endive for Winter Salads
- 22. Fall-Planted Strawberries for a Spring Crop
- 23. Fava Beans Sown to Overwinter
- 24. Sweet Potato Dig at Summer’s End
- 25. Leaf Lasagna Bed for Next Year
The ideas below cover the whole range: quick crops you can still sow this week, long-season plantings to plan next summer, and simple setups that stretch the harvest into winter. There are ideas for a single window box and for a full backyard plot, for Northern gardens racing the first frost and for Southern ones where fall is the main growing season. Some cost nothing but a packet of seed; others, like a cold frame or a hoop tunnel, are a weekend project that pays you back for years.
Each idea explains what you are looking at, why it works, and exactly how to grow it, with varieties, spacing and timing. Look up your average first frost date before you start, since almost every fall crop is timed backward from it, then pick the ideas that suit your climate and your space.
01. Succession-Sown Salad Bed
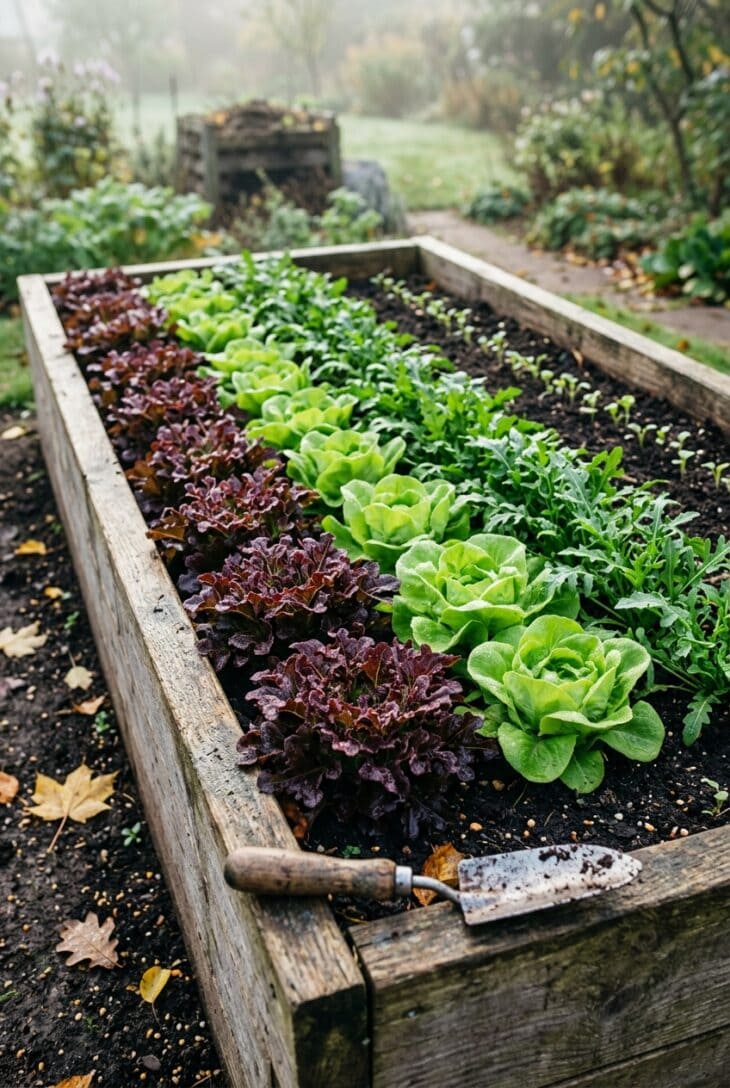
What you see A wooden raised bed striped with salad greens in the early morning, dew still on the leaves. Burgundy oakleaf lettuce sits beside a row of soft green butterheads, then a band of peppery arugula, then a row of seedlings barely an inch tall. It looks like one planting, but it is really four, sown a couple of weeks apart.
Why it works Salad greens are the fastest crop in the fall garden, and cool weather is what they like best. In summer, lettuce bolts and turns bitter; in September and October it grows steadily and stays sweet. Sowing a short row every 10 to 14 days means there is always a row ready to cut and another coming on, instead of a glut followed by nothing.
How to get it Start sowing 8 to 10 weeks before your first frost and keep going until about 4 weeks before it. Lettuce seed germinates poorly in soil above about 80°F (27°C), so sow in the evening, water well and lay a board or shade cloth over the row until the seedlings appear. Choose cold-tolerant lettuce (Lactuca sativa) such as ‘Winter Density’, ‘Rouge d’Hiver’ and ‘Buttercrunch’, plus arugula (Eruca vesicaria subsp. sativa), which shrugs off light frost. Thin lettuce to 6in (15cm) apart for baby leaves or 10in (25cm) for full heads. Harvest the outer leaves, or cut whole plants 1in (2.5cm) above the soil and many will regrow.
02. Rainbow Chard and Lacinato Kale Row
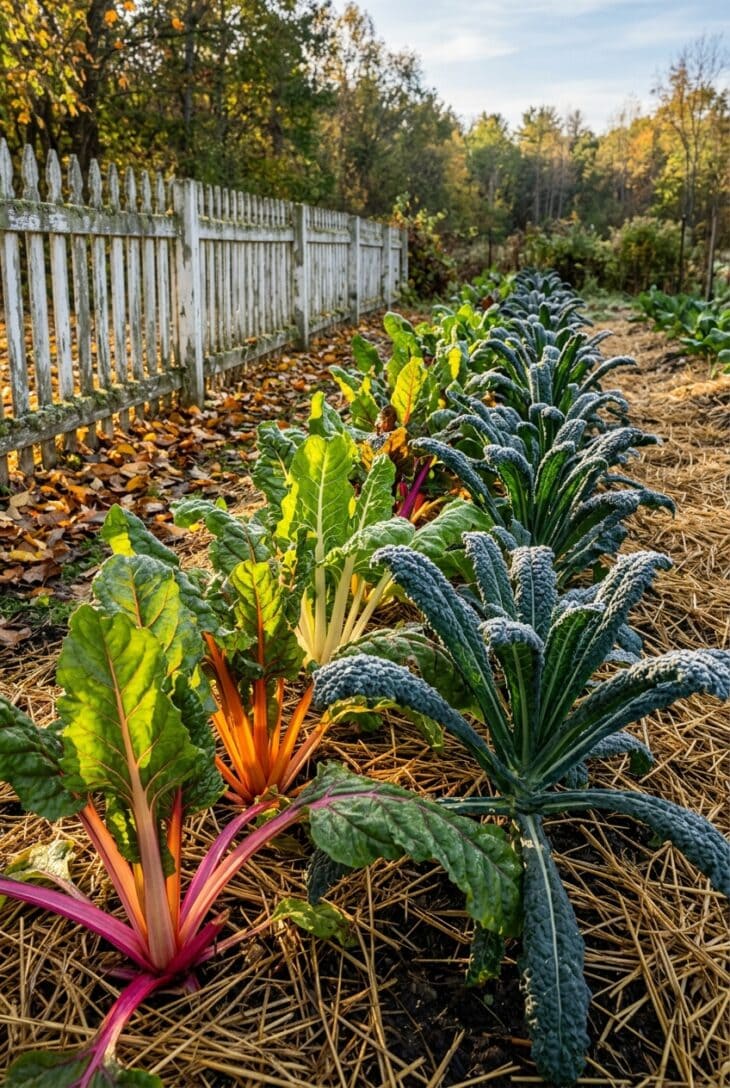
What you see A single vegetable row that could pass for an ornamental border. Swiss chard stems in magenta, tangerine, gold and white catch the low sun, and between them stand the dark, pebbled leaves of lacinato kale, still rimmed with frost. Straw mulch fills the gaps, and a picket fence closes off the view behind.
Why it works These are the two most generous plants in the fall garden. Both are picked leaf by leaf, so a handful of plants feeds a household for months rather than giving one meal and done. The kale improves with cold, since frost prompts the plant to convert starch to sugar, and the chard’s colored stems bring the kind of fall garden color most vegetable plots have lost by October.
How to get it Set out transplants of lacinato kale (Brassica oleracea ‘Lacinato’, also sold as ‘Nero di Toscana’) and Swiss chard (Beta vulgaris ‘Bright Lights’) 8 to 10 weeks before your first frost. Space kale 18in (45cm) apart and chard 12in (30cm), alternating them down the row. Pick the lowest leaves first and always leave the central five or six so the plant keeps producing. Kale takes frost down to around 20°F (-7°C), and curly types like ‘Winterbor’ go lower, but chard starts to suffer in the mid-20s Fahrenheit, so throw row cover over it on the coldest nights.
03. Raised Beds Under Low Hoop Tunnels
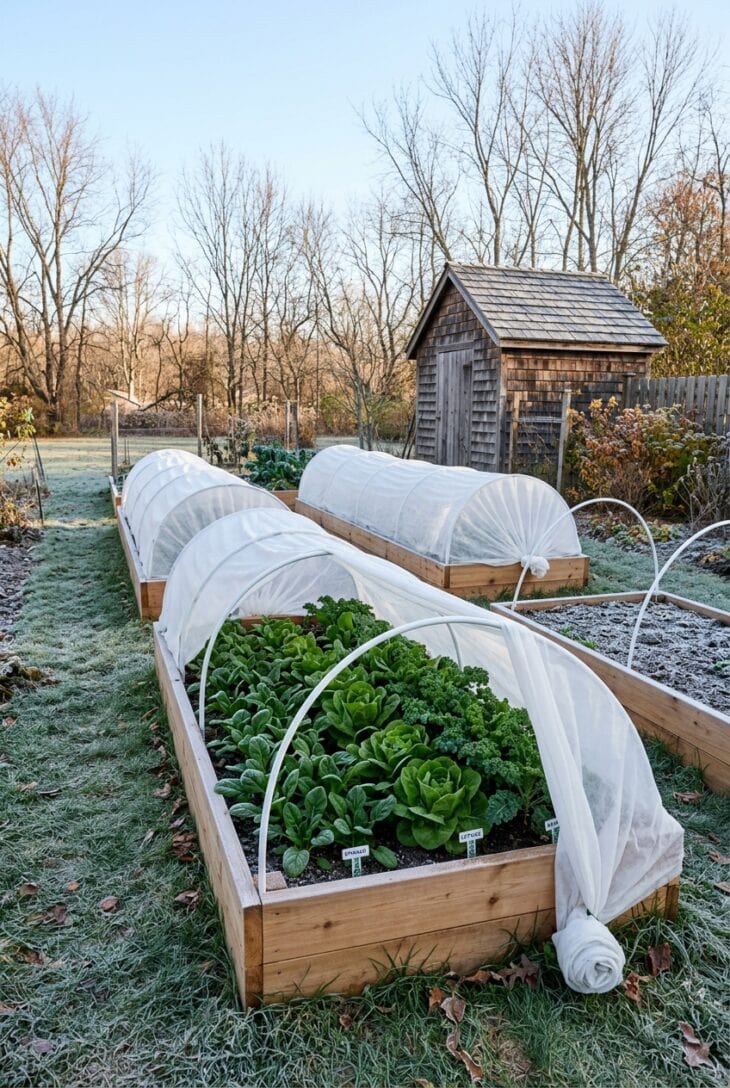
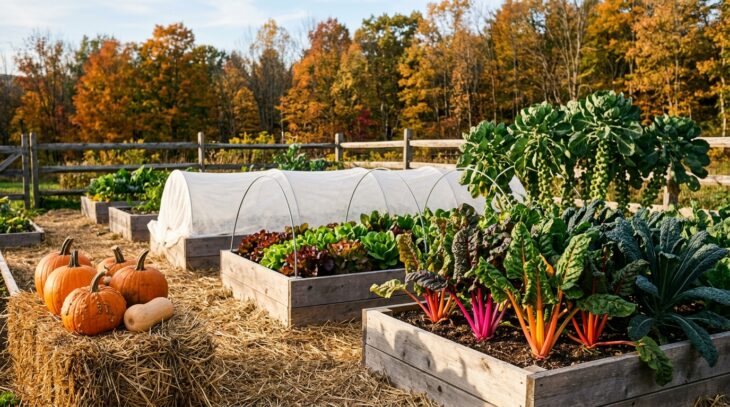
What you see Three cedar raised beds on a frosty November morning, each tucked under a low tunnel of white fabric stretched over metal hoops. The nearest cover is rolled back at one end to show what’s inside: rows of spinach, lettuce and kale, green and perky while the grass paths outside are crisp and white.
Why it works A low tunnel is the cheapest way to add weeks to the fall harvest. The fabric holds in the heat the soil gives off overnight and keeps frost from settling on the leaves, while still letting light and rain through. Because the hoops are low, there is very little air to keep warm. Raised bed designs take hoops especially well, since the frame gives you something solid to fix them to.
How to get it Bend 9-gauge wire or 1/2in (13mm) PVC pipe into hoops and set them every 3 to 4ft (90 to 120cm) along the bed, about 18 to 24in (45 to 60cm) high at the center. Cover them with medium-weight floating row cover, which gives roughly 4 to 6°F (2 to 3°C) of frost protection, and hold the edges down with sandbags or clips rather than burying them, so you can get in easily to harvest. In zone 5 and colder, add a sheet of greenhouse plastic over the fabric once nights drop into the low 20s Fahrenheit, and open the ends on sunny days above about 45°F (7°C) so the plants don’t cook. Brush off heavy snow before it flattens the hoops.
04. Cold Frame of Winter Spinach and Mâche
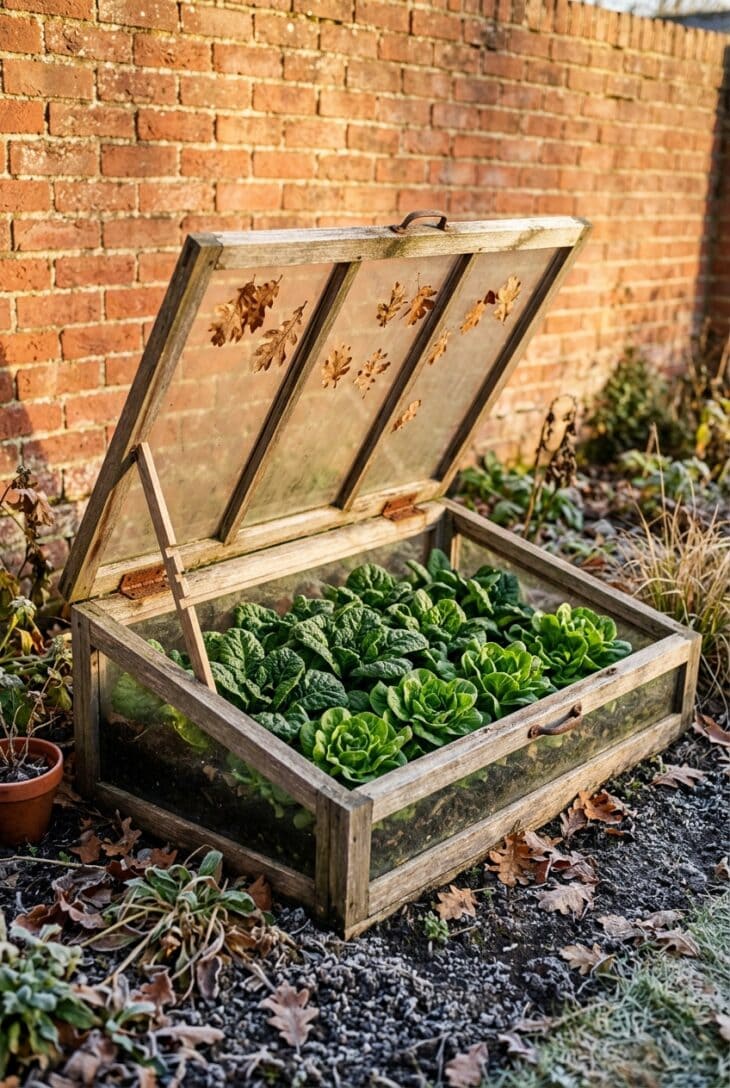
What you see A simple wooden box with a glass lid, propped open on a stick against a warm brick wall. Inside are tight rows of glossy, crinkled spinach and little rosettes of mâche, fresh and green while frost whitens the ground around the frame.
Why it works A cold frame is a miniature greenhouse with no heater. The glass lets in low winter sun and traps its warmth, and the solid sides block wind, which damages leaves as much as cold does. Spinach and mâche are two of the hardiest greens you can grow, so with that little bit of shelter they keep producing through most of the winter in zone 6 and warmer, and start growing again very early in spring in colder zones.
How to get it Build or buy a frame about 18in (45cm) tall at the back and 12in (30cm) at the front, so the lid slopes toward the south. Sow spinach (Spinacia oleracea) such as ‘Giant Winter’ or ‘Winter Bloomsdale’, and mâche, also called corn salad (Valerianella locusta), 6 to 8 weeks before your first frost. Timing matters more than the frame: once days drop below about 10 hours, plants barely grow, so they need to be close to full size by then and the frame simply holds them there. Tuck a row of radishes along the front edge; they are one of the classic companions for spinach and are pulled long before the spinach needs the room. Prop the lid open on any sunny day above freezing, because a closed frame can top 80°F (27°C) inside by noon.
05. Garlic Bed Tucked Under Straw
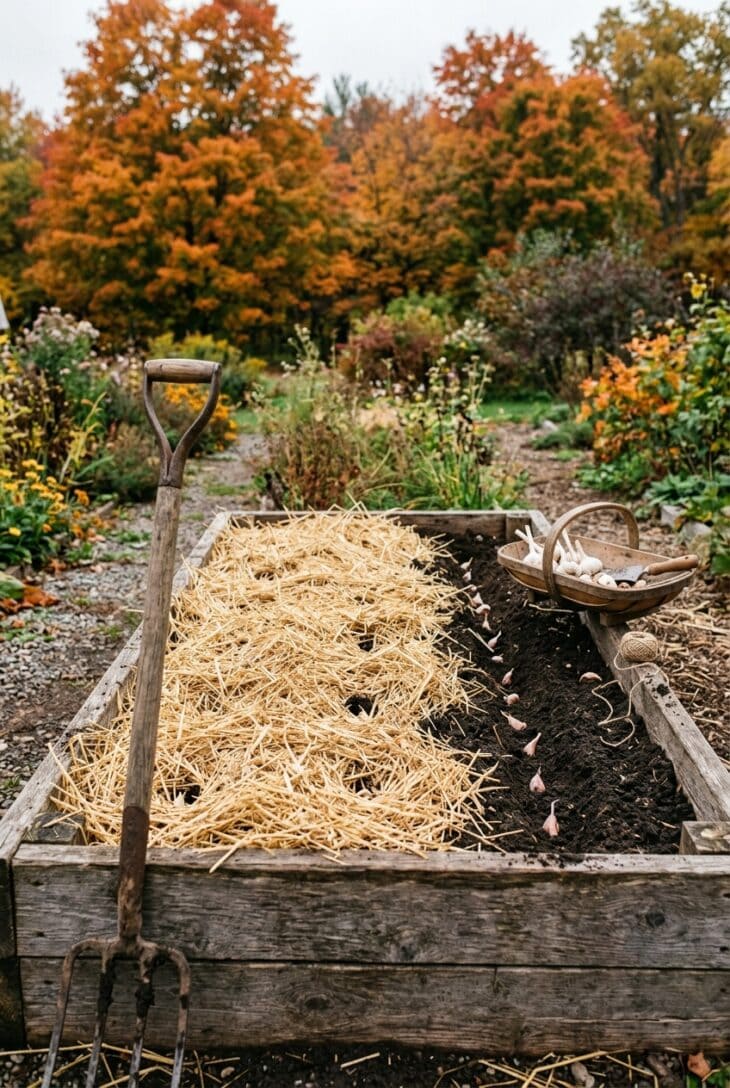
What you see A raised bed blanketed in fluffy golden straw, with the maples behind it in full orange. A wooden trug on the edge still holds a few papery bulbs and loose cloves, and a strip of bare dark soil shows where the last row is going in.
Why it works Garlic is the crop you plant in fall for a harvest the following summer, and it asks almost nothing in between. The cloves root in the cool autumn soil, sit out the winter, and take off in spring well before most gardeners have sown anything. The straw evens out freezing and thawing so the cloves aren’t heaved out of the ground, and in spring it smothers weeds, which garlic competes with poorly.
How to get it Plant a few weeks after your first frost and roughly 4 to 6 weeks before the ground freezes, which is the same window you would use to plant spring bulbs. Break bulbs into cloves only on planting day and set them pointed end up, 2in (5cm) deep and 6in (15cm) apart. Buy seed garlic (Allium sativum) from a garden supplier rather than the supermarket: hardneck types like ‘Music’ and ‘German Extra Hardy’ suit cold northern winters, while softnecks like ‘Inchelium Red’ and ‘California Early’ do better in the South. Once the soil surface starts to freeze, spread 4 to 6in (10 to 15cm) of straw over the bed. Harvest next summer when about half the leaves have turned brown.
06. Broccoli and Cauliflower Under Insect Netting
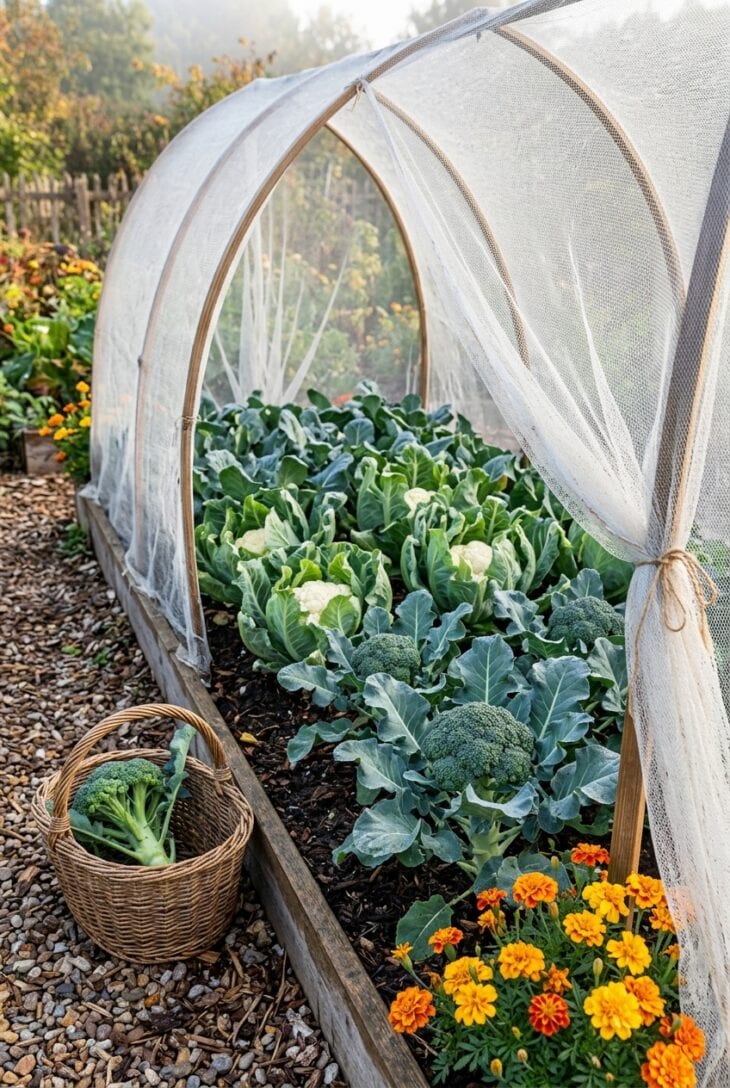
What you see Big blue-green brassicas under a frame of fine white mesh, pulled back on one side to show a tight, dark broccoli head ready to cut. Beside it, cauliflower leaves curl around pale white curds, and a freshly cut crown sits in a basket on the path.
Why it works Broccoli and cauliflower are much easier in fall than in spring. Spring plantings race into hot weather and bolt or form loose, grainy heads, while fall plantings mature into cooling, shortening days, which is exactly what they want. The netting deals with the other big problem: cabbage white butterflies and cabbage looper moths, whose green caterpillars riddle the leaves and hide inside the heads.
How to get it Set out transplants 10 to 12 weeks before your average first frost, which means mid to late summer in most of the country, and space them 18in (45cm) apart. Choose varieties bred for fall, such as broccoli (Brassica oleracea Italica Group) ‘Belstar’ or ‘Arcadia’ and cauliflower (Brassica oleracea Botrytis Group) ‘Snow Crown’. Cover the bed with fine insect netting on hoops the day you plant, tuck the edges down, and leave it on until the weather turns cold. Cut broccoli while the buds are still tight and leave the plant in, since side shoots will keep coming for weeks. When cauliflower curds are the size of an egg, fold a few leaves over them to keep them white.
07. Frost-Sweetened Carrots and Beets
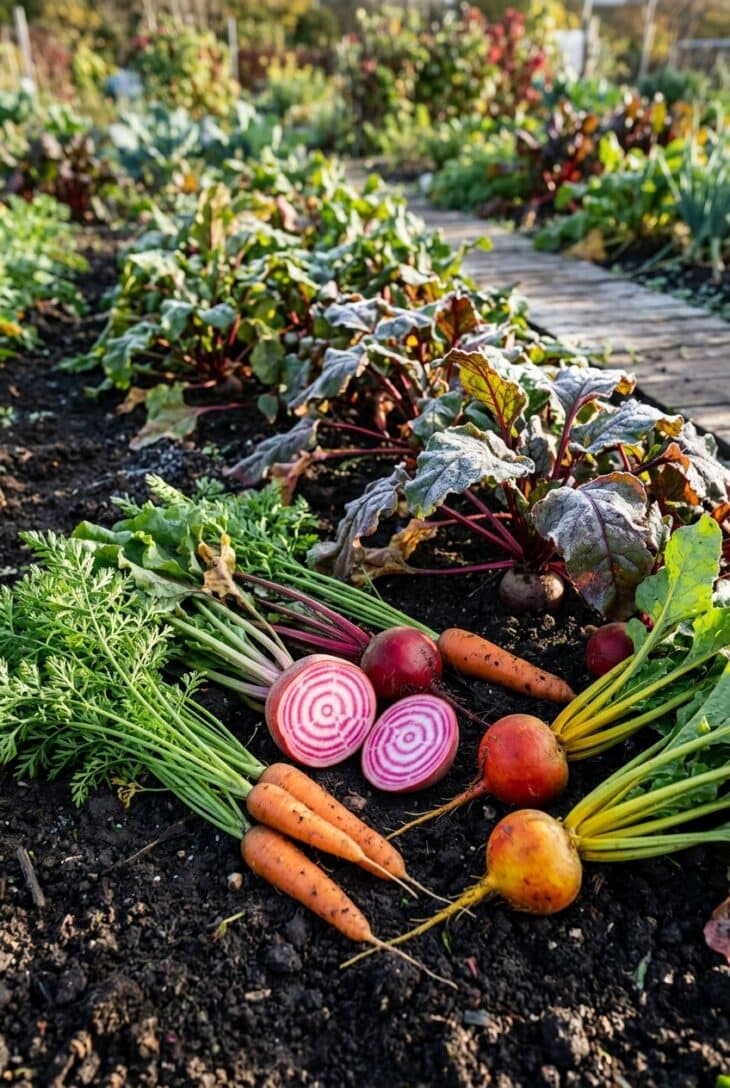
What you see A harvest laid out on the bed where it grew: slim orange carrots with their feathery tops, round beets in deep red and gold, and a Chioggia beet cut in half to show its pink and white rings. Frost is melting off the red-veined beet leaves in the rows still waiting to be pulled.
Why it works Root crops sown in late summer are some of the best-tasting vegetables of the year. As the soil cools, carrots and beets convert stored starch to sugar to protect themselves from freezing, which is why a November carrot tastes so much sweeter than one pulled in July. They also hold well in the ground, so you can harvest as needed rather than all at once.
How to get it Sow 10 to 12 weeks before your first frost, in loose soil free of stones. Carrot (Daucus carota subsp. sativus) seed must stay moist for the one to three weeks it takes to germinate, so lay a board or damp burlap over the row and check it daily. ‘Bolero’ and ‘Napoli’ are reliable fall carrots; thin them to 2in (5cm) apart. Beets (Beta vulgaris) such as ‘Detroit Dark Red’, ‘Touchstone Gold’ and ‘Chioggia’ come up in clusters, because each seed is really several, so thin to one seedling every 3 to 4in (8 to 10cm) and eat the thinnings as greens.
08. Patio Pots of Kale, Lettuce and Chard
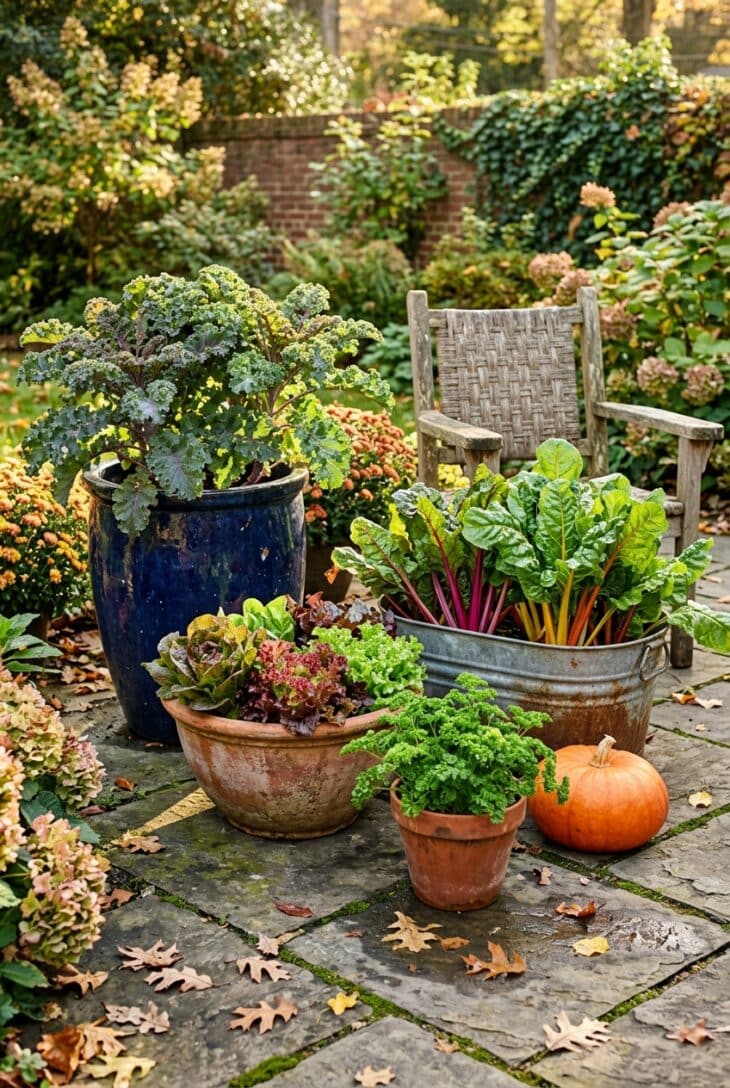
What you see A cluster of pots on a sunny patio, each holding a vegetable. Frilly purple kale rises from a tall navy glazed pot, a wide terracotta bowl overflows with red and green lettuce, and a galvanized tub holds rainbow chard. A small pot of parsley sits at the front, close enough to the kitchen door to pick in slippers.
Why it works Fall greens make ideal container crops: they are compact, they are picked a few leaves at a time, and they look good while they do it. Pots also let you chase the sun as it drops lower in the sky, and on a frosty night you can move them against the house wall, where they stay a few degrees warmer. For anyone without a vegetable bed, it is the easiest way to grow food this season.
How to get it Use pots at least 12in (30cm) deep and wide for a single kale or chard plant, or 16in (40cm) wide for two. Lettuce needs only 6 to 8in (15 to 20cm) of depth, so a wide, shallow bowl works well. Fill with fresh potting mix, not garden soil, and feed every two weeks with a liquid fertilizer, since frequent watering washes nutrients out. Start from transplants in early fall for a quick result: kale (Brassica oleracea ‘Redbor’), Swiss chard ‘Bright Lights’ and a loose-leaf lettuce such as ‘Salad Bowl’. Pots freeze faster than the ground, so in cold regions group them against a south-facing wall once nights drop below about 25°F (-4°C).
09. Front-Yard Potager of Kale, Chard and Violas
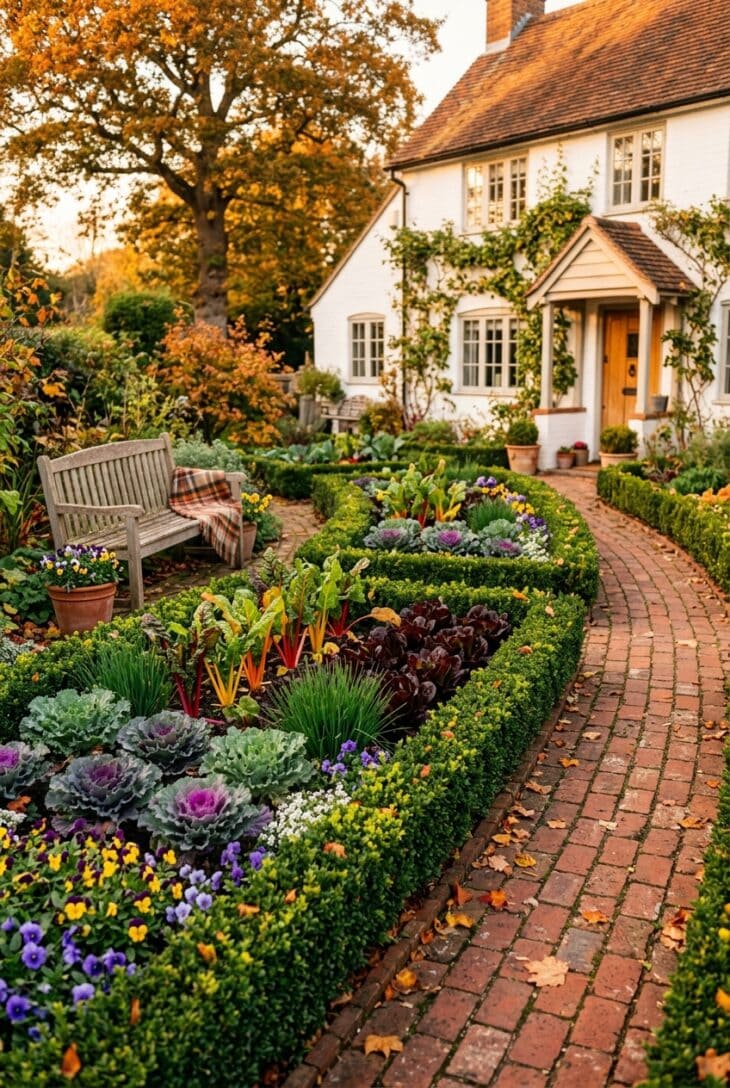
What you see A front garden that happens to be edible. Low boxwood hedges enclose curved beds along a brick path, filled with ruffled purple kale, rainbow chard, burgundy lettuce and clumps of chives, all edged with purple and yellow violas. From the street it reads as a flower garden; from the kitchen, it is supper.
Why it works A potager treats vegetables as design material, using color, repetition and a clipped edge to make them look deliberate. Fall suits it, because cool-season crops are at their most colorful just as the summer annuals in a typical front yard garden give out. The boxwood frame holds the shape together while you harvest, so the bed never looks picked over.
How to get it Keep beds narrow enough to reach the middle from the path, about 3 to 4ft (90 to 120cm), and plant in repeating blocks rather than single plants, which read as intentional from a distance. Reliable performers are ‘Redbor’ kale, ‘Bright Lights’ Swiss chard, a red lettuce like ‘Merlot’ and chives (Allium schoenoprasum), which are also among the most useful companions for kale. Edge the beds with violas (Viola cornuta), whose flowers are edible and keep blooming through light frost. If you don’t want to plant boxwood (Buxus sempervirens), a steel or brick edging gives the same crisp line. Check local HOA rules before you turn a front lawn into beds.
10. Leeks Standing Tall into Winter
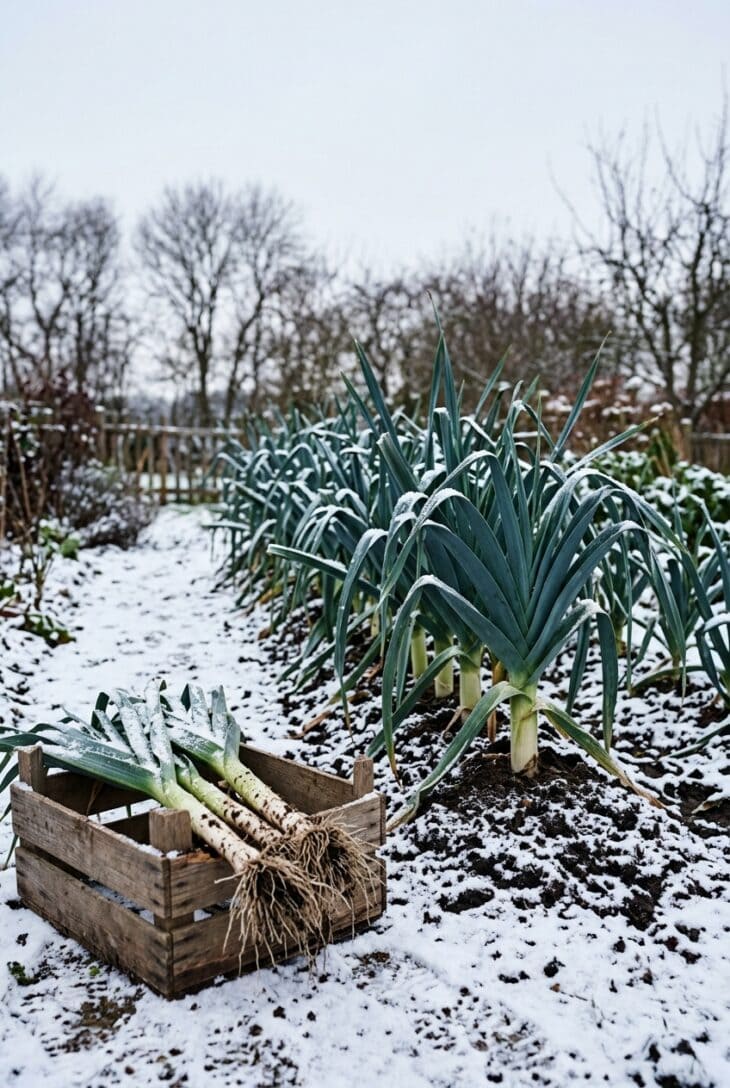
What you see A row of blue-green leeks standing upright through a light snowfall, their fanned leaves dusted white. Soil is mounded around each stem, and a wooden crate beside the row holds a few just-pulled leeks with long white shanks and muddy roots.
Why it works Leeks are one of the few crops that simply wait for you. Winter-hardy varieties stay in good condition in the ground from October to the new year, and through the whole winter in milder areas, so you can pull one whenever a soup calls for it. Mounding soil around the stems blanches them, giving a longer white section that is tender and mild.
How to get it Leeks (Allium ampeloprasum Porrum Group) are a long-season crop, so a fall harvest starts with seed sown indoors in late winter and transplanted in late spring or early summer. Drop each seedling into a hole 6in (15cm) deep made with a dibber or broom handle, 6in (15cm) apart, and water it in without filling the hole. Draw soil up around the stems two or three times over the summer. For the longest harvest, choose hardy types like ‘Bandit’, ‘Tadorna’ or ‘Bleu de Solaise’, which stand temperatures down to about 10°F (-12°C). If you missed the window this year, harvest what you have and mark late winter on the calendar.
11. Asian Greens Bed of Bok Choy, Tatsoi and Mizuna
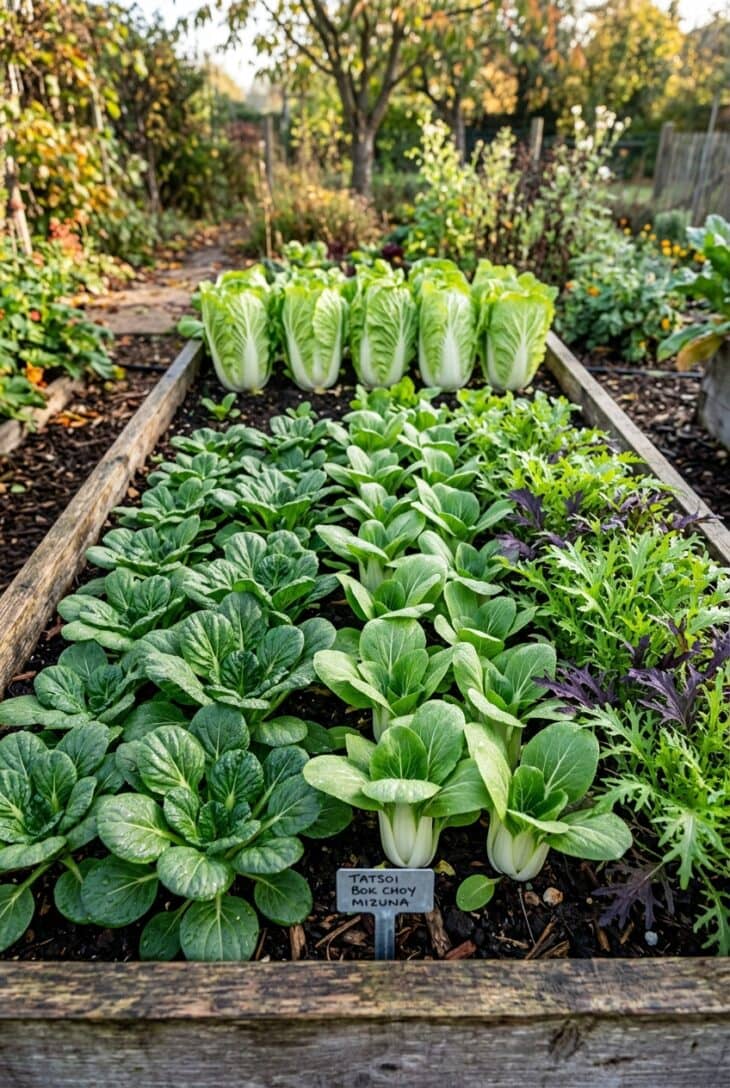
What you see A raised bed laid out in blocks of Asian greens. Dark, glossy tatsoi rosettes lie flat as dinner plates, baby bok choy stands in tidy rows of thick white stems, and mizuna in green and purple forms feathery mounds. A few napa cabbages stand upright at the back like sentries.
Why it works These greens are fast, often ready in 30 to 45 days, so they are the answer when you have missed the window for slower crops. They also belong in fall: sown in spring, the lengthening days make them bolt almost at once, but in autumn’s shortening days they stay leafy. Each one tastes different, from mild bok choy to peppery mizuna, so a single bed covers a whole stir-fry.
How to get it Sow direct from late summer until about 6 weeks before your first frost, and use transplants for napa cabbage (Brassica rapa subsp. pekinensis), which needs 50 to 70 days. Grow baby bok choy (Brassica rapa subsp. chinensis) such as ‘Toy Choy’ 6in (15cm) apart, tatsoi (Brassica rapa subsp. narinosa) 8in (20cm) apart and mizuna (Brassica rapa var. japonica) in a band cut as baby greens. Flea beetles pepper the leaves with tiny holes in warm weather, so cover the bed with row cover right after sowing. Mizuna and tatsoi take hard frost well, but bok choy is best harvested before temperatures fall much below 28°F (-2°C).
12. Cover Crop Blanket for Resting Beds
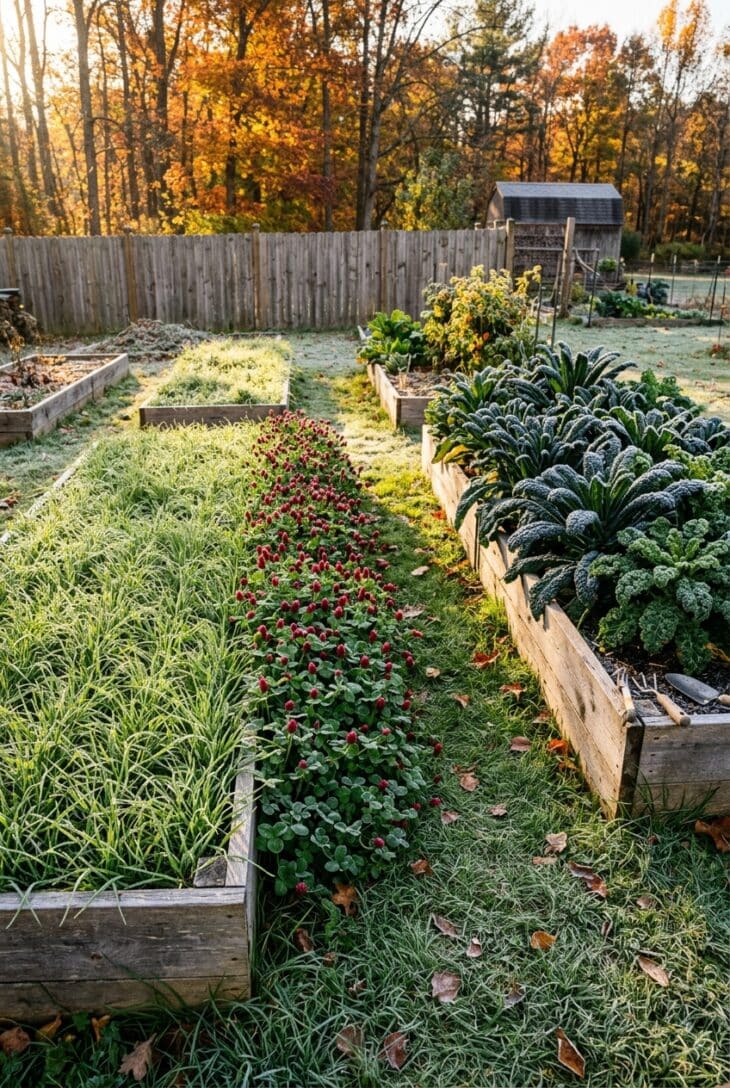
What you see Beds that would otherwise be bare mud, covered instead in a bright green carpet. One is thick with fine blades of cereal rye, another with the rounded leaves of crimson clover, while a neighboring bed of kale is still producing. The low morning sun catches the frost on the paths between them.
Why it works Bare soil over winter loses nutrients to rain and structure to erosion. A cover crop keeps living roots in the ground and feeds soil life, and in the case of clover, adds nitrogen that next year’s crops will use. It also means the garden looks cared for in December rather than abandoned.
How to get it Sow as soon as each bed is cleared, ideally at least 4 weeks before your first frost. For beds you want to plant early next spring, sow oats (Avena sativa): in zone 6 and colder they die over winter and leave a mulch you can plant straight into. Crimson clover (Trifolium incarnatum) overwinters in zone 6 and warmer and flowers red in spring, when the bees are glad of it. Cereal rye (Secale cereale) is the hardiest and can be sown latest, but it grows tall and tough, so cut it down when it flowers and wait three weeks before planting into the bed. Scatter the seed, rake it in lightly and water.
13. Late-Sown Snow Peas on a Trellis
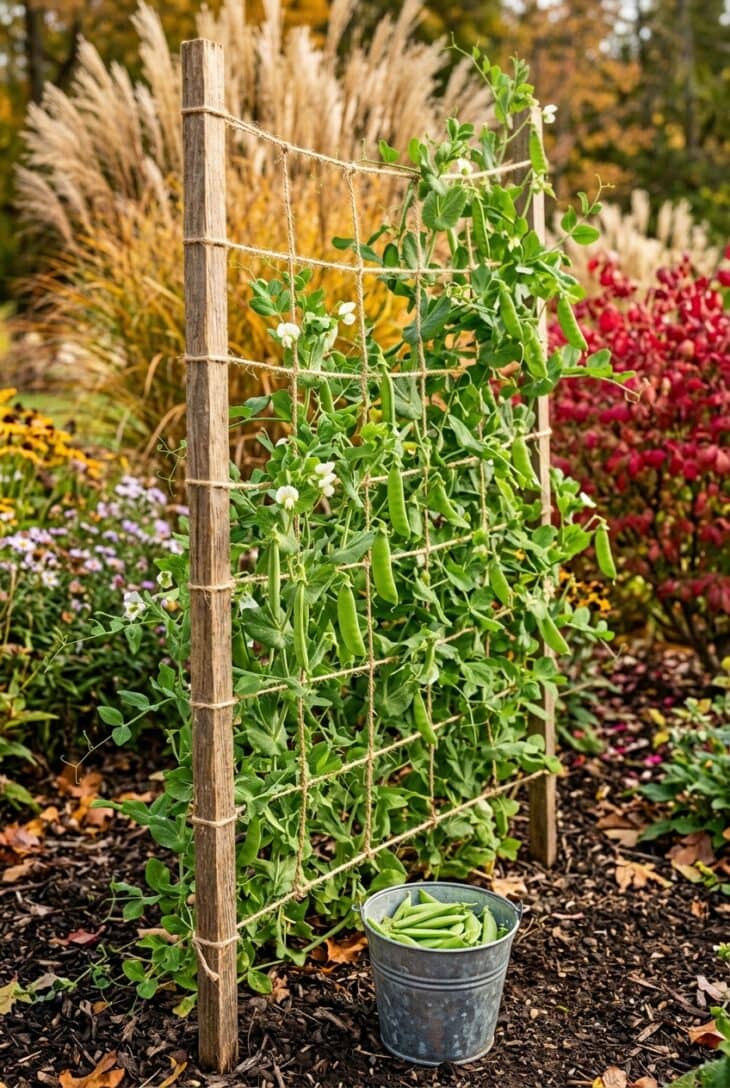
What you see A wall of pea vines climbing a wooden and twine trellis, hung with flat, bright green snow pea pods and a few white flowers still opening. Tendrils curl around every string, and a galvanized bucket at the base is half full of the day’s picking.
Why it works Peas love cool weather, which gives them a second season in fall that most gardeners overlook. The vines grow quickly in the warmth of late summer, then flower and set pods as the nights cool, which keeps the pods sweet and crisp. A trellis keeps the crop clean and at picking height, and it takes up almost no bed space.
How to get it Sow 10 to 12 weeks before your first frost. Peas germinate poorly in hot soil, so soak the seed overnight, sow 1in (2.5cm) deep and 2in (5cm) apart at the base of a trellis 5 to 6ft (150 to 180cm) tall, and keep the row shaded and moist until the seedlings are up. ‘Oregon Sugar Pod II’ is a dependable snow pea (Pisum sativum) for fall, and the dwarf snap pea ‘Sugar Ann’ needs support only 2ft (60cm) tall. The plants shrug off light frost, but a hard freeze below about 28°F (-2°C) damages flowers and pods, so this works best where the first frost comes late, from zone 7 south. Pick every two or three days, because the more you pick, the more the vines produce.
14. Brussels Sprouts Sweetened by Frost
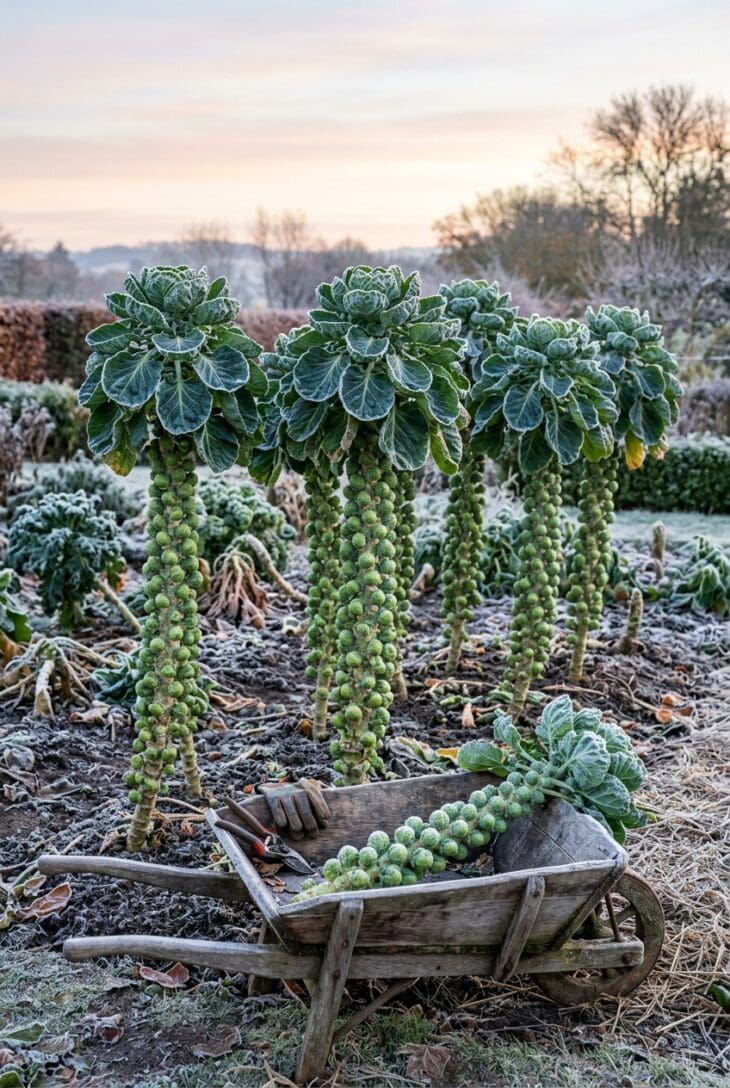
What you see Tall stalks of Brussels sprouts rimed with hoarfrost at sunrise, each one studded from base to tip with tight, round sprouts. The lower leaves have been stripped away and only a topknot of broad blue-green leaves remains. One stalk has already been cut and lies across a wheelbarrow.
Why it works Brussels sprouts are the classic proof that frost improves a vegetable. Sprouts that mature in summer heat tend to be loose and bitter, while those picked after a few frosts are firm, nutty and sweet. The plants are also very hardy, standing into December in much of the country, so they carry the garden well past the end of almost everything else.
How to get it Brussels sprouts (Brassica oleracea Gemmifera Group) need a long season, about 90 to 110 days from transplant, so they go out in early summer for a fall harvest. Space plants 24in (60cm) apart and stake them in windy gardens, because the stalks become top-heavy. Three to four weeks before you want to harvest, snap off the growing tip, which sends the plant’s energy into the sprouts so they size up together. Hybrids like ‘Diablo’ and ‘Churchill’ are reliable, and ‘Falstaff’ gives purple sprouts. Harvest from the bottom up, twisting off sprouts when they are 1 to 1.5in (2.5 to 4cm) across.
15. Southern Collards and Mustard Greens
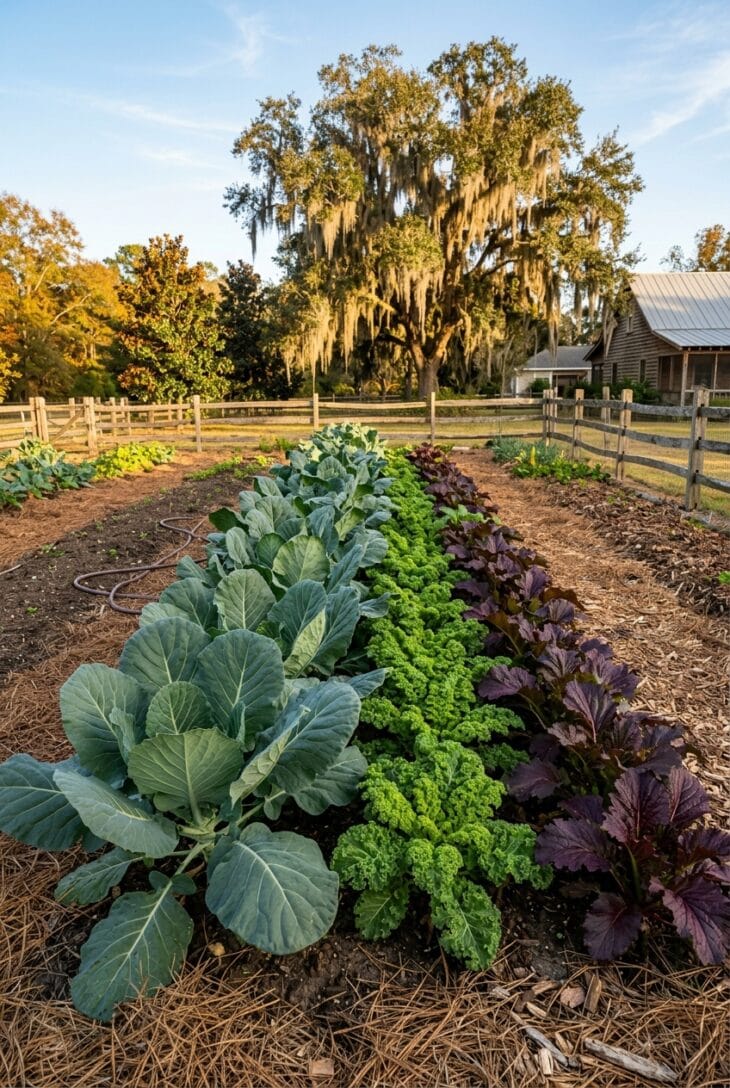
What you see Long rows of collards with huge, flat blue-green leaves, some plants already knee-high, next to frilly bright green mustard and a row of burgundy mustard. Behind the split-rail fence, a live oak trails Spanish moss in the late afternoon sun.
Why it works In much of the South, fall is not the end of the vegetable garden but its best season. Summer is too hot for leafy greens, while mild winters let them grow almost without pause. Collards are the backbone: they tolerate heat at planting time, get sweeter with each cold snap and keep producing leaves until spring. Mustard grows fast and fills the gap while the collards size up.
How to get it In zones 7 to 9, set out collard (Brassica oleracea Viridis Group) transplants from August through October, 18 to 24in (45 to 60cm) apart; ‘Georgia Southern’ and ‘Champion’ are dependable. Direct-sow mustard greens (Brassica juncea) such as ‘Southern Giant Curled’ and ‘Red Giant’ over the same period, thinning to 6in (15cm) for baby leaves or 12in (30cm) for full-size plants. Harvest collards from the bottom up, taking a few of the largest leaves at a time. Watch for harlequin bugs and cabbage worms; row cover over young plants prevents most of the damage.
16. Pumpkin and Winter Squash Harvest Patch
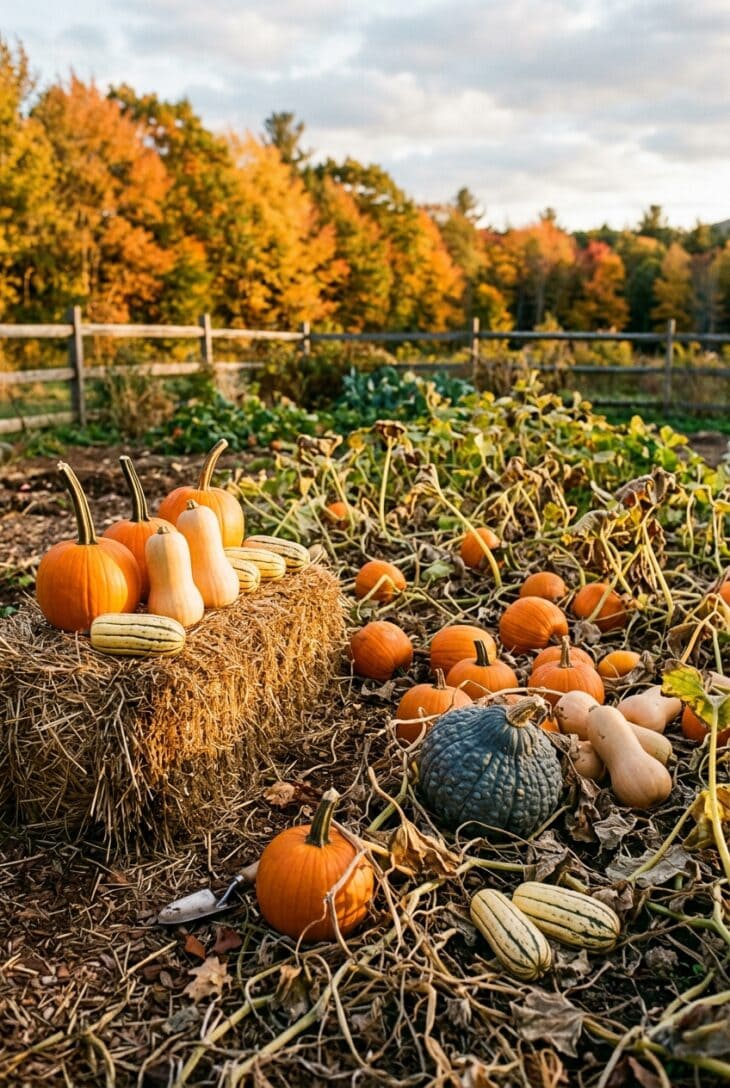
What you see A squash patch at the end of the season, the big leaves collapsing to reveal what they have been hiding. Orange pumpkins, tan butternuts, a blue-gray Hubbard and cream-striped delicatas lie among the dying vines, and a row already cut with long stems sits on a straw bale in the sun.
Why it works Winter squash is the late harvest that keeps giving, because properly cured fruit stores for months in a cool room. Growing several types spreads out the eating: delicata is best within a couple of months, while butternut can last until spring. And the pumpkins that sit in a fall porch display in October can still end up in the oven in November.
How to get it Leave fruit on the vine until the rind resists a fingernail and the stem has turned corky, but bring it in before a hard frost, which damages the skin. Cut rather than snap, leaving 3 to 4in (8 to 10cm) of stem on pumpkins and 1 to 2in (2.5 to 5cm) on squash, and never carry them by the stem. Cure butternut (Cucurbita moschata ‘Waltham Butternut’), pumpkins (Cucurbita pepo) and Hubbards (Cucurbita maxima ‘Blue Hubbard’) for 10 to 14 days somewhere warm, ideally 80 to 85°F (27 to 29°C), then store at 50 to 55°F (10 to 13°C). Skip curing for acorn squash, which keeps better without it. For next year, remember most varieties need 90 to 110 days, so they are sown in late spring.
17. Parsnips and Carrots Stored in the Ground
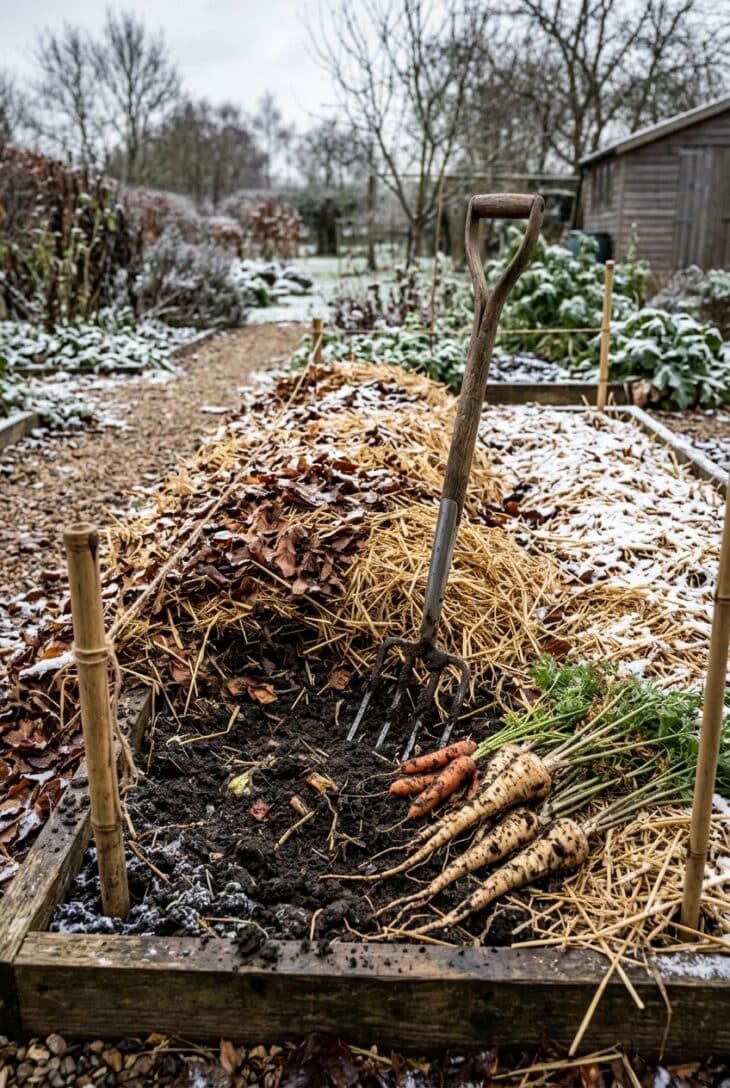
What you see A bed that looks empty under a thick quilt of straw and leaves, with a light snow on top. At one end the mulch has been pulled back, and a digging fork has lifted a clump of long cream parsnips and orange carrots out of dark, moist soil. Short stakes mark where each row runs.
Why it works This is winter storage without a root cellar. A thick mulch keeps the soil beneath it from freezing hard, so the roots stay fresh and crisp in the ground and you dig them as you need them. Parsnips in particular need the cold: they are bland until they have had a few hard frosts, after which they turn sweet and nutty.
How to get it Parsnips (Pastinaca sativa) such as ‘Hollow Crown’ or ‘Gladiator’ are sown in spring because they take 100 to 130 days, while carrots for winter storage go in by midsummer. Buy fresh parsnip seed every year, since it loses viability quickly, and expect it to take up to three weeks to come up. When the ground starts to freeze in late fall, cover the rows with 12 to 18in (30 to 45cm) of straw or shredded leaves, and mark the row ends with tall stakes so you can find them under snow. Dig through the winter whenever the soil under the mulch is workable, and lift everything before the roots resprout in spring. Wear gloves when handling parsnip foliage on sunny days, as the sap can burn skin.
18. Cool-Season Herb Corner
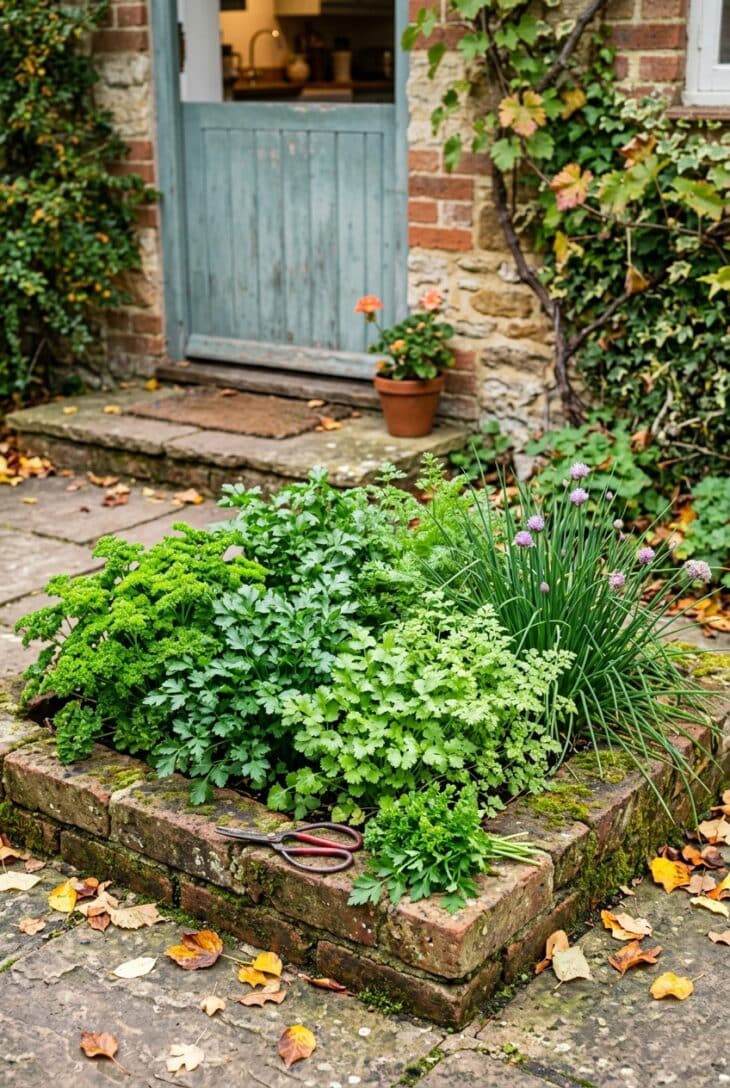
What you see A brick-edged square of herbs just outside the kitchen door. Curly and flat-leaf parsley grow in thick clumps, cilantro is bright and feathery, lacy chervil fills one corner and tufts of chives poke up at the front. A pair of scissors and a freshly cut bunch of parsley rest on the brick edge.
Why it works Some herbs do far better in fall than in summer. Cilantro bolts almost as soon as the weather turns hot and chervil sulks in heat, but both grow lush and leafy through cool weather and survive light frost. Parsley planted in spring is at its best now and stays green well into winter. Put them close to the kitchen, as in any good herb garden layout, and you will actually use them.
How to get it Sow cilantro (Coriandrum sativum) and chervil (Anthriscus cerefolium) directly in late summer or early fall, every three weeks for a steady supply, since neither transplants well. Slow-bolting cilantro such as ‘Calypso’ or ‘Santo’ lasts longest. Parsley (Petroselinum crispum) from a nursery establishes quickly if it goes in by early fall, spaced 8in (20cm) apart. Chives are perennial; they die back after a hard frost and return in spring. In the South this bed carries on through winter, and in colder areas a row cover or cold frame keeps parsley and chervil going into December.
19. Salad Window Box on a Balcony Railing
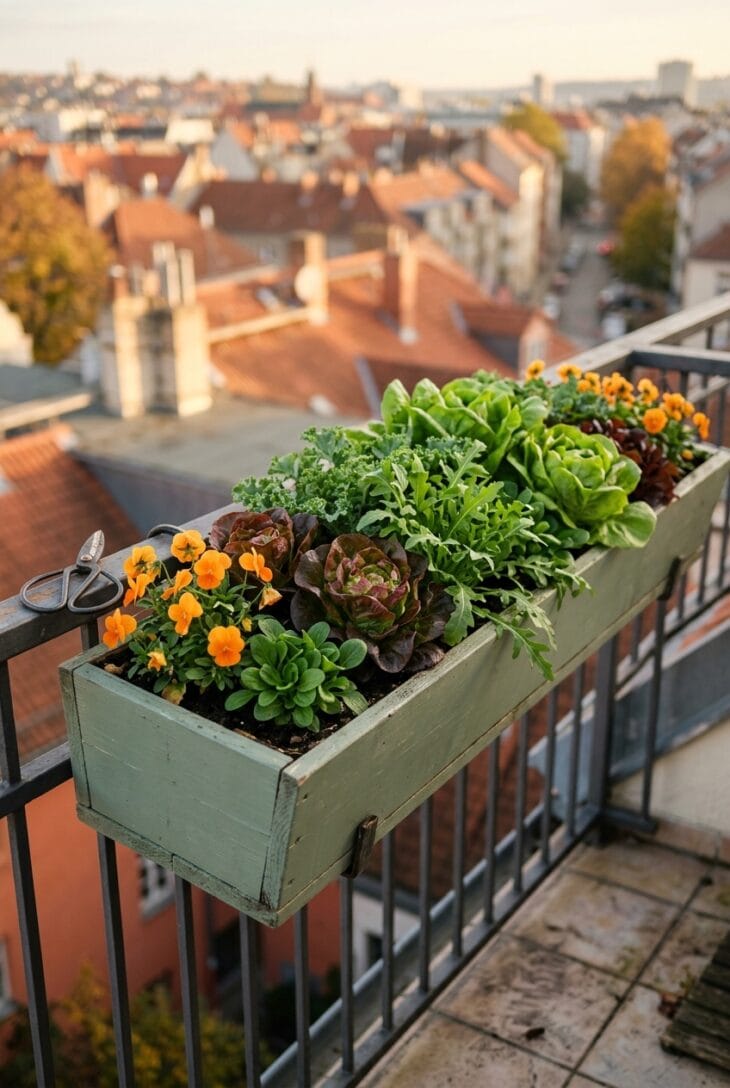
What you see A slim painted window box hung on a balcony rail, packed with compact red and green lettuces, baby kale, arugula and little rosettes of mâche. Orange violas at each end add color, and a pair of kitchen scissors sits on the rail, ready for tonight’s salad.
Why it works Salad greens have shallow roots and a short life, which makes them perfect for a window box. You cut what you need, a few leaves from each plant, and the box keeps producing for weeks. Hung high on a railing, it catches more sun than the ground below and stays out of reach of slugs and rabbits, which makes it one of the most productive balcony garden setups for its size.
How to get it Choose a box at least 6 to 8in (15 to 20cm) deep with drainage holes, and fill it with fresh potting mix. Plant compact lettuces such as ‘Tom Thumb’ and ‘Little Gem’, with baby kale, arugula and mâche between them, about 4 to 6in (10 to 15cm) apart. Tuck violas in at the ends, as you would in any fall window box, and add their edible flowers to the salad. Water whenever the top inch is dry, because boxes dry out fast in the wind even in fall. Fix the box securely to the inside of the railing and check your building’s rules first.
20. Spinach and Radishes Sown Under Tomatoes
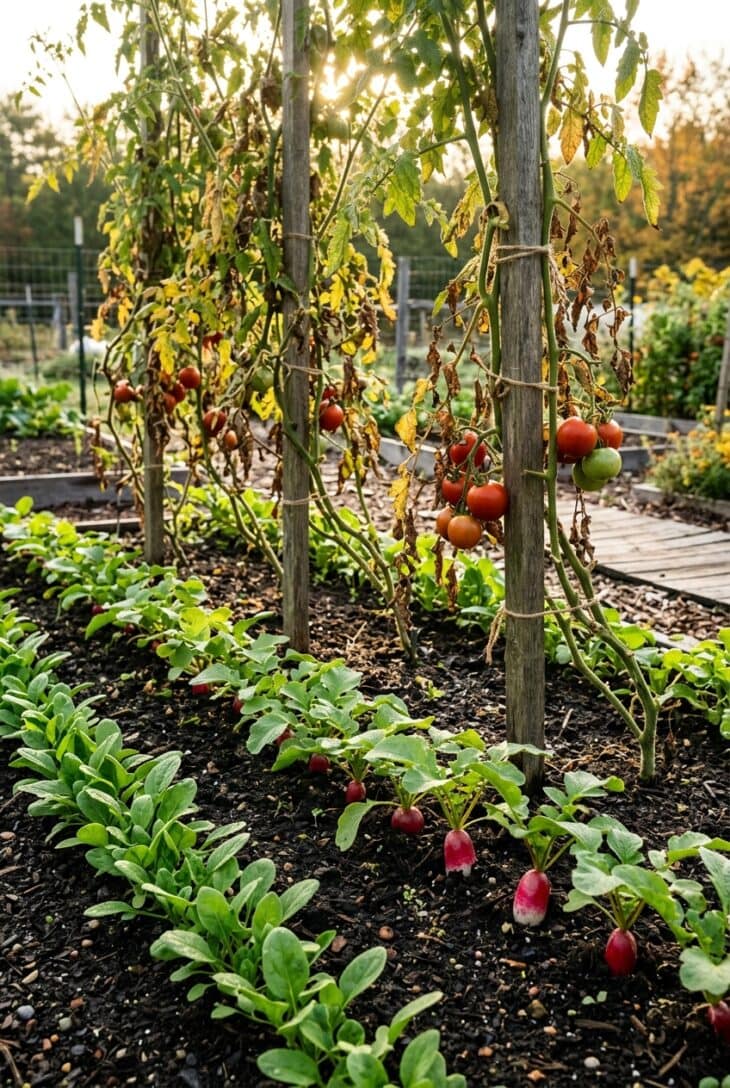
What you see Tall staked tomatoes at the tail end of summer, their lower leaves yellowing and the last few red fruits hanging on. In their dappled shade, short rows of young spinach are up and growing, and a line of radishes shows red shoulders at the soil surface.
Why it works This is relay planting: sowing the next crop before the last one is finished, so the bed never sits empty. The tomato foliage shades the soil and keeps it a few degrees cooler, which matters because spinach germinates poorly in hot soil. By the time frost kills the tomatoes, the fall greens are established and take over the space. In a small vegetable garden, it fits a whole extra crop into the same square feet.
How to get it In late August or early September, strip the lowest tomato leaves to let in some light, then sow spinach and radishes (Raphanus sativus) in short rows between the plants. Radishes are among the classic tomato companion plants, and quick varieties like ‘French Breakfast’ and ‘Cherry Belle’ are ready in 25 to 30 days, often before the tomatoes come out. Keep the soil evenly moist, since seedlings under a leafy canopy can miss the rain. When you clear the tomatoes, cut the stems at soil level instead of pulling the roots, so the greens around them aren’t disturbed.
21. Radicchio and Endive for Winter Salads
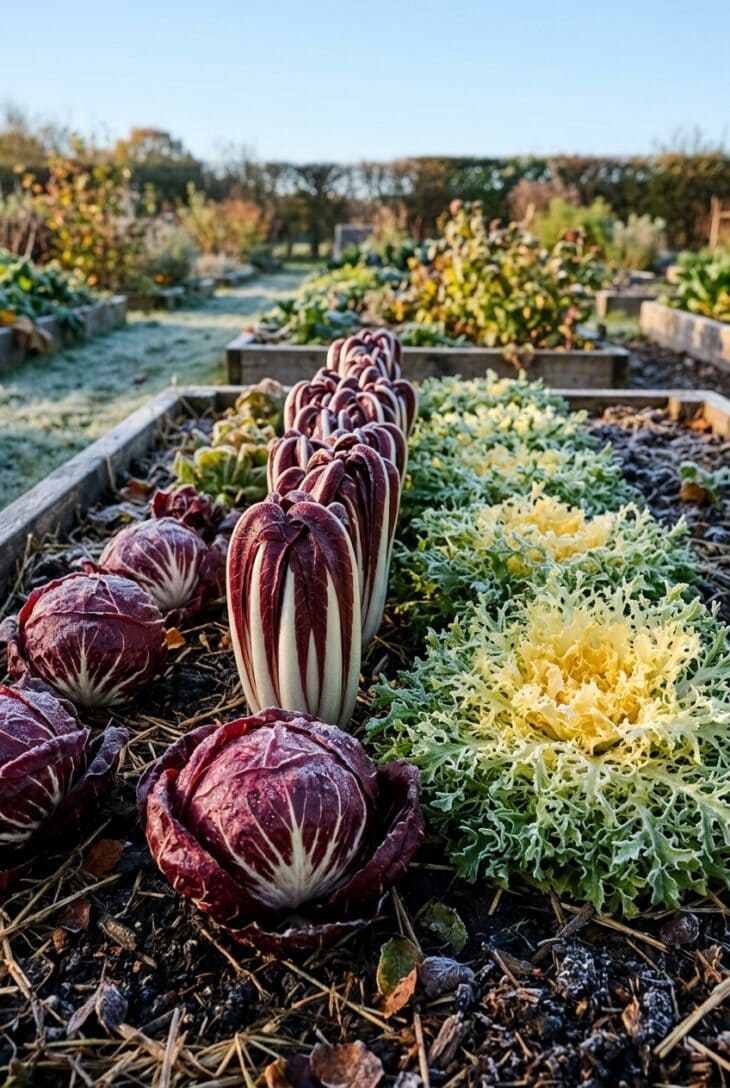
What you see A bed of bitter greens at their peak: round burgundy radicchio heads marbled with white veins, taller tapered Treviso heads in the next row, and frilly frisée with a pale golden heart. The outer leaves are still wet with melting frost.
Why it works Radicchio needs cold to become what you buy in the store. Its leaves stay green and loose through summer, then as the nights cool the heads tighten and turn deep red, and frost takes the edge off their bitterness. Frisée is just as at home in cool weather, and together they give you an Italian-style winter salad that costs a small fortune at the grocery store.
How to get it Radicchio (Cichorium intybus) takes 80 to 100 days, so sow it or set out transplants in midsummer; ‘Palla Rossa’ makes round heads and ‘Rossa di Treviso’ tapered ones. Frisée (Cichorium endivia) such as ‘Tres Fine Maraichere’ matures in about 50 days, so it can go in later. Space both 10 to 12in (25 to 30cm) apart. To blanch frisée, cover the center of each head with an upturned plate for 5 to 7 days before harvest, which turns the inner leaves pale yellow and mild. If radicchio heads stay loose, cut the plants back to 1in (2.5cm) above the soil in early fall; the regrowth often forms a tighter head.
22. Fall-Planted Strawberries for a Spring Crop
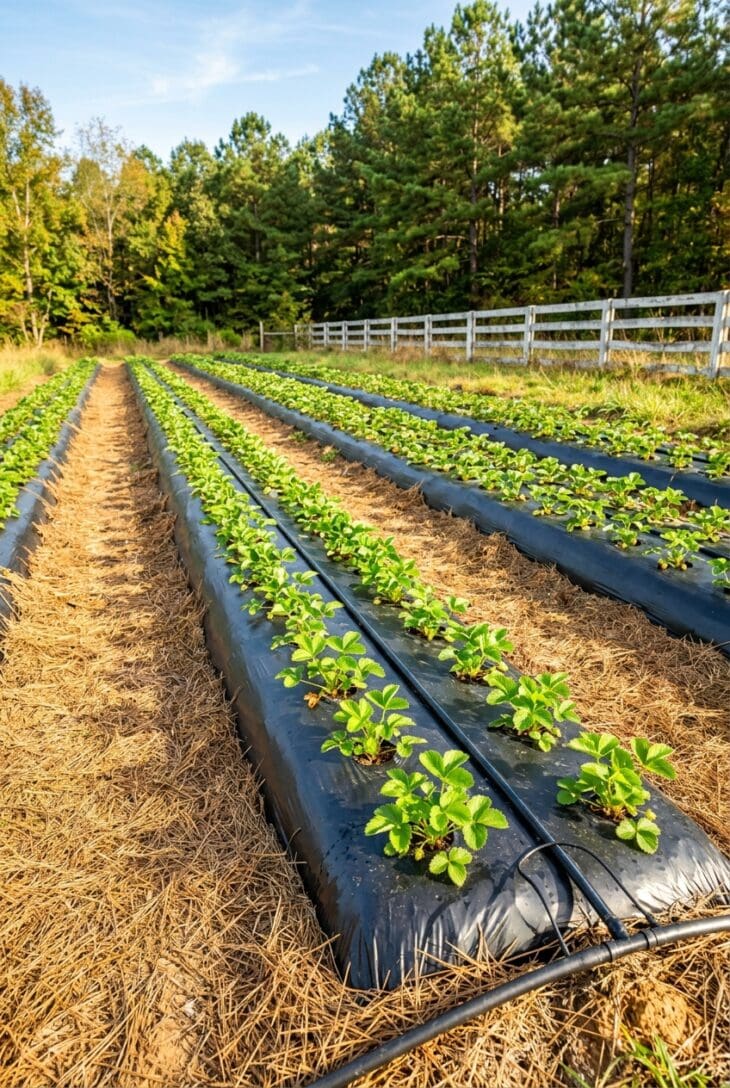
What you see Raised rows under black plastic, with young strawberry plants set in staggered double lines through the holes. Straw fills the paths, a drip line runs along the edge, and the freshly planted strawberries sit small and bright green in the warm October sun.
Why it works In the South and in California, strawberries run on the opposite calendar from the North. Planted in fall and grown as annuals, they root in during the mild winter and fruit heavily from late winter into spring, before summer heat ends the season. The black plastic warms the soil, holds in moisture and keeps the berries clean.
How to get it In zones 7 to 9, plant strawberry (Fragaria × ananassa) plugs from late September to early November, earlier in the upper South and later along the Gulf Coast. Choose short-day varieties bred for this system, such as ‘Chandler’, ‘Camarosa’ or ‘Sweet Charlie’. Build rows about 8in (20cm) high and 24in (60cm) wide, lay drip tape, cover with black plastic and set plants 12in (30cm) apart in two staggered lines. Keep the crowns exactly at soil level, since buried crowns rot and exposed ones dry out. Keep row cover handy in spring, because a frost on open flowers kills them before they can fruit.
23. Fava Beans Sown to Overwinter
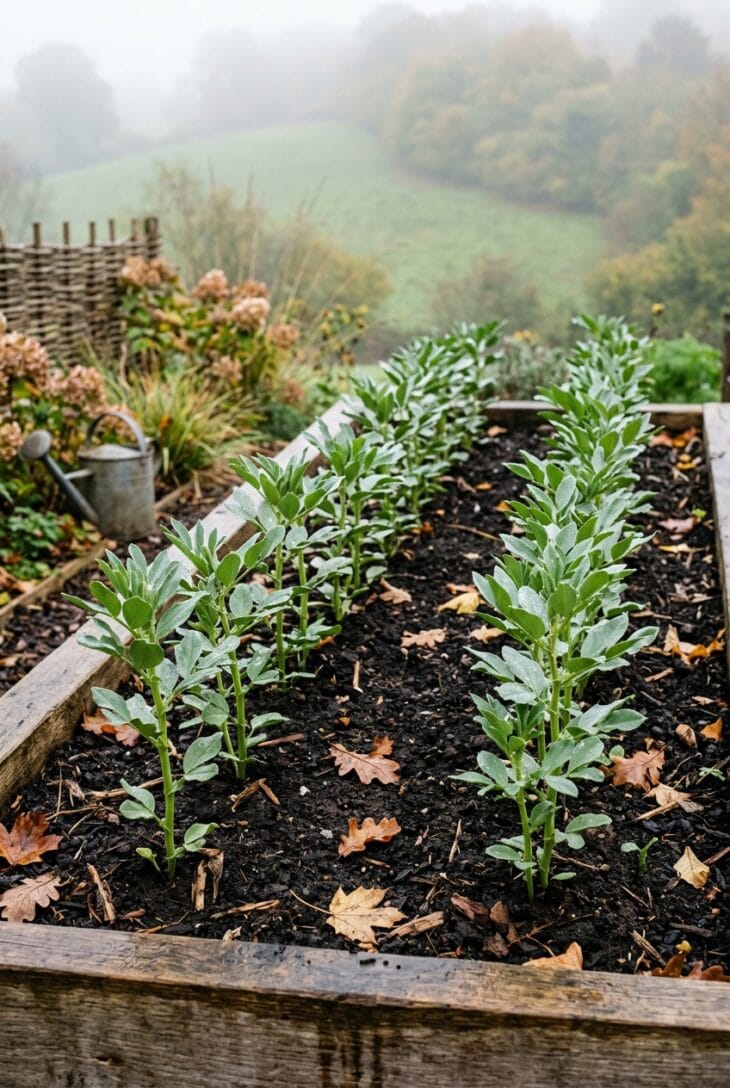
What you see Double rows of young fava beans, about 6in tall, standing sturdy and blue-green in a raised bed on a misty morning. Their square stems carry paired, slightly fleshy leaves beaded with dew, and a hazy green hillside rises behind.
Why it works In mild-winter areas, fava beans turn an empty winter bed into an early spring harvest. Sown in fall, they put down roots before the cold, sit tight through winter, then flower and set pods in spring, weeks ahead of anything sown in March. Like other legumes, they carry nitrogen-fixing bacteria in their roots, so cutting the plants off at soil level after harvest leaves that nitrogen in the bed.
How to get it Grow fava beans (Vicia faba) where winter lows stay above roughly 10 to 15°F (-12 to -9°C), which means zone 7 and warmer, including the lowland Pacific Northwest and California. Sow in October or November, 2in (5cm) deep and 6in (15cm) apart, in double rows 9in (23cm) apart. ‘Aquadulce Claudia’ is the classic overwintering variety. In spring, pinch out the top 3in (8cm) of each plant once the lowest pods have set, which discourages black bean aphids. Pick the pods when the beans inside are plump but still bright green.
24. Sweet Potato Dig at Summer’s End
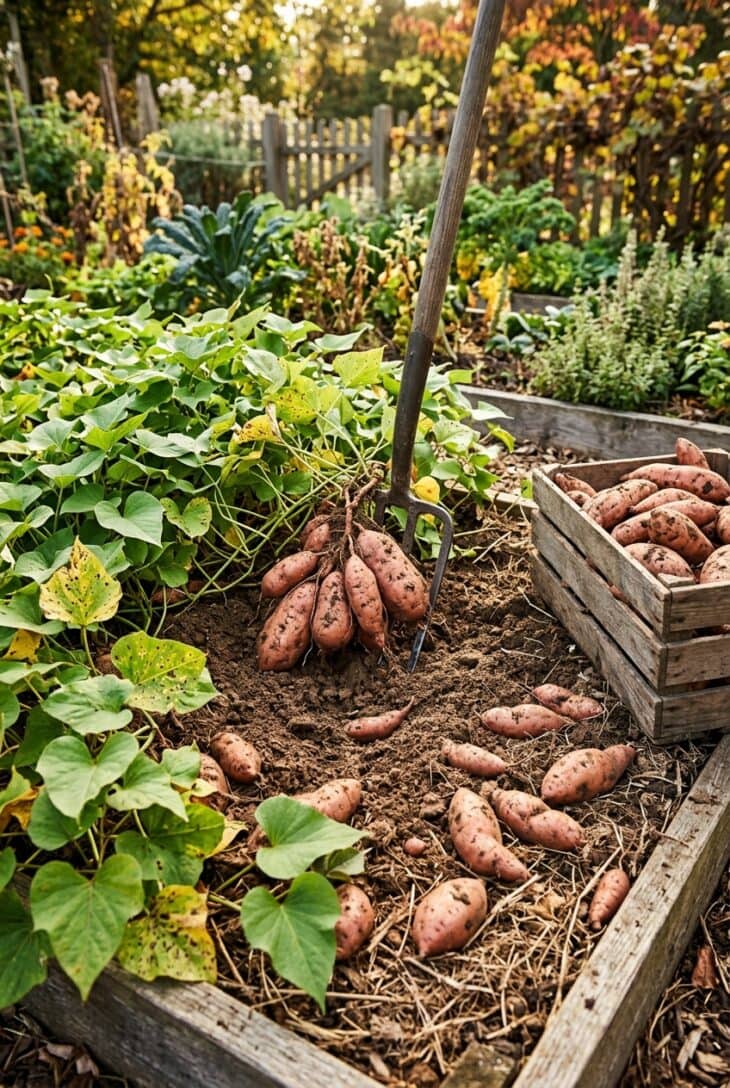
What you see A tangle of heart-shaped sweet potato vines pulled back, and a garden fork lifting a big cluster of rosy, copper-skinned tubers out of loose brown soil. More lie on the surface drying in the sun, and a flat wooden crate at the edge of the bed is already half full.
Why it works Sweet potatoes are the payoff for a long, hot summer, and digging them is one of the real pleasures of the fall garden. The harvest is large for the space, and cured sweet potatoes keep for months in a cool room. They even improve in storage: curing and a few weeks’ rest convert starch to sugar, so they taste sweeter at Thanksgiving than on digging day.
How to get it Dig before the first frost, or within a day or two of a light frost blackening the vines, because cold soil damages the roots. Start 18in (45cm) out from the crown and work inward with a fork, since the tubers bruise and skin easily. Cure sweet potatoes (Ipomoea batatas) for 7 to 10 days somewhere warm and humid, ideally 80 to 85°F (27 to 29°C), then store them at 55 to 60°F (13 to 16°C). Never refrigerate them, which causes hard centers and off flavors. For next year, ‘Beauregard’ and ‘Covington’ are reliable, productive varieties, planted as slips once the soil warms in late spring.
25. Leaf Lasagna Bed for Next Year
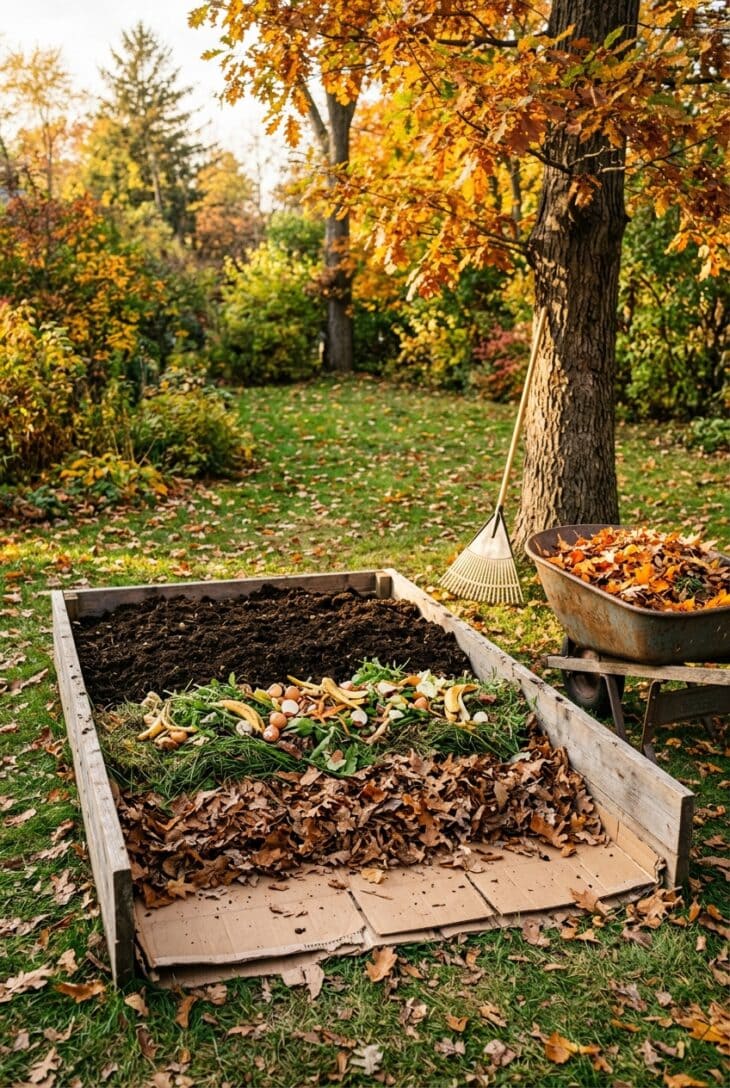
What you see A new bed taking shape on top of the lawn: cardboard flattened at the bottom, then stripes of shredded brown leaves, green clippings and kitchen scraps, and a dark layer of compost on top, piled nearly knee-high inside a low wooden frame. A wheelbarrow of freshly raked leaves waits beside it.
Why it works Fall is the season with the most free organic matter lying around, and a lasagna bed puts it to work. Instead of digging out turf, you smother it under cardboard and pile on layers that rot down over winter into dark, crumbly soil. By spring the pile has shrunk to about half its height and is ready for whatever vegetable garden plan you have in mind, with no digging and no bags of soil to buy.
How to get it Mark out the bed, mow the grass short and lay overlapping cardboard with the tape removed, then soak it thoroughly. Build up alternating layers of browns (shredded leaves, straw) and greens (grass clippings, vegetable scraps, spent crops), using roughly two to three times as much brown as green by volume, to a height of 18 to 24in (45 to 60cm). Running the leaves over with a mower first makes them break down far faster. Finish with 2in (5cm) of compost on top; any of the common types of compost will do, from leaf mold to aged manure. Plant in spring, adding a little extra compost into each planting hole if the layers haven’t fully broken down.